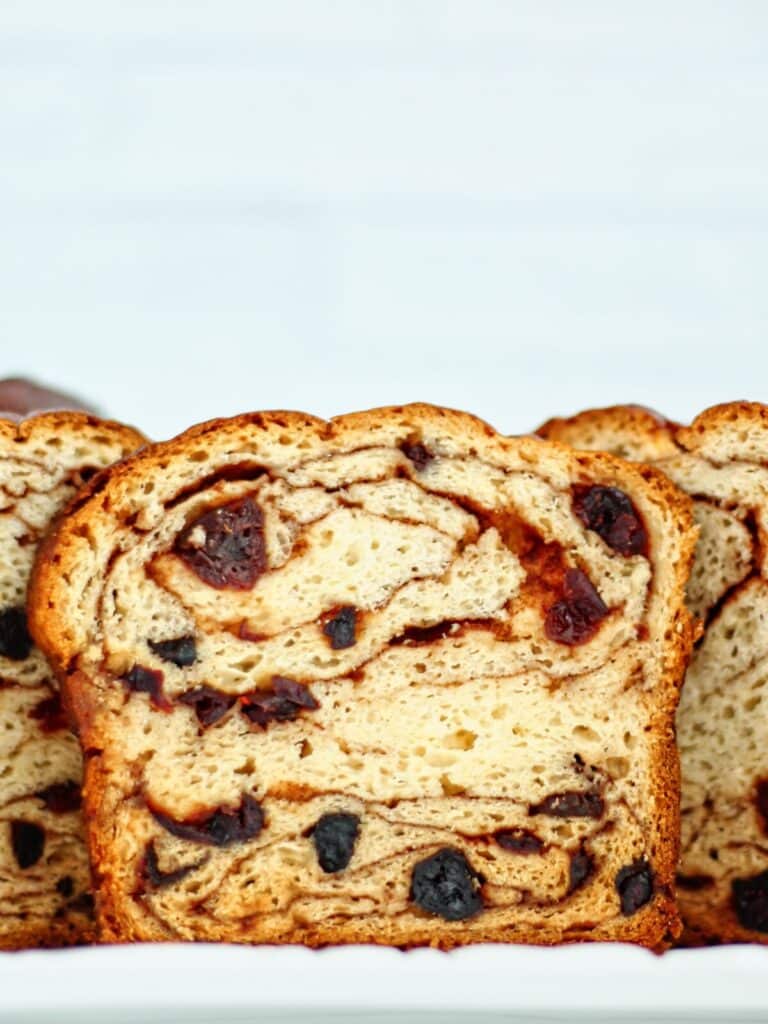
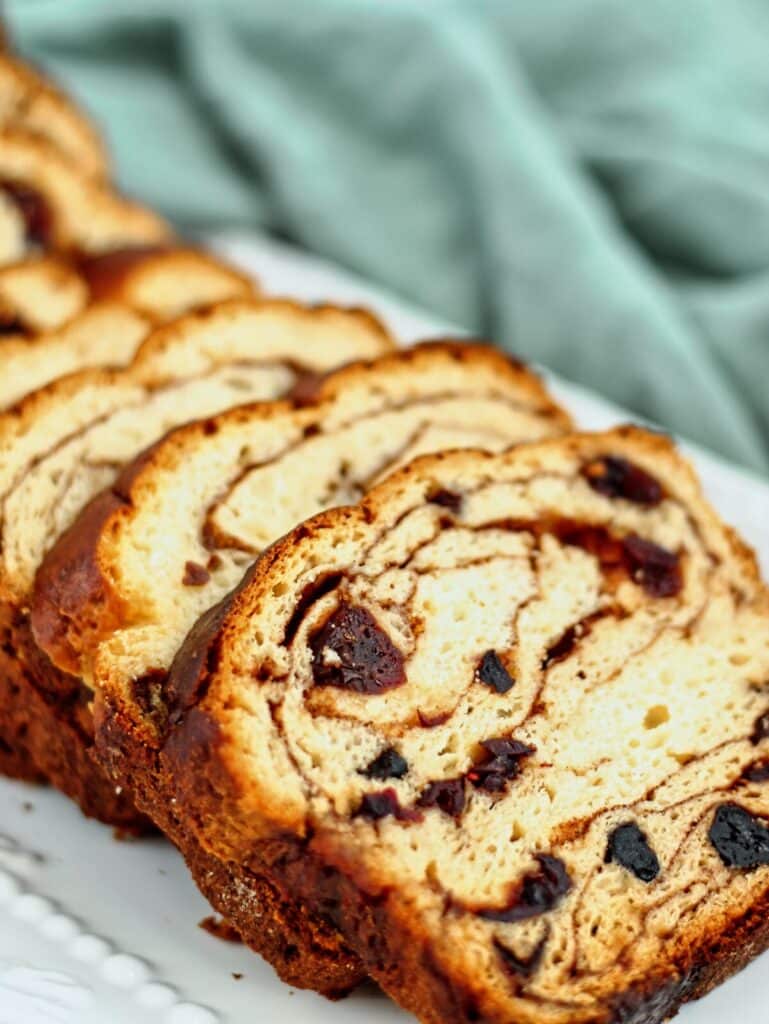
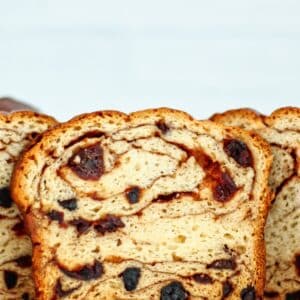
Studded with plump raisins and swirls of cinnamon, this Gluten Free Cinnamon Raisin Bread is perfect for toasting and spreading with butter.
This post was originally published on October 25, 2019 and has been updated with an entirely reimagined recipe, new pictures, plenty of new information, and a video.
Some of the items linked in this post are affiliate links, meaning, at no additional cost to you, if you click through and make a purchase, I will earn a small commission.
When was the last time you had a piece of cinnamon raisin toast? A while you say? Me, too. Well, until now that is. I remember buying loaves of cinnamon raisin bread for my son when he was a middle schooler. Somehow, even though the loaves were sealed in plastic and then in a plastic bread bag, the waft of cinnamon yeasty goodness would still get through. You know what I mean? Do you ever go down the bread aisle at the grocery store and just smell all that yeasty bread? It's like the bread is baking right there, that's how overwhelming it is sometimes.
That can be agony for those of us who can't have gluten anymore. But it doesn't have to be. Because now we can say we'll make our own, and it will better than anything we could have ever bought at a store, gluten filled or not! That's how this bread is. It's soft and pillowy, filled with raisins throughout, and has a modern cinnamon raisin swirl that's as beautiful as it is tasty.
the ingredients you'll need to make this bread
The dough for this bread is a riff on my gluten free sweet dough with a few minor changes, but the ingredients are mostly the same:
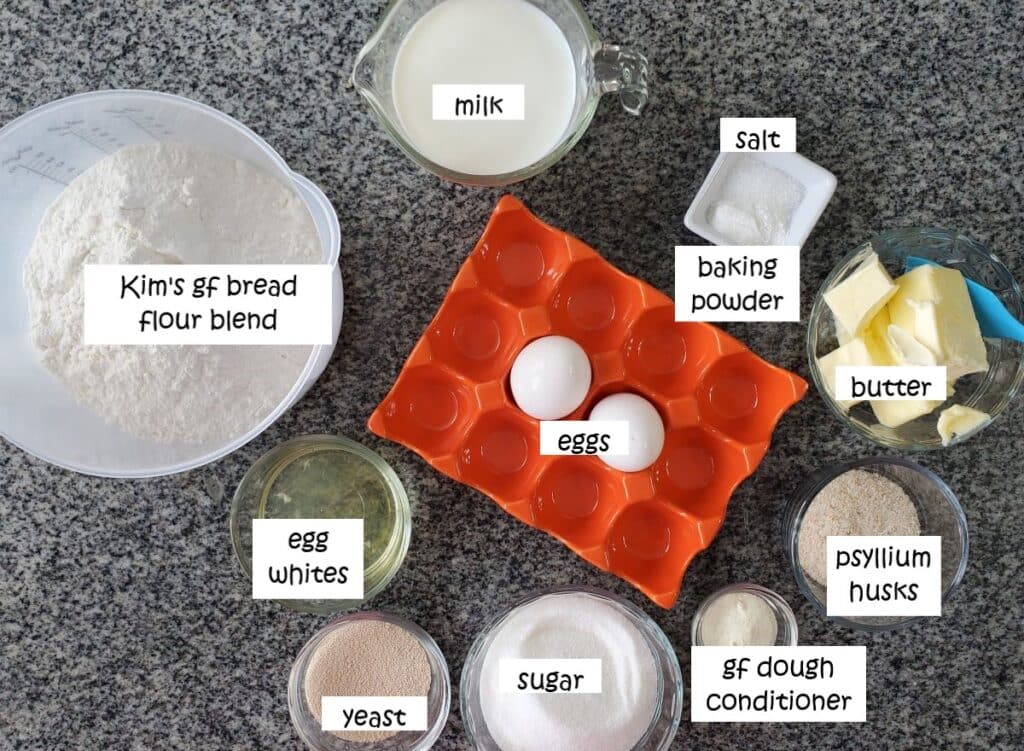
- Kim's gluten free bread flour blend -- please don't try to make this bread with anything but my bread flour blend. You won't be happy with the results.
- Eggs and egg whites -- I wish I could tell you this bread works with an egg substitute, but I really don't think it will. The eggs and extra egg whites really contribute to the texture of this bread.
- Psyllium husks -- I always use whole psyllium husks because I feel like they add a sort of "wheaty" taste to my breads, but you can also use psyllium husk powder. You'll need to follow the directions for changing the amounts within the recipe card.
- Sugar -- another very crucial ingredient that is massively responsibly for the soft texture of this bread. Reduce it or eliminate it and you WON'T get the same results. I'm sorry. I wish things were different, but with many gluten free enriched breads, sugar is not mainly used for sweetness. It's used as a food for the yeast AND as a dough tenderizer.
prefer to watch?
how to make gluten free cinnamon raisin bread
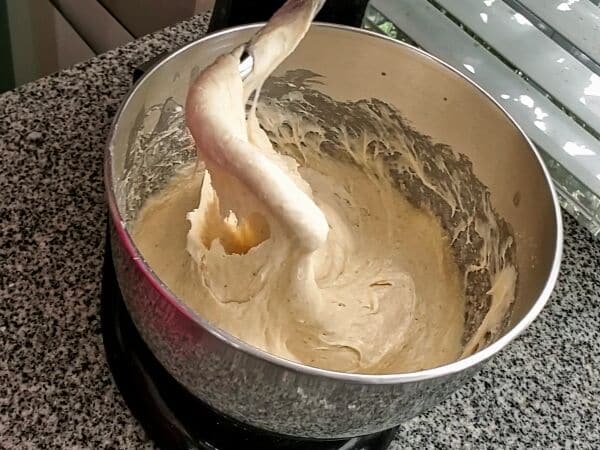
- Make the dough. Put the milk, eggs, and egg whites into the bowl of a stand mixer. Add the sugar, flour blend, baking powder, yeast, psyllium husks (if using), and salt. Begin mixing using the dough hook and slowly add the butter. Turn up the mixer speed to medium and continue to knead for 5 minutes. Cover and allow to proof for 2 hours, or until doubled in volume. Refrigerate for at least 6 hours, preferably overnight.
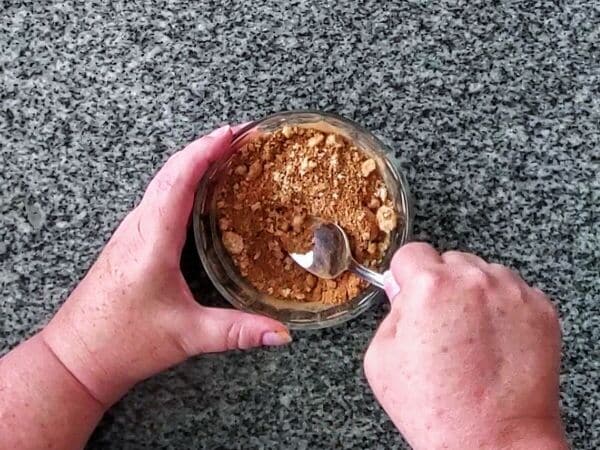
- Mix together the brown sugar and cinnamon in a small bowl and set aside. Measure out raisins in a small bowl and set aside.
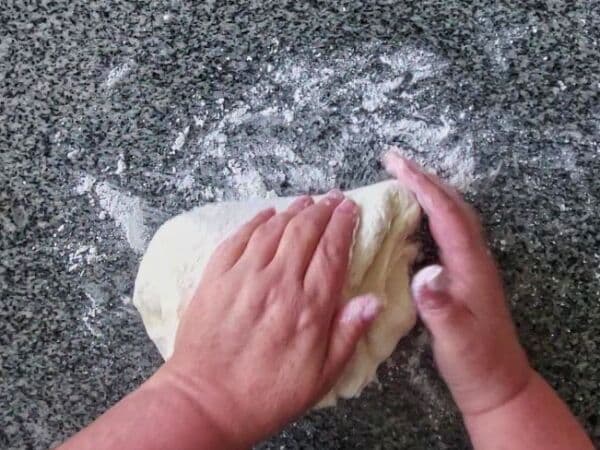
- Knead dough on well-floured surface until smooth.
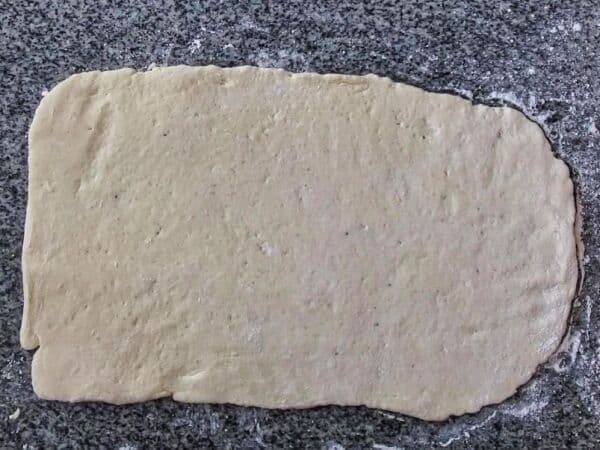
- Roll out the dough into a large rectangle that's roughly ¼-inch thick.
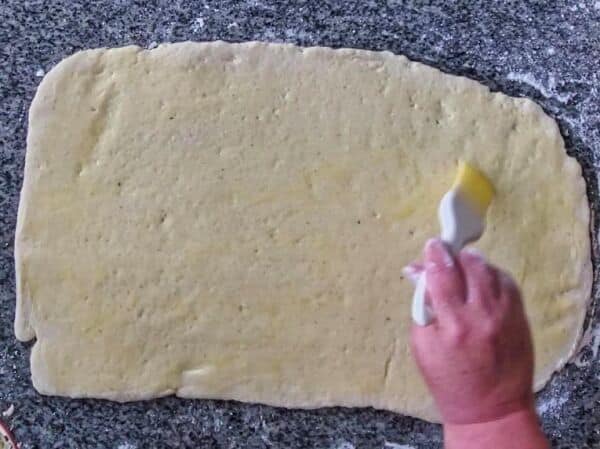
- Brush egg wash all over the dough (one egg mixed with one tablespoon of water and a pinch of salt).
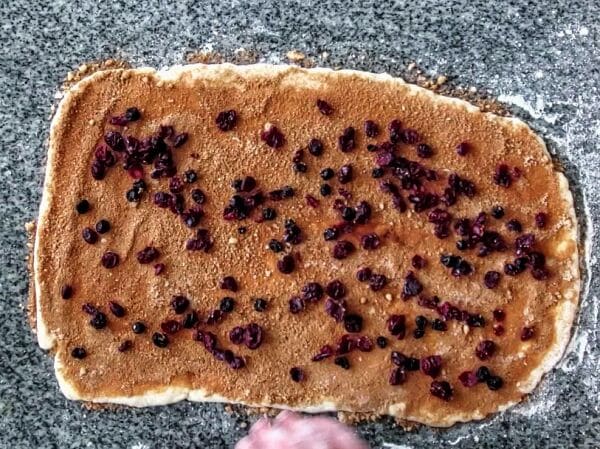
- Sprinkle brown sugar cinnamon mixture over the dough, pressing the mixture onto the egg wash to adhere as best you can. Follow with the raisins.
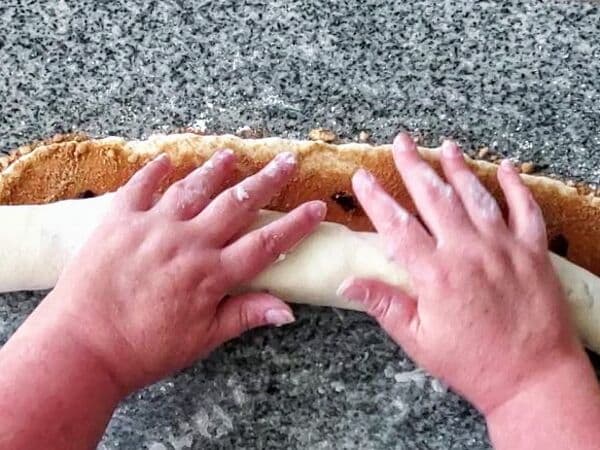
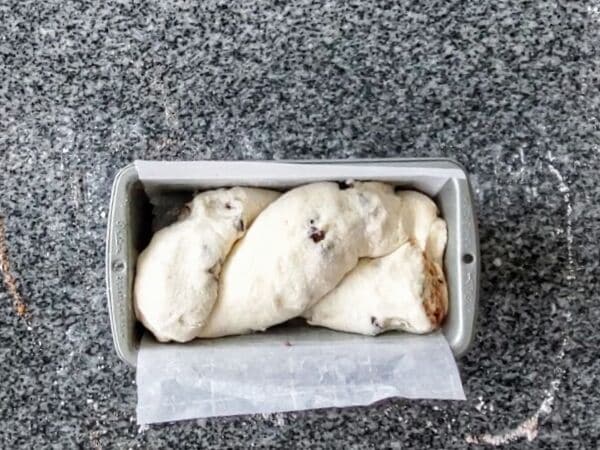
- Roll the dough up as tightly as possible until the seam is on the bottom.
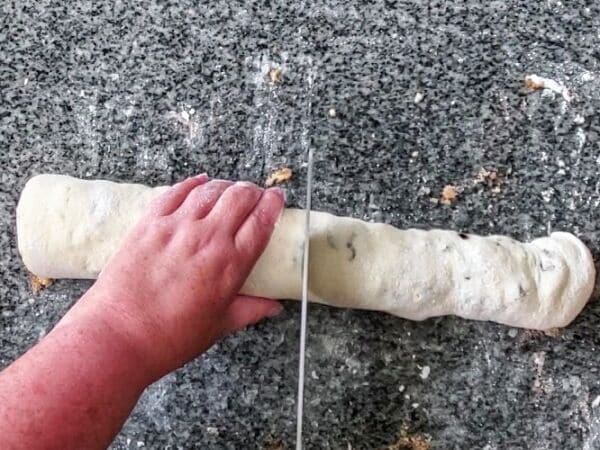
- Cut in half horizontally.
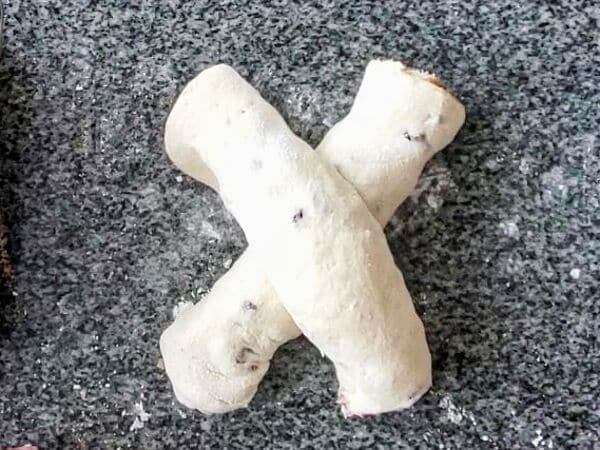
- Make an X with the two pieces of rolled dough to where one roll is on top of the other at the center point.
- Slightly twist the ends together.
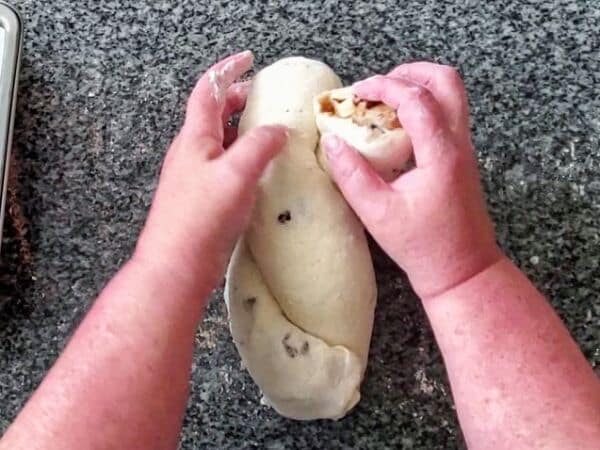
- Place it in a loaf pan lined with parchment and cover loosely with plastic wrap. Allow it to rise in a warm, draft-free area until nearly doubled in size (it should rise over the top of the pan).
- Brush with leftover egg wash.

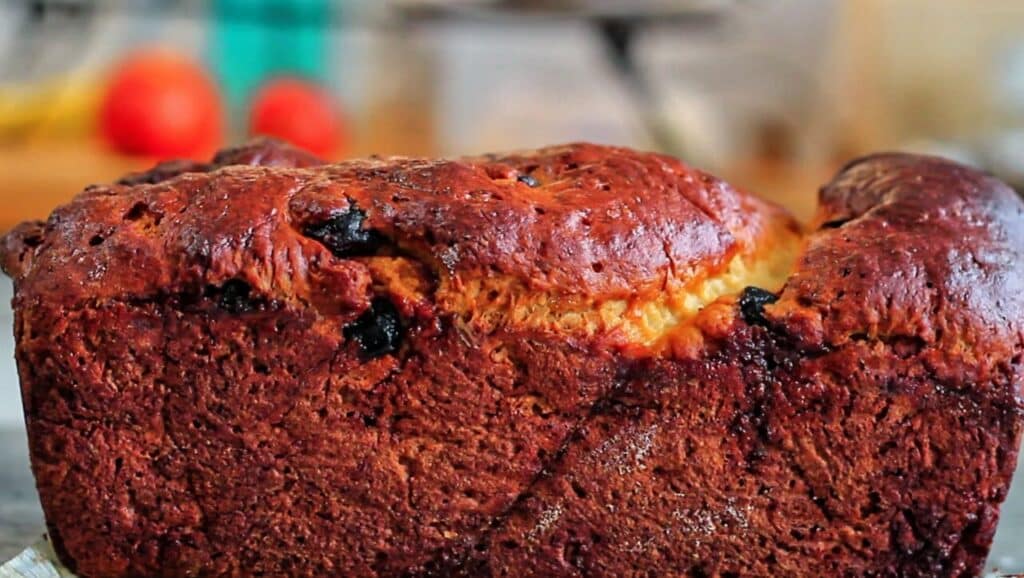
- Bake at 400 degrees F for 15 minutes. Cover the loaf with tin foil, reduce the temperature to 350 degrees F, and continue to bake until a thermometer poked directly into the center registers 190-200 F, about 45-60 minutes more.
gluten free cinnamon raisin bread fAQs
No, there is enough enrichment in the bread to keep it for 2-3 days at room temperature in a ziptop bag. Longer than that, it would be recommended to slice it and freeze the slices.
The egg wash is the only thing that will allow the brown sugar cinnamon to adhere to the dough.
No, soaking the raisins will only make the bread soggy everywhere the raisins are touching the dough.
more gluten free breakfast recipes
- The Ultimate Overnight Gluten Free Monkey Bread
- The Best Gluten Free Pumpkin Bread
- Gluten Free Cinnamon Knots
- Ultimate Gluten Free Cinnamon Rolls
- Homemade Gluten Free Bagels
- Gluten Free Zucchini Bread
- Gluten Free Orange Rolls
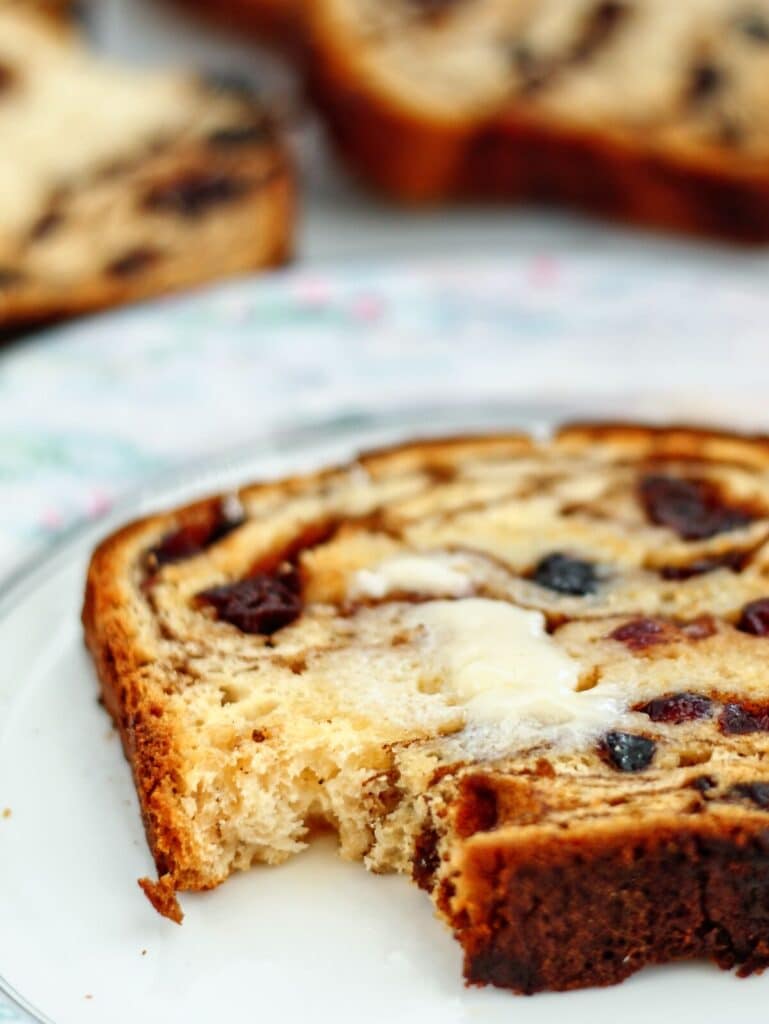
Slice it, toast it, slather it with butter, make french toast out of it. I don't care! Whatever you do with it, just MAKE this gluten free cinnamon raisin bread because it's the real deal and you won't believe it's gluten free.
Gluten Free Cinnamon Raisin Bread
Ingredients
Enriched Dough
- 1¼ cups (300ml) whole milk (see notes below for modifications if not using psyllium husks)
- 2 large eggs, at room temperature
- 2 large (60ml) egg whites, at room temperature
- 1 cup (200g) granulated sugar
- 2 tbsp plus 1½ teaspoon (24g) instant yeast
- 2 tbsp (10g) whole psyllium husks (optional) (see notes below for eliminating psyllium husks or using psyllium husk powder)
- 1 tablespoon gluten free dough conditioner optional
- 3½ cups (490g) Kim's gluten free bread flour blend
- 1¾ teaspoon baking powder
- 1 teaspoon salt
- ¾ cup (1½ sticks or 169g) butter, very soft or melted
- 1 large egg, mixed with 1 tablespoon water for egg wash
Brown Sugar Cinnamon Filling
- ½ cup (100g) light brown sugar
- 4 teaspoon cinnamon
- 1 cup (160g) raisins
Instructions
Make the Dough
- In the bowl of a stand mixer (see below for stand mixer alternatives), pour in the milk, followed by the eggs, egg whites, yeast, psyllium husks, and sugar. Add the dough conditioner (if using), flour blend, baking powder, and salt. Using the dough hook, turn the mixer on to low speed and add the butter. Crank up the speed to medium and allow the dough to knead for 5 minutes.
- Cover the bowl and place in a warm, draft-free area to proof for 2 hours, or until doubled in volume. Refrigerate at least 6 hours, preferably overnight.
Assemble the Loaf/Loaves
- Mix together the brown sugar and cinnamon in a small bowl and set aside.
- Remove the dough from the refrigerator and knead it on a well-floured surface until smooth and all air bubbles are released. Divide it in half. If you have the space, you can roll both out at the same time, or leave one half covered in the bowl while working on the other half.
- Roll out each half into a large rectangle about ¼-inch thick (size of rectangle doesn't matter, as long as the thickness is roughly ¼-inch thick). Brush all over with egg wash (one egg whisked with one tablespoon of water and a pinch of salt). Sprinkle with brown sugar cinnamon mixture and raisins, pressing lightly to adhere.
- Roll up jelly roll style as tightly as possible and pinch seam to seal. Cut roll in half width wise so you are left with two equal-sized rolls. Arrange rolls in a large "X" on counter, and then overlap the ends to twist slightly. Carefully place twisted loaf in prepared loaf pan. Repeat with the other half of dough.
- Cover loosely with plastic wrap and allow to rise in warm, draft-free area until nearly doubled in size and risen over the top of the pans, about one hour (it could take longer depending on the ambient temperature).
- Bake at 400° F for 15 minutes. Cover the loaves with foil and reduce the temperature to 350° F and continue to bake for 45-60 minutes, or until a thermometer inserted into the center registers at 190-200° F.
- Cool on wire rack in loaf pans. Allow to cool completely before slicing. Store well wrapped at room temperature for a few days, or cut into slices, flash freeze in single layer on baking sheet (to keep slices from sticking together), and store in freezer bag or plastic wrap for up to three months.


Alona
Hi, Kim. Have been using some of your recipes for quite a while. You do incredible work!
I`m a fan of your all purpose gluten free flour blend. Have you tried to make this updated cinnamon raisin bread with your AP flour blend? Thanks.
Kim
I have not. I find that the yeast breads in particular do much better using the bread flour blend.
Diane
Can whey be substituted with anything?
Kim
Read the blog post for the flour blend please.
MaryAnn
Hi Kim,
Just baked my bread and have to tell you that I didn’t know that the dough was to be divided in half. I have a mega loaf! Goodness, I learned a lesson about reading your tutorials before starting. I usually just print out and read your recipes and don’t watch your videos.
It wasn’t until I finished twisting the dough and putting it in the pan that I decided I should watch your video to see if I did it right. Since I already had the dough in the pan rising I decided to just go with it and see how it turned out. Even though I tented it, the crust is rather brown because of the extended bake time.
After closer examination I saw in the servings section of the recipe that you do say 2-loaves. I admit, I rarely read that part.
Would you consider revising your printed recipe to say that the dough should be divided in half? Other things you mention in the tutorial but aren’t printed out are the pinch of salt to the egg wash, the egg wash being brushed on the risen loaf, and the internal temperature being 190-200 degrees, not the 150-160 listed. Also, is the filling amount enough for the two loaves?
I appreciate all you do to create these recipes and share them with us, I was just a bit confused by this one.
Thanks!
Kim
Oh my gosh, MaryAnn. I'm so sorry that it is so confusing. I just went back through it and read it myself and you are absolutely right. It is very confusing and I don't mention separating the dough in the recipe at all! I am going back through and correcting this right now.
Thank you for alerting me and, again, I apologize for the confusion.
JB
Wanting to make the raisin bread dough this afternoon, I researched several websites, and most agree that 190 degrees is the best temp for bread, that anything higher will make the bread too dry and too "crusty." Using 190 degrees (instead of anything higher), and the bread will also be more moist for a couple of days longer. So 190 degrees it is.
JB
The recipe narrative/photos (before the recipe) indicate "until a thermometer poked directly into the center registers 190-200 F, about 45-60 minutes more." However, the recipe (for printing) indicates, "continue to bake for 45-60 minutes, or until a thermometer inserted into the center registers at 150-160° F." Quite a difference. Which would be the needed temp?
Terry Call
Would love to make this in my bread machine on the GF cycle.
Brian Weiss
I found it easier to cut the rolled-out flat dough in half after spreading the cinnamon sugar, and then rolling up the two halves separately. That way my hands can support the entire (half) width as I roll it up.
Still working on high-altitude adjustments (I'm at 7000 feet). I cut the yeast to 20g but the dough was still pretty "poofy." My wife and I LOVE eating the experiments!
Mary
Hi Kim,
Thank you for sharing your recipes. This might be a dumb question-- but can I make your breadflour mix in a big batch ahead of time then put it in a container to use it when needed?
Kathy Taylor
I make a lot of bready-things with her blend. I store it in a large plastic container and it lasts about 6 weeks.
Brian Weiss
This is the first (of MANY) Kim recipes that didn't work perfectly for me on the first try. The dough was overly wet and pretty much impossible to handle. I'm at 7000 feet altitude, so perhaps that was a contributing factor. Maybe I need to cut back slightly on the liquid. The initial rise was great and I could practically taste the result, but it was downhill once I chilled it and rolled it out. I wound up tossing it all into a square pan and am waiting for the final rise. I'll bake it off and hope there's something eatable there.
Kim
I'm sorry you're having problems with this recipe. I don't get these problems you're talking about, so I'm guessing your altitude is a huge reason why. I wish I knew what to tell you about baking at high altitude, but being that I am on the coast at sea level (actually below sea level), I've never had to bake at high altitude so I don't know anything about it. I do know that some followers are at high altitude and have had to alter ingredients and/or directions to get things to work just right, but that is something that is beyond my expertise unfortunately. I know there are sites that you can Google for how to change recipes for high altitude baking, such as this one: https://www.kingarthurbaking.com/learn/resources/high-altitude-baking
Brian Weiss
I put the unruly dough into a square pan and baked it off. It wasn't pretty, but it was VERY good anyway, and disappeared in our two-person household in a couple of days.
The usual corrections needed for altitude are a bit more water (usually a tablespoon or so/cup of recipe liquid) a bit less sugar (about a TBS less per cup called for), and a decrease of 1/8tsp baking powder per teaspoon (doughs expand more easily at lower pressure) . Maybe the tablespoon of water I added pushed it over. I'll definitely try again. And most high altitude recipes call for adding about 25 degrees to the "standard" recipe, which I did not do—but my problem was pre-baking handling.