Best Ever Gluten Free Sourdough Bread

With our easy gluten free sourdough starter, this Gluten Free Sourdough Bread is so perfect, you’ll want to make it every single day!

whole loaf of gluten free sourdough bread.

Gluten Free Sourdough Bread was originally posted on June 22, 2020 and has been updated with a modified recipe using a new sourdough starter, new pictures, and a new video.

Some of the items linked in this post are affiliate links, meaning, at no additional cost to you, if you click through and make a purchase, I will earn a small commission.

My husband has to remind me to slow down and take a breath when I find a new method of gluten free baking. Or a new (to me) ingredient that makes things so much better. My brain starts going a thousand miles a minute because I want to make ALL THE BREADS!!!

I have to learn to stop and focus on one thing at a time. But it’s so hard because even though I wanted to update this earlier, I put it on a back burner. Not because I didn’t have it nailed down, I wanted to try different variants and see how they would affect the final outcome. And I’m so glad I was diligent because there are so many new things I’ve learned about sourdough that are worth sharing.

Anywho, I know I’m a little late in revising this sourdough recipe to use my new(ish) sourdough starter method, but that’s just how I am. I do NOT want to hurry things along just to get them on the blog because it’s the right time. It’s very important to me to test and retest recipes to make sure they’re as perfect as I can get them before sharing them with you. But I promise, this one is well.worth.the.wait!

side split gluten free sourdough

What IS Sourdough Bread?

Sourdough bread is a bread made without any commercial yeast. Instead, the yeast is substituted with a wild yeast and bacteria combined with flour and water, also known as a sourdough starter. You’ll find all the details needed to start and maintain a gluten free sourdough starter in this post here.
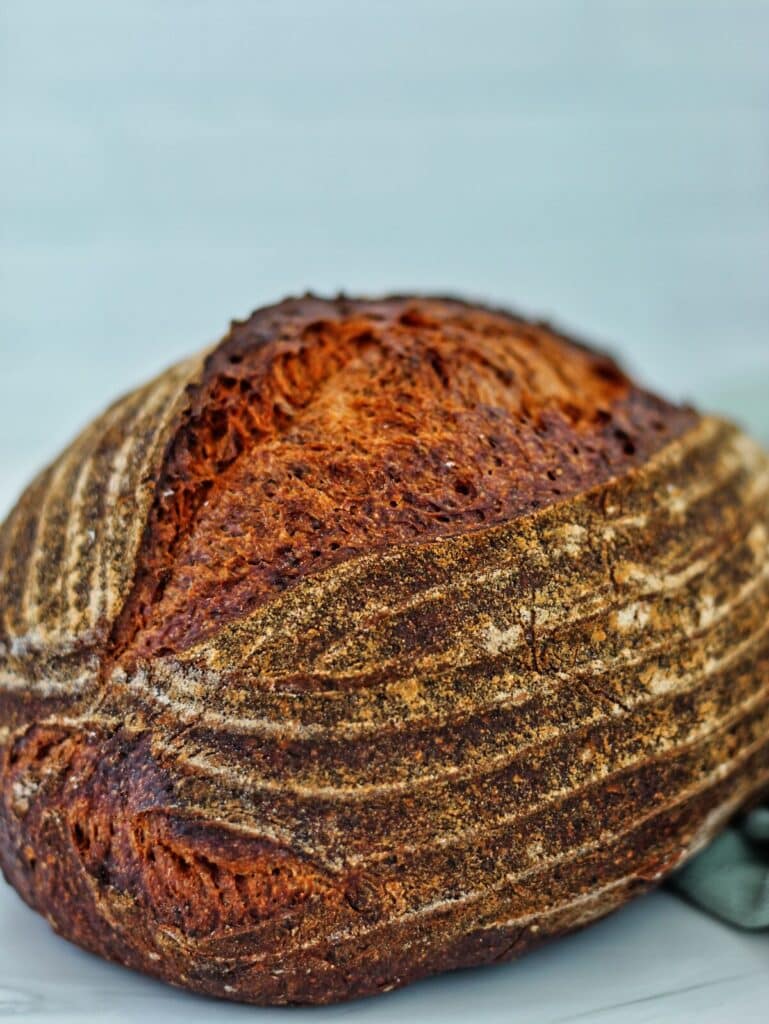
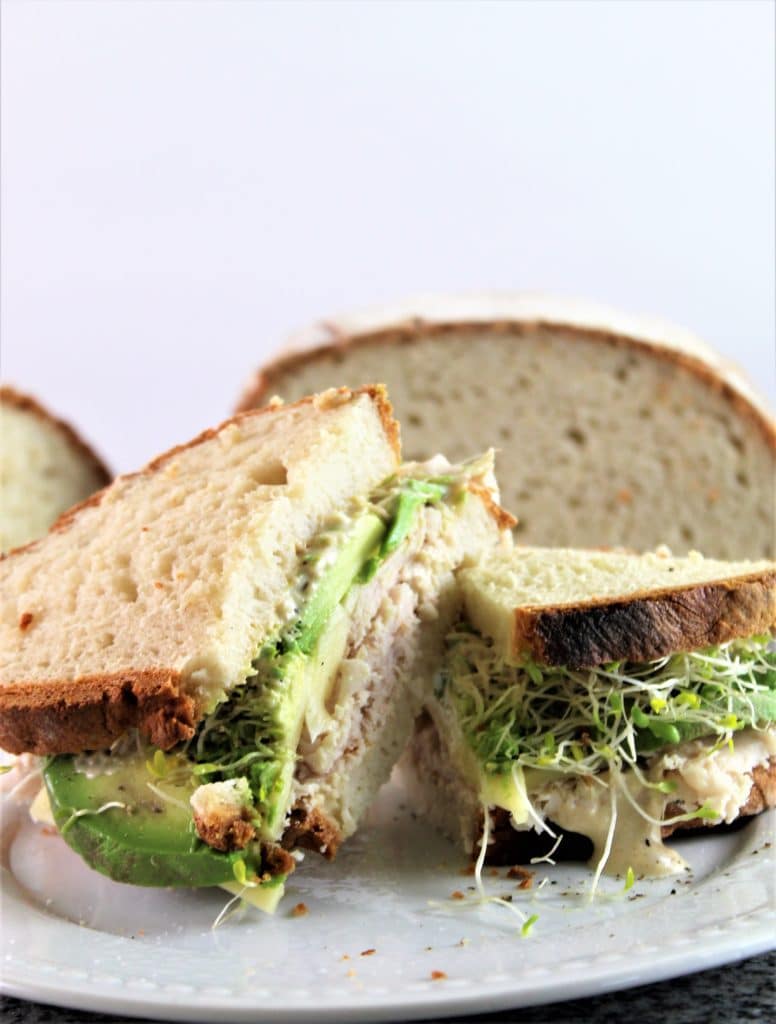
When I think of sourdough bread, I’m transported to a local restaurant (Baker’s Crust) eating a sandwich on their freshly baked sourdough without a care in the world. Slightly tangy, chewy textured, and a nice crisp crust, their sourdough was so good I could have eaten it plain. After taking my first bite of my homemade gf sourdough, I shut my eyes for a minute just to savor the flavor and the chew. It’s like I was back in Baker’s Crust eating that same bread again. Then I opened my eyes and looked again at the bread I had just made.

I was in an alternate reality because it sure looked just like the bread from that local restaurant, not at ALL like a gluten free version. And the texture was so spot on with what I remember! Isn’t it crazy how memories of food we used to eat can stick so vividly in our minds, especially because we can no longer have those things?!?!

I promise you’re going to love this bread, and any other breads you decide to make sourdough. Once I made one loaf, I was addicted and couldn’t seem to stop baking ALL THE SOURDOUGH!!

ingredients needed to make the best GF sourdough of your life

ingredients for gf sourdough measured out and labeled on granite countertop.
  • Gluten free sourdough starter–you obviously will need a starter and my easy gluten free sourdough starter requires no daily feedings and no daily discard once it’s established. What’s more, it can hang out in the fridge until you’re ready to feed and use it.
  • Baking powder–you can leave it out and the bread will still be delicious. You just might not get quite as much oven spring. You can also use regular baking powder, but my preference is to use heat-activated baking powder (affiliate link) because you get maximum oven spring. More on that below.
  • Psyllium husks–another optional ingredient, but it lends a better ability to shape the dough. Without it, you may have some trouble with stickiness.

helpful tools for getting started

  • Digital kitchen scale — this is the hill I will die on. The kitchen scale hill. Please, just do yourself a favor and buy a cheap kitchen scale and start using it. You will thank me profusely. The accuracy and ease is bar none.
  • Stand mixer — a great stand mixer is an investment, but it’s one that will last a long, long time (mine is still kickin’ after nearly 30 years!). A Danish dough whisk can be substituted with a little more elbow grease, but you’ll get the best results with a stand mixer.
  • Dutch oven — until I tried it, I didn’t know the advantage of using a Dutch oven. But once I tried it, I’ll never go back. It holds in the steam for maximum oven spring. There are circumstances where a Dutch oven just won’t do, though (think baguettes), in which case the second best option is a pizza steel, pizza stone, or overturned baking sheet set on your middle rack with a shallow heat-proof pan on the rack below this. Hot water is poured into the shallow pan, which creates steam for good oven spring.
  • Bread lame — it’s not absolutely necessary, but a bread lame is a great tool for scoring your sourdough. I started scoring with a serrated knife, but I found I got better results with a lame.
  • Banneton basket — these little baskets are perfect for shaping and getting those beautiful lines on your finished bread (and they’re fairly cheap), but another alternative is an high-temperature-oven-safe bowl, such as a Pyrex bowl, lined with a tea towel will also do.

Tips for Making Gluten Free Sourdough Bread

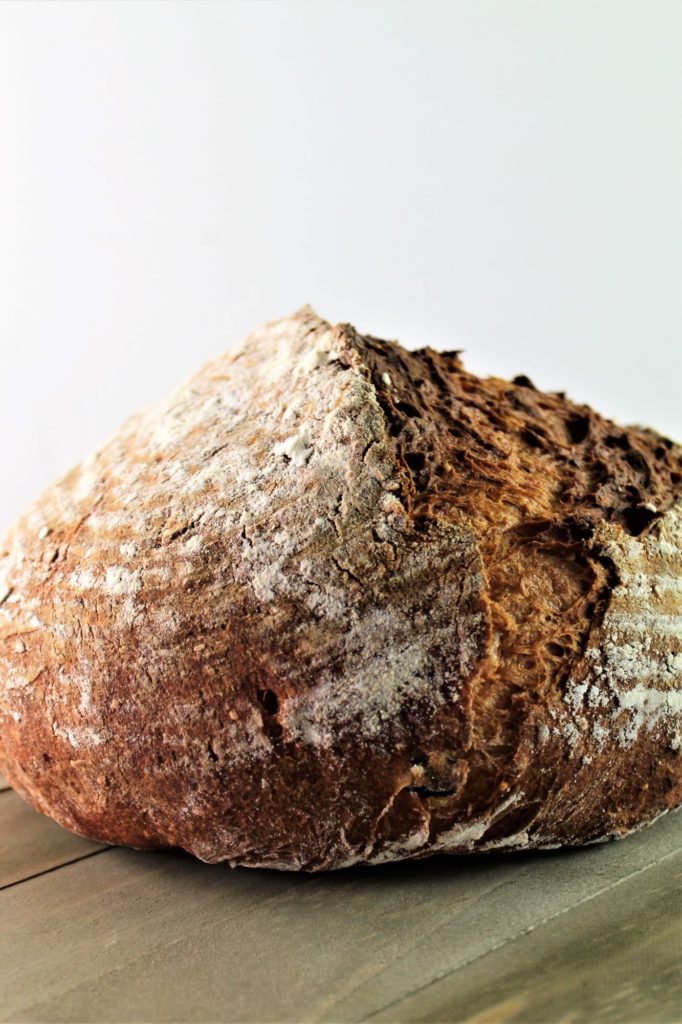
When first starting my venture into the gluten free sourdough world, I knew the best recipe to begin with was my gluten free artisan bread. It’s easy enough to make and it already has a good crust and nice texture.

But the first thing I needed to do was research, research, research. I knew nothing about baking sourdough, gluten free or not! And once I understood a little more, I started experimenting. And here’s a few things I’ve learned along the way:

  • Gluten free sourdough bread isn’t as involved as its gluten-filled counterpart. What I mean by this is there is a lot of stretching and folding the dough when making regular (gluten-filled) sourdough bread. That doesn’t work for gluten free dough (there’s not enough stretch). So the hands-on time is exactly the same as in any of my bread recipes (very minimal).
  • Sourdough takes longer to rise. I usually let most of my dough bulk ferment for roughly 2 hours. When making sourdough, however, this may increase to 3-4 hours (or more). And still, it won’t have as much bulk rise as its commercial yeast counterpart.
  • Completely optional, but adding baking powder to the dough increases its oven spring. And specifically adding heat-activated baking powder (affiliate link) will allow the baking powder to lay dormant until the dough hits the hot temperature of the oven.
top view of artisan sourdough in black Dutch oven

how to make sourdough
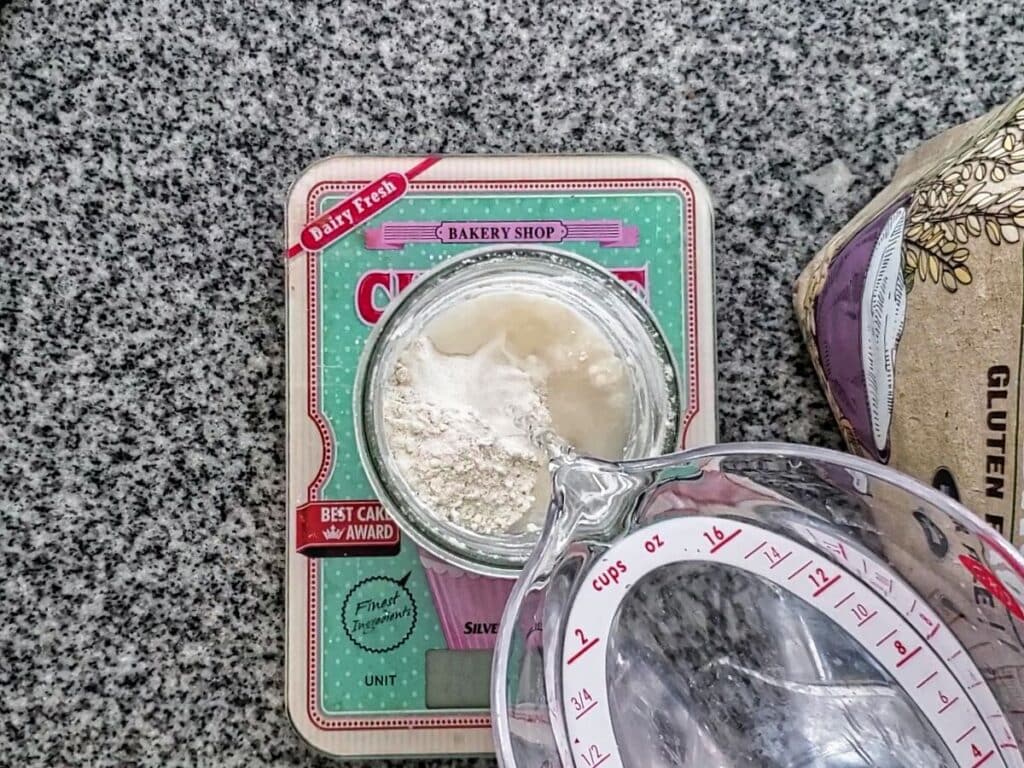
  1. If you haven’t yet made your gluten free starter, go to my sourdough starter post and get that going. It takes at least 10 days (or longer, depending on the time of year/temperature). Feed your starter with 50 grams of whole grain flour and 50 grams of water. Stir and adjust with more water if necessary. Allow it to almost double in size (depending on the thickness, it may not completely double), which will take 8-10 hours on average.
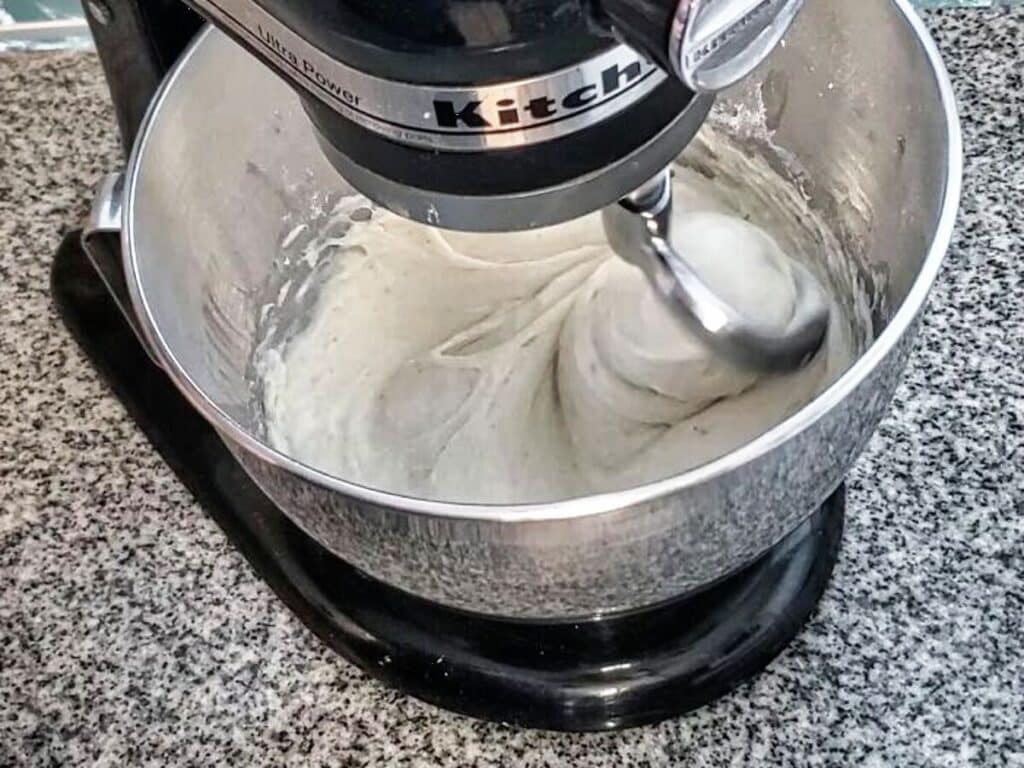
  2. When your starter is ready, make the dough. Add all ingredients to the bowl of a stand mixer and mix on medium high for 5 minutes. Cover and proof for 3-4 hours, or until puffed. Refrigerate overnight.
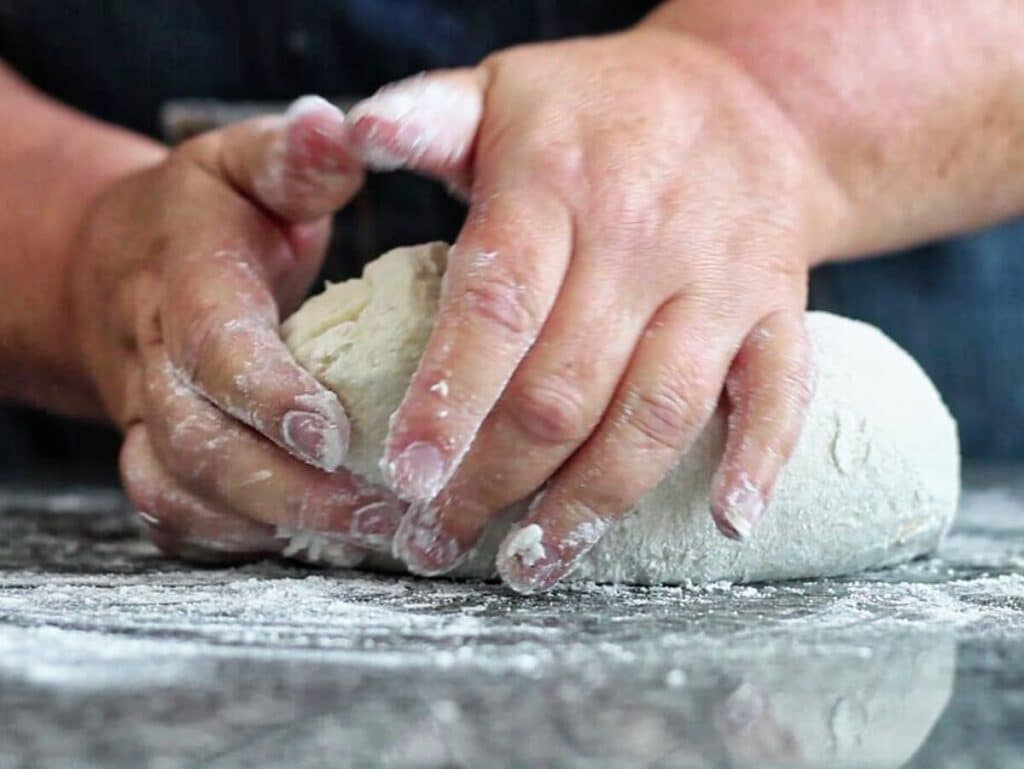
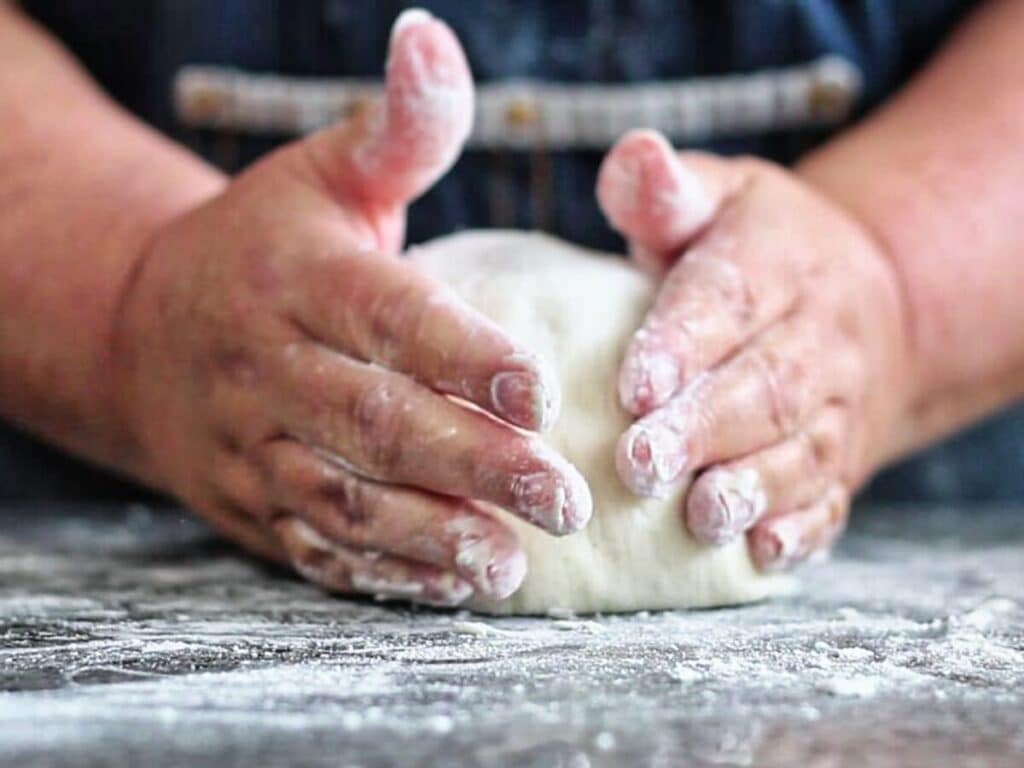
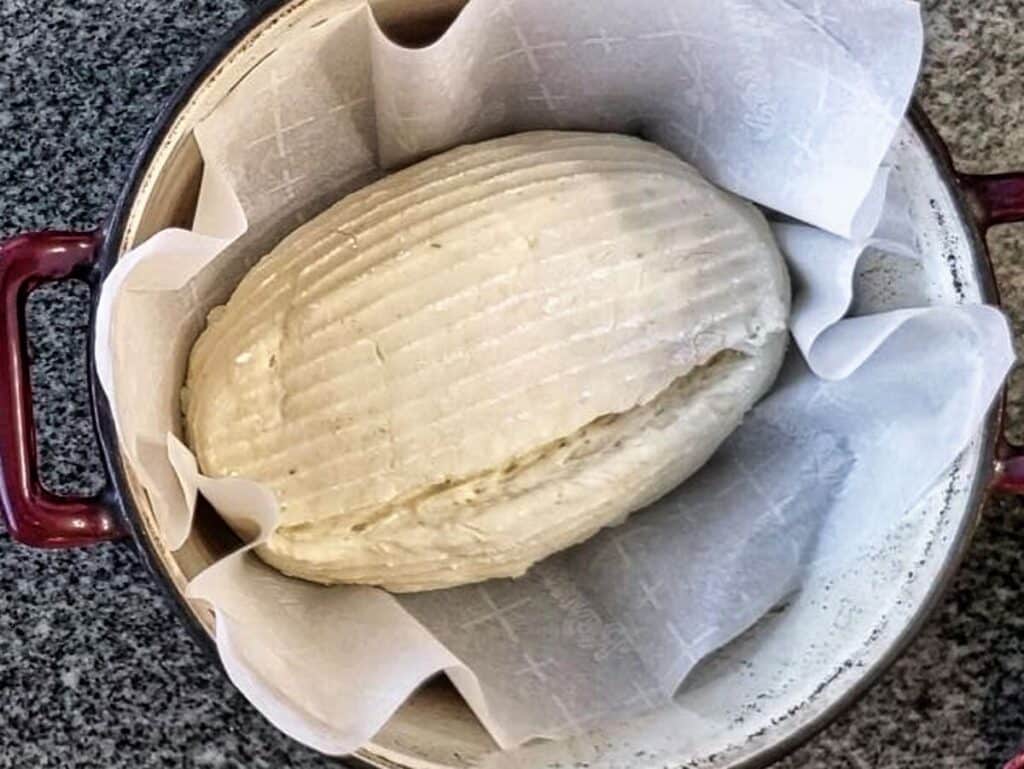
  3. When ready to shape, knead dough on well-floured surface. Shape into boule or batard (or whatever shape your banneton basket is–if using). If not using a banneton, shape and place onto a baking sheet lined with parchment paper.
  4. Cover and let rise until almost doubled in size.
  5. Halfway through proofing, place a Dutch oven in your oven and preheat the oven to 500 degrees F.
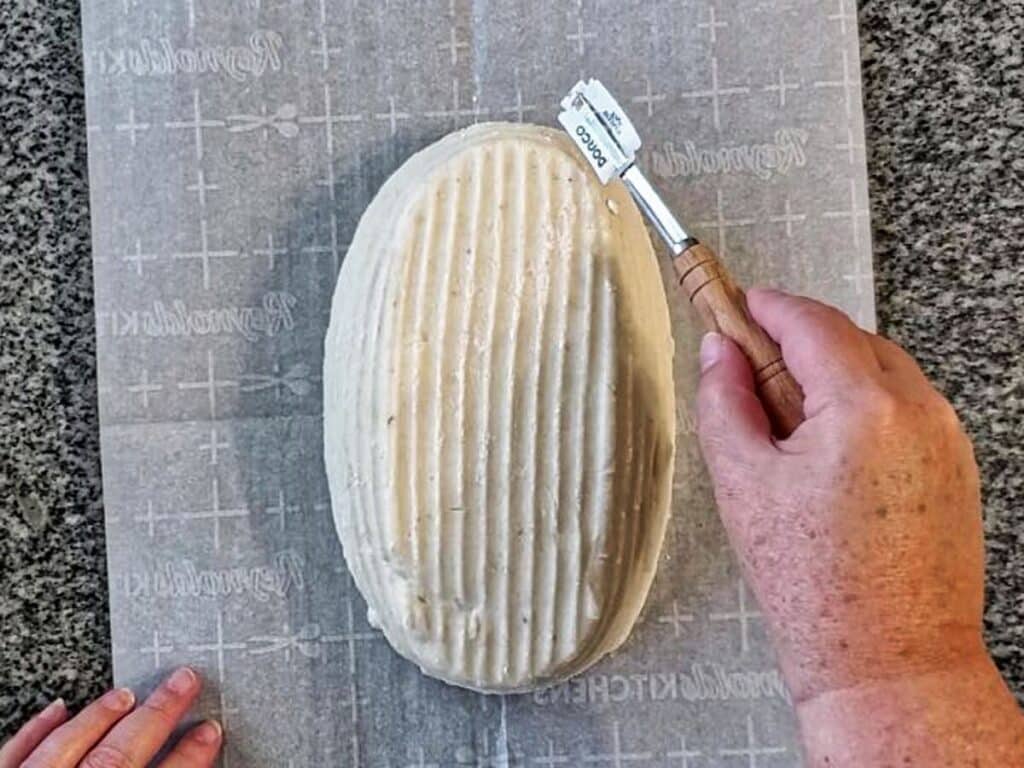
  6. Carefully flip dough over onto a sheet of parchment and slash with a bread lame (affiliate link).
  7. Carefully lower shaped dough into hot Dutch oven with parchment and replace lid.
  8. Reduce heat to 450 degrees F and bake for 40 minutes with the lid on and 20 minutes with the lid off.

Rather Watch?

Timelines for Feeding Your Starter and Making Sourdough

There are a few different ways to make this bread that will fit into anyone’s schedule. Pick the one that works best for you.

The Night Before Feeding

  • Feed the starter directly from the fridge and replace the lid. Leave it on the counter all night long.
  • In the morning, make your dough. Return the rest of the starter to the fridge until the next time you bake sourdough.
  • Bulk ferment your dough for 3-4 hours, then refrigerate overnight.
  • The next morning, shape dough, proof, and bake.

Morning Feeding

  • Remove the starter from the fridge and allow it to warm up at room temperature before feeding it (a couple of hours).
  • Feed your starter and allow it to nearly double in size, which can take up to 6-8 hours or more.
  • In the evening, make your dough and return the rest of your starter to the fridge.
  • Bulk ferment your dough for 3-4 hours, then refrigerate overnight.
  • The next morning, shape dough, proof, and bake.

help! I fed my starter and now I have to leave

No worries. If you fed your starter and find that you unexpectedly have to go out, just put it in the fridge until you return. As long as the starter has been fed within 2 weeks, you can use it directly without needing to feed it again. However, if your starter has become too thin and inactive, this method will not work. That’s why it’s always best to err on the side of creating a thicker starter.

Why is Your Recipe in Grams and Not Cups?

When it comes to gluten free sourdough baking, or any baking for that matter, it is really essential to have the proper measurements for each ingredient. The only way to assure this is by weight and not volume. One person’s cup measurement could be a little different than another person’s. By weighing ingredients, every person will always get the same exact ingredient amounts, which makes for better baking overall and easier troubleshooting if something goes wrong.

To Use a Dutch Oven or NOT To Use a Dutch Oven

I had tried baking bread in a Dutch oven previously, but it never really got to the height it did when I used the hot water technique in a shallow pan (see my original gf artisan bread post). But for sourdough, I really wanted to try it.

I bought myself this (affiliate link) 5 quart fairly cheap Dutch oven and set out to bake a great loaf of gf sourdough. And it did NOT disappoint!!!!! I am completely sold on the Dutch oven method. I now use a larger 6-quart Dutch oven because I find it offers less chance to get burned. If you don’t have a Dutch oven, don’t fret. You can still bake wonderful gluten free sourdough using the shallow pan hot water technique.

To use this technique, simply place a baking steel or stone or even an overturned baking sheet on the middle rack of your oven and a heat-resistant shallow baking pan (I use an old broiler pan) on the rack below it. Preheat your oven with both items in the oven and when ready to bake, slide the shaped dough (on a sheet of parchment) onto the baking steel/stone/pan and pour one cup of hot water into the shallow pan underneath. Close the door, drop the temp to 450 as per recipe instructions, and continue baking for 60 minutes total.

shaped round loaf of artisan sourdough before baked

gluten free sourdough frequently asked questions

Is sourdough bread gluten free?

Sourdough bread is NOT gluten free, unless you make it with a gluten free starter and gluten free flours. While traditional sourdough breaks down some of the gluten in the bread, making it easier to digest, it is not gluten free and not safe for celiacs or anyone with a serious gluten intolerance.

Why is my gluten free sourdough gummy inside?

There could be a few reasons, the top two being you didn’t allow it to cool completely before cutting into it or you didn’t bake it long enough. Most gluten free breads do best with a longer bake time than regular (wheat-based) breads.

Help! I have to run out and my gf sourdough starter has peaked and I can’t make the dough right away. What do I do?

Stash it in the fridge, where it will sit comfortably in limbo while awaiting your return. Guess what? As long as your starter is nice and strong, it will actually stay ready for up to TWO WEEKS!!

I put my gluten free starter in the fridge over a month ago and forgot about it. Do I need to start over?

Not at all. Just pull it out, feed it with 30-50 grams of whole grain flour and 40-60 grams of water and it will revive right up. I once left mine in the back of my fridge for over 3 months and it was still alive and well after feeding!

open crumb shot of inside of gf sourdough bread.

How to Turn Any of My Breads into Sourdough

This gluten free artisan sourdough bread is just the beginning to a whole new gluten free world. There are many other breads that can be made using a sourdough starter instead of yeast with simple steps:

  • Use 60 grams of gluten free sourdough starter as a replacement for the yeast in the recipe.
  • Reduce the flour in the recipe by 30 grams and the liquid also by 30 grams. However, if adding anything else to the dough, such as nuts, seeds, etc, do not reduce the water content at all. I like to pre-soak my nuts and seeds overnight so they don’t soak up much of the water in the dough. But I still leave the liquid content the same as some water will inevitably be lost.
  • Add more time to bulk fermentation, as well as proofing. Sourdough always takes longer to rise than instant yeast.
  • For more of an open crumb, add 1/4 to 1/2 teaspoon of baking soda when kneading the dough before shaping (just make sure to knead it in well or your baked bread will have brown streaks in the interior). It’s not conventional, but we can’t always do the conventional thing when baking gluten free.

Can I Add Nuts or Seeds or Dried Fruit to My Sourdough?

Yes! Adding things like nuts, seeds, or dried fruit to bread is a great way to get extra nutrients and texture. I love a good seeded bread and sourdough is the ultimate seeded bread. See my Gluten Free Multigrain Seeded Bread recipe for ideas on how to do this (you will need to soak them prior to adding to the dough).

sandwich made on sourdough with turkey, cheese, and avocado

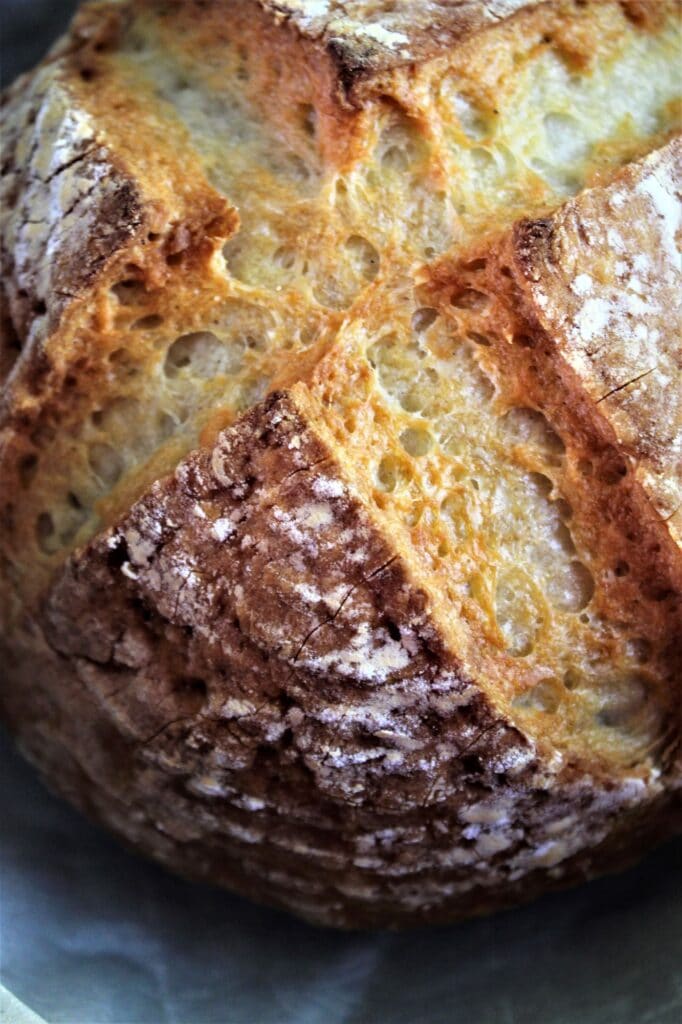
Hopefully your starter is bubbling away and you can now make your Perfect Gluten Free Sourdough Bread and be amazed that it’s actually gluten free!

gluten free sourdough bread

Best Ever Gluten Free Sourdough Bread

Kim
With our easy gluten free sourdough starter, this Gluten Free Sourdough Bread is so perfect, you'll want to make it every single day!
4.49 from 81 votes
Prep Time 10 minutes
Cook Time 1 hour
Proofing Time, Chilling Time 1 day 4 hours
Total Time 1 day 5 hours 10 minutes
Course bread
Cuisine American
Servings 1 loaf

Ingredients
 

Sourdough Starter

Dough

  • 390 grams Kim's gluten free bread flour blend (another blend will not give the same results)
  • 5 grams whole psyllium husks or 1½ tsp psyllium husk powder (not required, but it will help with the stretch of the dough)
  • 12 grams (2 tsp) kosher salt
  • 10 grams (2 tsp) heat-activated baking powder (optional, but improves the crumb structure) (regular baking powder can also be used with less open crumb structure)
  • 390 ml water
  • 26 grams olive oil
  • 21 grams honey
  • 60 grams active gluten free sourdough starter (mature and ripe)**
  • ¼-½ tsp baking soda, added during kneading and shaping, if desired (optional) (do not use this if already using baking powder in the dough) (see notes)***

Instructions
 

Feed the Starter

  • When ready to feed your starter, remove it from the fridge and feed it with 30-50g of a whole grain flour of choice (see notes*) and 40-60g of water. Stir and cover tightly. Leave on the counter until nearly doubled in size.

Make the Dough

  • In the bowl of a stand mixer, add the water, olive oil, honey, gf bread flour blend, psyllium husks, baking powder (if using), salt, and active starter. Knead using the dough hook for 5 minutes on medium high. Alternatively, the dough can be mixed in a large bowl using a Danish dough whisk or similar, but you will need to mix very vigorously to get the proper texture.
  • Cover the dough and allow it to rise in a warm, draft-free area until puffed, but not doubled in size, about 3-4 hours (sourdough always takes longer to rise). Place the puffed dough in the refrigerator overnight.
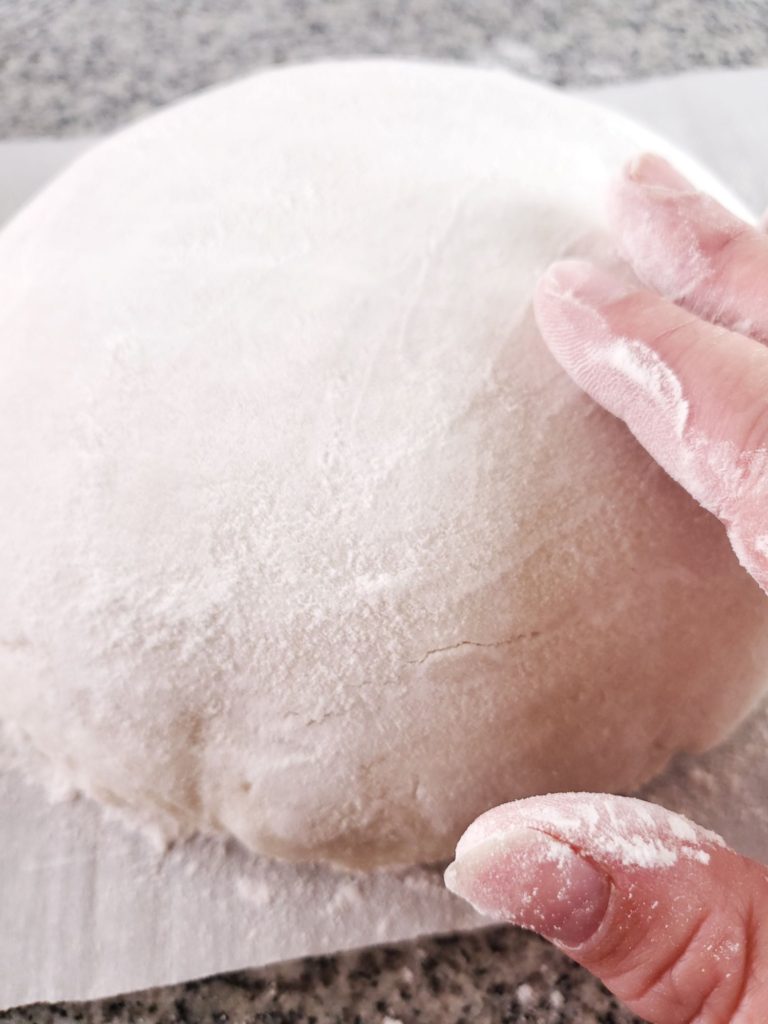
  • The next day, remove the dough from the fridge and turn it out onto a surface well-floured with extra gf bread flour blend. If using baking soda, add ¼-½ tsp to top of dough and begin kneading dough until smooth. (Don't be afraid to add enough flour to shape the dough into a smooth shape).
  • Form into a round and turn over into a floured banneton basket or in a floured tea towel-lined bowl. Cover and allow it to rise until dough reaches the top of the banneton or bowl, anywhere from 2-6 hours (this time varies because of temperature differences, humidity, etc).
  • Towards the end of the rising time, place a Dutch oven with lid (or baking steel or stone and shallow pan) into the oven and preheat it to 500° F for 30 minutes.
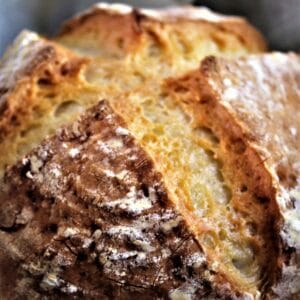
  • When the dough has finished rising, carefully flip it out onto a sheet of parchment paper and slash (score) it with a lame or sharp serrated knife. Open the oven door, carefully place the loaf in the Dutch oven, parchment and all, and replace the lid. Alternatively, slide the loaf, parchment and all, onto a baking steel or stone and pour one cup of hot water into the shallow pan. Immediately close the oven door and drop the temperature to 450° F. Bake the bread for 40 minutes. If using a Dutch oven, remove the cover and continue to bake for another 20 minutes. If using a baking steel or stone, bake the bread for the full 60 minutes.
  • Remove the bread from the oven and allow to cool before slicing.

Notes

*Whole grain gluten free flour options include brown rice flour, millet flour, sorghum flour, buckwheat flour, and teff flour to name a few.  
**See the sourdough starter recipe post for more details about how to work with the starter and get it going.  Ripe starter is starter that’s been fed within the past 12 hours (and sometimes even up to 2 weeks).   
***Make sure to fully incorporate the baking soda into the dough as if it’s not fully mixed in, it will cause brown streaks throughout your bread.  It will still be edible, but doesn’t look very appetizing.  
 
Keyword artisan, bread, Gluten Free, sourdough
Tried this recipe?Tag @letthemeatglutenfreecake on Instagram so we can see!


186 thoughts on “Best Ever Gluten Free Sourdough Bread”

  • I have made and loved the first version of this bread – even though I omit the psyllium because my husband is very allergic to it!I just found version 2.0 and will be baking it for the first time today.

    My question is about the crust. I do not like a hard, crispy crust. What do you recommend to produce a crust that is only slightly crisp?

    • I actually find by either covering the loaf with a tea towel or placing it under foil when it comes out of the oven will soften the crust perfectly.

  • Is the psyllium husk that you use and that is pictured on your recipe ingredients whole psyllium husks or the husk powder? My container states “whole psyllium husk” and looks like yours but it is ground small enough that it could be considered a powder. I ask because I just started the recipe and after 5 minutes with the dough hook, I found multiple balls of what appears to primarily be psyllium husk. So, I won’t be baking this until tomorrow but if it doesn’t turn out and I do some trouble shooting, I thought that may be a place to start. I’m wondering if the dough hook isn’t enough to mix the ingredients well and if I should start with the ceramic beater, mix until everything is combined and then put on the dough hook. I’m very excited by the recipe . Thank you!

  • Wish I could attach my pic. This bread is amazing! Adding the baking powder makes a huge difference. I have made 12. Sourdough loaves and this one is perfection. I use Kim’s bread flour and follow her directions- she has done all the hard work for us. I kid you not, best gf sourdough bread I’ve had in 15 years! Thank you and a million hugs Kim!

  • Hi Kim, I tried your recipe last week and am trying again now that my starter has gotten stronger. I wanted to ask why you changed the format of the recipe ingredients? I understand weighing the flour and starter but it’s made it much harder to follow now that honey, water, etc are all measured by grams and mL’s. I also wanted to ask if you’ve omitted the extra xantham gum for a reason? Thanks again for this recipe. Will you consider making it easier to follow?

    • And 390mL of water seemed like way too much. I couldn’t use it all bc it was making my dough super sticky, like a batter consistency so I had to add more flour to the recipe.

      • I’m not sure where it went wrong because the 390ml is just my original artisan bread amt minus 30ml for the starter amt (60g starter-30g of flour and 30ml of water). It’s the same baker’s math that was used in my original artisan bread and actually in my original sourdough recipe. The difference is the amt of sourdough starter that was used in this recipe. I reduced it because I found that it actually worked better with less starter. In all of these recipes of mine (artisan, old sourdough, and new sourdough) the hydration rate is 100% so the water amt always equals the flour amt. Nothing has changed, so maybe you measured something wrong or perhaps you substituted something within the flour blend??? My dough is not batter like at all. I tested this bread over 20 times before publishing it. When all was said and done, I didn’t feel the xanthan gum was required because the sourdough starter kind of took its place.

        As for the honey and water, etc all being in grams/ml, it is extremely easy to measure all ingredients straight into your bowl when it’s sitting on a scale and you just pour your ingredients in until you reach the amt required for the recipe. However, if you’re still resistant to change, the original amt was 2 tbsp of olive oil and 1 tbsp of honey and the water equates to 1 1/2 cups plus 2 tbsp (which is much harder to follow if you ask me)😊

        • Ok, thanks for the response. Maybe it’s just me bc I’m new to making bread and still learning. Just seems complicated but I’m sure I’ll get the hang of it!

  • Help please! I can’t find where it says how much starter I should use for this recipe. Is it 140 grams of starter? Hoping to make my first loaf in a few days.

  • Hi Kim, I used your flour blend and even weighed all the ingredients but when I took it out of the fridge in the morning, it was basically like soup! It was sticking so bad to my fingers and everything. It was like cake batter. Help!!

  • I have not actually made this, (But I feel very confident it will come out perfectly as I am very used to sourdough, but not gluten-free,) but I have made the starter and as we speak, it Has been fed and will be bubbly very soon.
    My question is this, and I’m sorry if you have already answered this question but there are so many replies I just haven’t had time to read them all.
    Why do you not add the bicarb of soda in the beginning of the mix. Rather than adding it when you knead the bread before the final rise. Thank you and I hope to hear from you very soon

    • Because baking soda will begin activating right away, so it needs to be added as close to baking as possible.

  • I followed the starter recipe and it turned out great. I then put it in the fridge on day 10 and on day 11 I took it out and followed your GF sourdough recipe to a tee! left it over night and it did not rise. I then left it for another night and nothing. Was I supposed to subtract the 140 grams of starter from ( 70 from flour and 70 from water?) I did not do that because it does say to in your recipe. I just added everything like it is on this page. I noticed my dough was a lot more dense and less like yours in your video. I am confused. What can I do now to save my hard work?? More water and commercial yeast? Was I supposed to feed my starter again before using?
    I wanted to just use my starter. Help!

    • Did you feed the starter the night before you used it in the recipe? It needs to be well fed before using it, not taken directly from the fridge and poured into the mixing bowl. You don’t need to subtract anything from the recipe as it’s already configured to remove the 70 grams each of flour and water.

      Without being there, I’m not sure what went wrong, but I could maybe take a guess that either your starter wasn’t quite ready or it wasn’t well fed before using. There is a narrow window of time where you have to use it before it falls again (12-13 hours max), so if by chance it started to fall before you were able to get it into the dough, that could be the reason.

      I hope this helps 🤞

    • I figured out my problem which is happens a lot with a lot of my GF baking, because I live in a high altitude it requires more water and more rise time. I also fed my starter a couple hours before at room temperature. My sourdough turned out absolutely amazing and only required 40 min. Thank you!!!

      • Danielle, I live at 7500′ and am working on tweaks for my altitude. What altitude are you at and what adjustments did you make other than feeding your starter shortly before making your bread?

  • Hi Kim! On your bread flour recipe, can it be made in a large amount and stored or does it need to be mixed fresh for every recipe?

    • Yes, I do it all the time. I store it in a large tightly sealed container, where it sits in my pantry, which is dark and cool, for at least 3-4 weeks. For longer storage, it can be frozen.

  • I am so glad I found your blog! I believe the starter GF sourdough is ready to be used. It’s currently in my fridge. I haven’t set it out yet and haven’t fed it the 50g/60g (based from your starter video)
    I notice in this recipe, we are to feed the starter… is this in addition to the 50g/60g feed after we pull the initial starter out? I hope I am making sense…lol
    Thank you so much!

  • My loafs turn out kind of purplish or pinkish. I use fresh finely ground rice flour from Jasmine long grain rice. They look good except for the color. anyone else have this problem?

  • Thank you for sharing your recipe! I followed your instructions and this is the second time I’ve tried it, something weird happened during the bake where it get browning on the inside of the loaf. Any insight to what it could be? Also, day 2 the bread doesn’t have the same spring to it. It gets rather dry and no much of a sourdough taste.

  • Hi Kim, I’m trying to understand how you convert any of your yeast recipes into sourdough. You mentioned above that you swap out 140 grams of sourdough starter for the yeast “in this recipe” but this recipe doesn’t close yeast in the ingredients. So is that the general rule? 140 grams of sourdough for any of your recipes containing yeast?

    • Sorry for the typo. You probably know what I meant to say, but just in case, I meant to say that this recipe doesn’t list yeast in the recipe.

  • My second attempt was DELECTABLE! I could cry for joy it is so good Kim! A million thanks for you dedication to creating incredible gluten free breads! I realized my fail in the first attempt. I misunderstood your direction and took away the 70 grams of flour and 70 grams of water when I made the bread dough. I watched your video several times and reread the recipe and saw that you had already subtracted it when you posted the recipe. This second loaf is out of this world! Best gluten free sourdough EVER!

  • I followed Your recipe precisely but I came out with a much smaller loaf. I also took it out of the oven about 15 min early because when I took the lid off it was a very crusty brown! Don’t know what I did wrong but I am determined to keep at it! I even took a pic but don’t know how to attach it. It tasted good but not as sour as I hoped and also needed more salt. I really appreciate your recipes, videos and guidance with gluten free baking. Gluten free baking frustrates me but I will persist!

  • I just got done making this bread. I did sub the tapioca flour with arrowroot flour–as my tapioca flour hadn’t arrived yet. I didn’t hold out much hope for this bread as I had tried 3 other recipes from other sites (not your recipe nor your flour blend). I wish I could post pictures of the bread I just made (I have them if you ever want to see them). My bread came out GORGEOUS! It has the BEST crumb! Crunchy on the outside and tender on the inside. One of the “other” gluten free recipes I used came out like a brick and I needed a chain saw to cut it open. This cut beautifully! Browned up just great. I used a Kitchenaid Bread Bowl to cook the bread in the oven and used a Kitchenaid mixer as well. I cooked the bread for 50 minutes within the breadbowl and then took off the bowl part and let it cook for another 5 minutes. I tested the temp inside the bread and it was about 110–111 F. I was concerned it would be gummy. NOPE! It came out perfect! Thank you so much for (finally) a great GF bread!

  • Best GF bread!!! I need to know about freezing this bread so I can sell it! I’ve been baking for friends and recently was asked to bake for a small neighborhood market and they need it to be in their freezer section!! Any tips on slicing & freezing? Type of bag to use? How long will it be good if frozen? Thanks!!

  • Kim-I was so proud of this loaf. It actually looked like yours.
    I’m learning that all these yummy, healthier, no chemicals breads, do get stale faster. So I’m stock piling them in the freezer. Don’t want to throw any of these breads away.
    Thanks for all your help teaching us what you know. Learning to bake with your guidance has been so much fun.

    • You could try, but I just don’t know if it would work. The little bit of honey is used to feed the yeast, but it is possible it might get enough food from the flour components. I’ve just never tried it.

  • I apologize if someone has already asked this, however, is the 140 grams of sourdough starter in addition to the 350 grams of Kim’s GF bread flour blend and 240 ml of water?

  • Hi Kim
    Tried to bake your bread, but without any success😢
    The water one put in when making the dough, is that cold water, or luke warm water like in most yeast based recipe,s?
    My bread did not raise at all in any of the steps, so end result, VERY dense.
    When one feeds the starter the night before, the morning, should that starter still be at peak, or already have collapsed?

    I sooo much want to try this again and this time have success🤗🤗

    • The starter should have already collapsed when you feed it.

      I’m taking a guess here, but it’s possible your proofing area isn’t warm enough for the dough to rise. This is a constant problem with gluten free bread in that it needs a warmer environment than what we’re used to with gluten filled bread. What I do is turn my oven on to the warm function (which on my oven is 170 F), turn it off and put the dough inside the warm oven. In colder weather, I might even turn it on and off a couple of times again while the dough is proofing if it’s not rising like it should. It does take a much longer time, however, for sourdough to rise so be aware of that as well.

      The water does not have to be warm if your proofing area is warm enough. But if you want to add warm water, it won’t hurt it.

      I hope these tips help in your next go round 😊

      • I agree on both the starter and the dough proofing. Where most standard gluten flours work anywhere from mid 60s to mid 70sF temp for gluten free ideally you need 80-90F for that last proof.

        Another trick I have used to get the wild yeast to a higher count in the starter and even in the dough is using rasin or wine grapes water. Soak organic raisins in slughtly warm not hot spring water. Then use that water for your starter or levian. I have even used a tbs of homemade yogurt whey drained. I use different lactobacillys strains vs standard cultures. These two things jump start the CO2 and lactic /acetic acid production. Putting the proof in the frig helps as the yest stays active but slow but the bacteria is practically hibernating with no activity. You get more CO2 with less acid vs equal activity at the 85F proofing temps. Allows the proof to slowly reach the 3.7-4.0 ph needed but with more rise. Which I think us needed with gluten free wild yeast. I agree the 1/4 -1/2 tsp baking powder helps get a larger hole crumb. A bit of apple cider can help as well and speed things up.

        Awesome recipe. Keep up the greatexperimentation. Of food science..

  • Kim, I have been searching and searching for a GOOD gluten-free sourdough bread recipe for my liquid starter, “Cuthbert”. I used your bread flour. I preheated my Dutch oven at 500 for 30 minutes before adding my dough. At 40 minutes in the Dutch oven (at 450) I removed the lid. My bread was super dark. I took its temperature: 205 so I know it was done. It was perfect, but the crust was too dark for my husband. Any suggestions or recommendations on oven time/temperature? Can I try 350? Or 20 minutes and then remove the lid?! Totally thankful for your recipe! Delicious bread and excellent shape! I feel redeemed after so many failures!

    • Thanks so much, Christine!!

      That is a little unusual because mine doesn’t ever come out too dark. It could be your Dutch oven compared to mine. Is yours coated in enamel by chance? Yeah, I think you could take it out of the Dutch oven after 20-30 minutes, but maybe just keep it loosely covered with some tin foil so it doesn’t continue to darken for the remaining of the bake. Let me know how it goes 🙂

      • Thanks Kim! I am trying again this weekend and will let you know how it goes. My Dutch oven is cast iron but not black. I will try 30 minutes at 450 than put on a baking sheet and cover loosely with foil.

        • Kim! It worked! A perfect sourdough loaf! 30 minutes at 450 then on to a baking sheet with loose foil over top for another 15 minutes. Beautiful! Trying your artesian loaf next!

  • Hi Kim! I’ve been making sourdough breads for years and this is the first GF sourdough that’s actually come out great! I know this was a relatively new recipe and I’m really happy you added it.

    I have a couple questions/comments though. I didn’t have potato starch so I substituted arrowroot starch at 2/3 the amount (by weight), which is a recommendation I saw online, and reduced the water proportionally. Everything about the texture and density seemed fine except that the bread was slightly sticky after it was completely cooled and sliced, even the next day. I’m wondering if you think it’s due to the substitution, and if so, any suggestions you might have. We have quite a bit of potato flour that I might try as a substitute for potato starch instead of the arrowroot.

    The other thing I did different was that I baked in a Dutch oven with the lid for 40 minutes, but stopped baking at that point because the temp was around 190 F and the top was already a nice golden brown with a crispy crust. Could the shorter baking time cause the stickiness?

    Thank you!

    • Hi, Matt!

      I’ve only used arrowroot as a substitute for cornstarch as they are more related in texture. Since potato starch is the biggest percentage of my bread flour blend, I would say that’s one of the reasons why you had stickiness.

      I would definitely NOT substitute potato flour for the starch. They are too totally different things and you won’t end up with anything worth baking. I’ve had a few readers who thought they were interchangeable and had disastrous results.

      As far as the baking time, I would continue to bake it for the full time. I find that checking the temperature is not always accurate when it comes to baking gluten free bread, or at least my recipes. If you went for the full 60 minutes, your bread would most likely not be sticky.

      Hope this helps 🙂

      • Thanks for the feedback! We just happen to have a big bag of potato flour so I was hoping it might produce something decent, even though I know they’re not interchangeable. I decided to just give it a try and it really was pretty terrible, haha. Luckily we turned the loaf into crackers and then crushed them into a salad topping, both of which were great.

        I just made another sourdough loaf but this time followed your recipe exactly, and it may have been the best gf bread I’ve ever made! It’s really great to be able to bake something that actually seems like real sourdough after going a couple years without it. You’re a true hero for Celiacs!

  • Do you have a good sourdough starter recipe or guide? Ive tried twice and can’t get a starter going!

    • Hi Leah,

      If you’re on Facebook, I recommend following the Gluten Free Sourdough Baking page. It’s very active with a lot of members, and they have instructions in the “Files” section on how to make your own starter. Their methods work well but I’ve had great results from a simpler approach. Here’s my recommendation:

      Start with a mix of grains; you’re more likely to get more microbes if you have variety. I’ve found teff flour to be a reliable source for creating a starter, even using just a tablespoon mixed with brown rice flour is likely enough to get your starter going within a week, but any grains should work given enough time. Adding a few grapes can also help because they’re usually naturally coated with wild yeast, which is that powdery substance you often see on grapes. You only need about 1/2 – 1 cup of flour blend. Add enough water to make it into the consistency of pancake/waffle batter (the exact texture isn’t important, as long as it’s thick enough to eventually see bubbles). Cover it with cloth or a paper towel to allow oxygen but keep out bugs, then let it sit at room temp.

      It helps to stir it every day to encourage airborne microbes to be incorporated. You might start to see it bubble in as few as a couple days, but often it can take a couple weeks. When there are a lot of bubbles, discard 1/2 – 3/4 of the starter and feed with fresh flour/water. Wait for it to bubble again and repeat. When you reliably get lots of bubbling within 8 hours of feeding (at temperatures above 70 F), the starter should be ready to use!

      A couple things to note: while the starter is being established, especially during the first week or two, it’s normal for it to develop a terrible smell like a dead animal (although this doesn’t always happen). People make the mistake of throwing the starter away because they think it’s ruined; that’s just the progression of different microbes battling it out while the yeasts and lactic acid bacteria establish themselves and create an environment suitable for themselves and inhospitable to the undesirable ones.

      You may notice a layer of dark liquid forming on the surface that can smell rotten, alcoholic, or like nail polish remover. Sourdough bakers refer to this as the “hooch” and it also forms in established starters that haven’t been fed recently. It’s not harmful, but it doesn’t taste great and you can just pour it off or stir it back in.

      To maintain the starter, I typically keep enough for 1 or 2 recipes, stored in a small mason jar with a sealed lid. When I’m baking, I take whatever starter I need from the jar and mix fresh flour (I just use brown or white rice flour with nothing else) and water right into the jar with whatever starter remains. You only need trace amounts of starter for it to completely re-grow but I usually make sure there’s at least a tablespoon. Then I let it sit out at room temperature (with the lid loose so the gas can escape) for most of the day or until it bubbles, then move it to the fridge until my next bake. If you’re not using it for more than two weeks, you’ll want to discard most of it and feed again just to keep it healthy. Weekly feeding is best.

      Finally, even though the starter seems active and stable, it can take a couple months or more for it to become reliable and predictable. Don’t be surprised or discouraged if you occasionally get little or no rise during those first couple months. The starter is still young and not entirely stable. Also keep in mind that temperature significantly affects rising time. I use a proofing box set to 80 – 85 F, and I can get the dough to double in about 4 or 5 hours, but at 70 – 75 F it can take twice as long.

      Hope this helps! If it doesn’t work and you want some established starter, let me know and I can mail some to you. Our house is 100% gluten free and my starter is safe for someone with Celiac who is extremely sensitive.

  • Just finished making a loaf and love it. I’m wanting to try some 2oz rolls with this recipe now. Any idea on what I should alter the cook time to?

  • OMG Kim, you are my lifesaver for real sourdough bread (the crispy crust alone had me squealing with joy!)…..if I didn’t know it was gluten free, I would never have guessed! I jumped right in and kept my dough in the fridge for 7-days before baking, as I really love the sour of sourdough. But I’m just curious, had you ever tried not refrigerating it in your many tests getting to this point? Wondering if just leaving it on the counter would speed up the souring process (okay, maybe I’m just being impatient and want to bake it quicker). Or is your main purpose of the refrigeration strictly so it’s easier to knead?
    I will advise I didn’t have the “milk” powder when creating your GF flour blend, so winged it by adding coconut milk when making the dough (a little at a time until I got the consistency of the dough in your video).
    I did find I had a “gummy” problem when cutting…but that was entirely because I just couldn’t wait any longer to try it. But when the rest of the loaf had finally cooled, it was perfectly amazing! THANK YOU KIM!

    • Awe, thanks so much, Nicki! You’re too kind 🙂

      The main reason I refrigerate it is for the ease of kneading. When you say milk powder, did you get the correct flour blend? My only flour blend that uses dry milk powder is my all purpose one. The bread flour blend uses whey protein isolate, not milk powder. That could be why you got a gummy texture as well.

      • Okay, apparently had a not-so-Swift moment there because I used your all purpose blend!(???!!) Wow, if it was amazing with the “wrong” blend, it’s going to be to-die-for with the right one! Thanks again Kim!

  • Thank you so much for the GF flour recipes! They’ve made a significant difference in GF baking for me(I bake GF for my daughter who is gluten intolerant) . I did substitute potato starch with arrowroot since she is staying away from nightshades as well. I’ve made a few things including this sourdough bread,,, it was incredible!

  • This was my 3rd time making this bread. The crust was very crunchy & hard to slice the first two times (I checked the temp of my oven and it was fine), so I adapted the timing a bit by baking it completely covered for 50 minutes and uncovered for 10. I also put in 3 ice cubes between the parchment and the cast iron when I put the loaf in. AND, I used pea protein instead of the whey isolate since I needed it DF, and it was perfect!!! Thank you, Kim, for this amazing recipe!!

    • That’s awesome, Marla, that you were able to adapt it to your needs!!! Adjusting the covered baking time could be something that’s required for dairy free. Thanks for informing me so I can add your info to the recipe for those who also need to be dairy free 😍😍😍

  • Hi Kim, is it essential to have a 5 quart Dutch oven or would 3.75 do ( this is the size I already have)?
    I’d love to use this method over the water pan one, if possible without buying something else.

    Would a round covered 5 quart Pyrex dish work instead of a Dutch oven?

    • I think the 3.75 size would work. It’s the ones that are bigger than 5 quart that I think would cause your loaf to spread out and not rise up 🙂

  • I made my first sourdough loaf from your recipe Kim. So pleased with it how it turned out. I too had streaks of brown through the outer edges of my loaf, due, I guess, to not working in the baking soda well enough. BUT, my dough was SO sticky I could hardly manipulate it at all to incorporate the baking soda. It did not look like the dough pictured on your website. Can you tell me why my dough might be so sticky? Could hardly get it off one hand without the complete glob of dough clinging to my other hand.

    • Hi, Margo! First question, did you use my bread flour blend? If so, did you substitute anything within the blend itself?

    • Yes, I used your bread flour recipe as directed. The only thing I was unsure of was whether to use the dough hook or the beater in my stand mixer. After making the bread I came across your video and you were using the dough hook. This is the only thing different that I think I did. Unless my starter wasnt really ready but I worked on that for 15 days and I did get a good rise in my loaf.

  • Bread tastes great but I am not able to get it to rise as much as I would like. I fed my starter the morning of making the dough and waited for it to rise before combining as it seemed most gluten recipes follow that but I noticed your recipe doesn’t mention that. Is the idea that it gets fed and rises once it’s all combined in the mixer?

    • How long did you wait for it to rise? My recipe calls for feeding it the night before (many others do this as well) because you want it to be at peak rise and be very active and “ripe” before using it in the recipe. If you don’t give it enough time to become fully active, you won’t get much of a rise. In my recipe, the very first step is to feed the starter the night before, so I’m not quite sure what you mean when you say my recipe doesn’t mention that?

      • Thanks for the reply Kim, sorry I wasn’t very clear in my question, I did feed it the night before but by morning time it has already risen and fallen. So I fed it again in the morning and let it rise 3 hours which is about the time it was taking me to get a peak and then i put it in. I didn’t realize that the starter could still be peaking after such a long time so I thought maybe I just missed a step of feeding it again in the morning but I must be doing something wrong if it has fallen by morning,

        • Hmmm. That is a head scratcher. Try feeding it double the amount the night before and see if it sustains its rise by the next morning.

          • I figured out at least one big mistake I made, I clicked the link for the flour blend and scrolled down to the first recipe which is the all purpose flour, not the bread flour. 🤦‍♂️ It still tasted great and had some rise but I’ll let you know if that fixes my rising problem.

  • I need some help figuring out what happened with this bread! I made a 10 cup batch of your bread flour, using the exact ingredients you listed, no subs!

    I followed the process and had a nice mature GF starter made from brown rice.

    I got a good initial rise.

    After storing it in the fridge overnight I kneaded it with a rounded 1/4 teaspoon of baking soda for about two minutes. It shaped up nicely and I placed it in a floured round banneton for the second proof. It puffed up nicely.

    I scored it and baked it and it came out of the oven looking exactly like yours in the photos. Gorgeous banneton marks and a nicely opened up x shaped score.

    Waited 3 hours to let it cool. great texture, nice little plentiful fermentation holes, but when I sliced it the entire loaf is tunneled through with streaks of brown. It almost looked like a marbled rye bread! What the heck?! The taste and texture are good even where I see the brown marks, but what is this??!! What caused this?! because even thought this is a nice loaf of GF bread, I know my kids won’t eat it with these marks!

    • That is puzzling. The only thing I can think of is maybe the baking soda didn’t get completely mixed in and it reacted with the alcohol in the sourdough. If you make it again, either try leaving the baking soda out completely or making sure to thoroughly mix it in. I found this thread from The Fresh Loaf where the person had a similar problem. See what others have said: https://www.thefreshloaf.com/node/14626/help-brown-spots-bread

      • Yep, I’m sure that baking soda is the culprit after reading the link – thank you for sharing that! I will try it again without the baking soda. I’m also thinking about turning this into a caiman raisin swirl loaf. I want to try adding soaked, drained raisins and cinnamon sugar before shaping and final proof in a banneton. I thought I might gently flatten the dough and try a sort of lamination of the raisins and cinnamon, then roll it up and tuck the ends under to shape it into a batard. I might even sprinkle some cinnamon sugar over the top before I score, but I hope the sugar won’t burn in the high heat of the dutch oven. FYI, I threw a couple of ice cubes into the bottom of the hot dutch oven when I placed my loaf inside and I got an incredible rise and even some blistering on the exterior crust!

        • Wish I had spotted this sooner. I had the brown marbling and slight chemical taste that I am now thinking was caused by the baking soda. I am about to try the recipe again as the texture and rise were great and the loaf still tasted ok.(even with the slight chemical taste)

  • I made this and I wish I’d taken a picture! My spouse, who is NOT GF, tore through this! Liked it way better than all the GF store bought breads. I did too! I used to bake bread all the time, but as my gluten sensitivity increased, my inability to simply even breathe while playing with gluten flour ended my bread baking hobby. Finally diagnosed officially with NCGS, I’d come kicking and screaming to the GF bandwagon. But this has completely changed my perspective. Now, my first attempt wasn’t perfect, but I was able to recognize my errors (thanks to rereading the commentary), not letting the dough sit for long enough, too impatient with getting it baked, failing to fight off the urge to cut into it piping hot, I recognized my errors. Regardless, it was good enough to keep my spouse coming back for seconds (and thirds!) and I feel a rekindling of my bread baking passion. *THANK YOU*. Round two is resting, I’m going to be patient this time and give it the time it deserves. Hopefully this time I’ll get a picture! Oooh! I hadn’t tried the Dutch oven method before, and despite my nervousness, it came out beautifully! All my bread pan methods for GF bread failed miserably so this method is definitely a keeper! Thank you!

      • Round two came out even better. I’m absolutely in love with this recipe! Now, my starter is starting to fizzle out, so I’ve gotta go back and research before attempting to make another batch, but, I’m hooked! Thank you!

  • This sourdough bread turned out pretty good. The dough and then the bread itself had a pink tint to it.. why would that be?

    • Did you happen to add the baking soda? I just had another reader say that she had brown streaks in hers and I wondered if it’s from the baking soda not being mixed in properly.

  • Outstanding recipe! I’ve also made this with Authentic Foods superfine brown rice flour, which works just as well. I find I need a little more water, maybe my starter is less liquidy.

  • So far so good. Making my first loaf of sourdough now. Should be done in about 15 minutes. My only question is how dark should the outside look? Mine looks very dark, almost burned looking. Is it supposed to be that way? I have it cooking in a dutch oven but my lid has a crappy knob that can’t deal with temps above 350 so I just left the lid off but I did make sure to put a cup of water in a shallow pan when I put the loaf in the oven. I’m just not sure if I did anything wrong, I’m such a newbie at this !

  • Kim, this recipe is incredible! Love it love it love it. Just finished baking it earlier today. Delish. I even made adjustments for a second loaf (before the original was even done with the first rise), including cocoa powder and extra honey for a lovely chocolate taste. Both turned out well. Thank you so much for the wonderful recipe, this will replace the gluten bread i consume, i love it that much 🙂

  • Shallow pan for steam. It was a stoneware pan. Does that matter? Also, the pan was completely dry when I pulled the bread out. Is that normal?
    I used a baking stone from Pampered Chef to bake the loaf on the center rack. My water pan was on the rack 2 levels down and to the right of the baking stone.
    I will email you. I have gotten nearly all my ingredients from your links. (You should be making at least some money for all your hard work…hehehe)

    • Haha! I do make a little bit with the product links, so thank you for that!

      Hmmm. I wonder if the stoneware pan soaked up all the water maybe? I’ll await your email to try to figure this out 🙂

  • This was only the second time I’ve tried to make bread completely from scratch. I read the recipe and watched the video a zillion times. My starter matured for over 3 weeks. My starter is 100% sorghum flour. My bread flour is your recipe. I was very careful to do everything just as you said/did. No substitutions.
    It rose beautifully during both proofing sessions. It looked perfect going into the oven. I was so excited!
    And then…the final end result…I was so disappointed! It did not rise at all during the bake. The crust was so hard I literally had to saw it to cut it. The inside was a bit dense. The only sourdough flavor was in the dough right by the crust, and that was not real distinct.
    What did I do wrong?
    I did stir my starter before I added it to the mixing bowl. Could that have caused the problem?
    Help please! Now I’m scared to make any bread.
    Btw, my first bread from scratch was your English muffin bread, that turned out a little dense, but worked well for my Thanksgiving stuffing.

    • Oh no! I’m not sure, Denel, but together we’ll figure it out. Did you put it in a covered Dutch oven or use a shallow pan for steam? The steam is very crucial in the recipe. If you can, please email me at [email protected] and give me some more information, including if you can give me brands of flours that you used to make the bread flour blend. Sometimes it’s as simple as that.

  • My bread is not rising. I am using a mature starter (over a month old now) made from brown rice flour. When I’m mixing the bread initially, the dough doesn’t seem as soft as yours in the video, it that the issue? My oven has a proofing setting so I’m putting my dough covered in there for 8hrs and its not doubling in size. Any suggestions?

    • Were there any substitutions in the dough or the bread flour blend? If you watch my video, you’ll see the dough itself doesn’t rise a whole lot. It’s just noticeably puffy. I would just go ahead with the next step. You’ll see the most rise from when it hits the hot oven.

  • I just made your sourdough bread for the first time and it is excellent! I can’t stop eating it. I struggled making the starter and threw the first batch out. I was thinking of throwing the second batch out too, but discovered that my house was on the chilly side and that was the problem. So I put the jar on a towel on a heating pad, and that did the trick! It took two weeks for the starter to be ready, but it turned out great. Now I want to try all your recipes. Thanks so much!

    • That’s awesome, Bev!! I am also addicted to this bread. And that’s a great tip for using the heating pad!! Thanks so much 🙂

  • Hi there! I’m sorry, I’m so confused about a few things.
    1. Why all the discarding? Where are we discarding it to and what are we doing with what we discard?
    2. Is there a rise and fall to the starter itself ? If so, how much of a rise is expected?
    Thank you for all your efforts with gluten free baking!

    • Hi, Amy! The reason for the discard is that if you don’t discard, your starter will take over the entire jar and possibly spill out the top. Each time you feed the starter, it’s going to grow. It will continue to grow and expand to measures far greater than your jar can probably handle. If you happen to have a very large jar and want to skip discarding a couple of times, that would probably be fine, though. I wouldn’t get into the habit of not discarding, however.

      I usually just trash my discard, but there are so many websites out there now that have great recipes for using some of your discard, such as this one here: https://www.theclevercarrot.com/2020/10/sourdough-discard-101-recipes-faqs-answered-pancakes/

      Yes, your starter will rise and fall. How much is dependent on how much flour you begin with and how much you discard and feed it. See my post on gluten free sourdough starters: https://www.letthemeatgfcake.com/gluten-free-sourdough-starter/

  • Hi Kim, this may be a silly question, so I apologize in advance. I love making gluten free sourdough and I love your flour blends, thank you for all the research you put into making your recipes! Do you by chance know if I can bake this low and slow instead of hot and fast? My pathetic oven has been having trouble maintaining high temperatures.

    • I don’t know for sure, but my guess is it wouldn’t work at all. The bread needs that (at least) initial blast of very hot temperature to create the oven spring before the crust sets. I feel if you were to bake it on low the crust would set before it had a chance to rise and you’d be left with essential a brick.

  • First try with this recipe after making your starter. I use the oven for proofing like you do and when I checked it after 3 hrs on the second rise, I noticed the dough had split in a giant x shape on the round loaf (made in cast iron skillet). Have you ever had your dough split during the rising? I did add the 1/4tsp baking soda, but maybe not enough kneading to incorporate?

    • Yes, my dough has split before. It’s usually indicative of over proofing in gluten free baking. I would begin checking at 1 hour and every hour after that. However, it should still be a very great tasting bread!

      • Oh, it was some of the best gluten free bread I’ve ever had, period! Just had a very rustic look lol. Thank you for this recipe, I’ve despaired over making good bread in the past and your recipes really boosted my confidence!

  • I live in Australia where your gf bread flour is not available so I use the one by Jeff hertzberg mixing enough for 10 days and have used your instructions for the rest but it is a little flat and needs to rise a bit more may it be because it is only around 13 degrees average can you confirm my recipe and I will Get there

    • Unfortunately, it’s probably flat because of the flour mix. I do have affiliate links for Australia for the flours needed to make my flour blend, so you should be able to find most, if not all, of those flour components in your area. I don’t actually sell my flour blends pre made. I offer the recipe for you to make them yourself.

  • Hi there! I’m hoping to add in kalamata olives, rosemary, and roasted garlic- at what point in the process would it be best to mix these in?

    • That sounds so good, Danielle!!! I would say to mix them in with a spoon or spatula after mixing the dough in the mixer, before the first rise.

      Please let me know how it turns out 🙂

  • I am new to sour dough bread. I made your recipe and now am ready to knead and bake the Artesian loaf. When I removed the bowl from the refrigerator I noticed a pink hue to the outer skin. I checked the starter – there is no pink hue here. I refrigerated in a metal bowl. Could that have impacted the color? Should I throw away and start over?

    • Oh, wow Martha. I’m not sure, but I would have to say it very well could be a reaction. I honestly would start over completely. That totally sucks and I’m so sorry you have to start over, but I just wouldn’t trust it.

  • Hi! After adding psyllium husk powder my dough later turned a light purple color. Is this from the psyllium husk? I am proofing now and going to bake anyway. I’m going to make another loaf tomorrow and omit the husk. Any thoughts? Thank you!!

    • In ordering psyllium powder/husk online, if you read product reviews, some brands have people commenting that the psyllium turned their baking products purple.

  • I am having an issue I have tried this recipe three times and followed it to the letter. My starter is active and bubbly and I still can’t get this to rise hardly at all. What else can I try because I love the flavor I’m just not quite sure what else to do. Would love your help!

    • Hi, Dawn! I’m sorry you’re having issues with the sourdough. It can be a finnicky bread, especially considering everyone’s starter is different.

      A few things to ask: did you substitute anything in my bread flour blend? If not, sometimes I find that people just aren’t making their proofing area warm enough. What I like to do is turn my oven on to the “warm” function, which I believe is at 170. As soon as it comes on (I have a gas oven so I can hear when that happens), I turn it off and put the dough in the oven. It’s nice and toasty in the oven, which most people think is too warm but I’ve found it perfect for gluten-free proofing. The dough won’t rise all that much for either the bulk fermentation or the final rise, but should definitely get a lot of oven spring. Have you tried using the baking soda? That also helps.

      I hope these tips and tricks help, and I’m crossing my fingers you’ll be in gluten free sourdough heaven soon 🤞

  • I made this sourdough last week and it was super! I have been cooking/baking GF for the last 11 years and I’m very particular about what I actually park on and make again and again. Your website is a treasure trove that I haven’t seen in all these years! Thanks for offering well crafted breads for those of us who are bread deprived. I am wanting to make this bread to sell and am wondering if there’s any way I can eliminate the whey? I actually used collagen in mine, since my husband is DF and it was what I had on hand! But it’s so costly to use, so I’m wondering if I can substitute it for coconut powder/milk powder or eliminate it with any sucess?!!

    • Hi, Laura and thanks for the kind words!!

      I do have some substitution suggestions right on my flour blends page for using something other than whey. However, I wouldn’t suggest eliminating a protein powder altogether because protein is what I feel makes my bread recipes successful, along with the other ingredients in the flour blend. Check my flour blends page for the other substitution suggestions I have listed 🙂

      • Thank you for the reply. So are you saying the night before use 140g starter, add 100g water and 100g flour to that then the following morning use that as the ripe starter in the bread recipe?

        • Basically, but don’t get so caught up on the exact numbers. As long as you have at least 140 grams of ripe starter the next morning, you’re good.

  • I had a quick query! Is the refrigerator step necessary? I have a very mature starter. I sub additional starter for some of the flour and water. If I am pleased with the sourness of the dough on the first rise, does the dough need that extra time? Thank you much!

    • Hi! The refrigerator step is necessary to be able to shape the dough easily. Without it, you’ll have a very sticky mess on your hands. Having well chilled dough makes it so much easier to shape. This may not be true for gluten-filled dough, but for my gf bread recipes it is one of the main steps that helps with shaping.

    • @blakewalsh-what flour did you use for your GF starter? I’m starting to experiment with gf starters and need all the help I can get!

      • I used random flours. I made about 4 starters in a 3-4 week period, just for testing purposes. One I started solely with buckwheat flour, one with sorghum, one I think with a mixture of white rice and brown rice, and another I think was made with teff. Once they got going with lots of bubbles, I then added white or brown rice flour for maintaining until I was ready to bake.

        Hope that helps! Good luck 🙂

        • Hi Kim! I am so excited to try making this Gluten Free Artisian Sour Dough Bread! I’ve never made bread from scratch and I absolutely LOVE Artisian Sour Dough! One of the things I love & appreciate most about your post is your specific ingredients & brands that have worked the best. What specific flour and brand has made the best starter for you?

          • Hi, Amy! I like so many of them, but I think my favorite was the one I started with sorghum flour and ended with brown rice flour. The sorghum was Bob’s Red Mill and the brown rice flour happened to be Authentic Foods Superfine Brown Rice Flour, but I think the Bob’s Red Mill brown rice flour would also work perfectly fine in this application 🙂

  • I have been baking GF bread for 14 years and this bread is one of the very best; certainly the best sourdough bread that I have made. I believe the secret to successful baking is the flour/protein blend. For those who live at 4300 feet above sea level: the initial rising time took 8 hours and I had to keep the dough in an oven that I would periodically warm up for 45 seconds at 170F. In step 4, sprinkled 1/2 tsp of baking soda on top of the dough before lightly kneading the bread. Letting the cooked bread cool completely is also necessary to avoid the weird GF gummy consistency. Thank you for the wonderful bread recipe.

    • Thanks so much, Nicole!!! And thank you for the high altitude baking tips, which will be very helpful to other bakers living at high altitude 🙂

  • The first time I made this recipe, it said 240g of starter (about 1 cup). Now it says 140g (1 cup) but I’m still using 240g or else I would only have about 1/2 cup. Does that make sense?

    • Hi, Catherine! I’m so sorry that I’ve made it so confusing. I actually had someone ask me about the 240g because in the video I say 140g and it was supposed to be 140g, so I changed it on the recipe to 140g. However, if for whatever reason yours is working great using 240g, so I’d just stick with it.

      I hope I haven’t made it even more confusing, haha!

    • Same thing happened to me! 140g measured half a cup and didn’t rise at all so I’ll try the 240g since that worked for you. Thanks!

  • Yes! I made the recipe with the dough hook! This was the best bread I have ever made!!! Thank you so much Kim!! Last question lol…. when doing your starter, I’m looking to make bread without xanthan gum. Can you use your own all purpose flour blend ? (Xanthan free blend or replace it with psyllium husk?) or do you have a certain blend Xanthan gum free you would recommend? Thank you so much for all the help! 🙂

    • Yay!!!!! I’m so glad you had success, Madeline!

      When making the starter, you could certainly use the xanthan gum free blend (mine or any other you might find). And you can also use psyllium husk as a replacement in my bread flour for the xanthan gum. 🙂

  • Hi Kim! So excited to make this bread! For the starter, do you know roughly how many grams 1/3 of the starter should be? Thank you so much!

    • Hi Madeline! I’m sorry, I don’t. It all depends on how much you’ve fed it throughout and how much its risen and how much has been discarded. I don’t think anyone’s starter would weigh the same as another’s. What are you trying to do? Maybe I could help figure it out?

      • Hi! So I’m just looking at Step 1 of this recipe and wanted to be exact with how much starter I have currently and how much I should have for the recipe! Thank you!

          • I also really don’t understand the wording of this step and the video didn’t help. I don’t understand why it says to discard all but 1/3 of your starter when everyone’s starter size be a different size? Like if I have 3 cups of starter that would be 1 cup, but if I have 6 cups it would be 2 cups…

          • I see your point. This is based on my starter recipe, but it really doesn’t matter in the final recipe. As long as you have 140 grams of the starter for the recipe, you’re good. So if you have a very large starter like you said, just discard whatever you would normally discard before feeding it.

          • I’ve reworded it. This recipe was based on using MY starter recipe. If you have a larger starter, all I’m saying is to discard whatever you would before you feed your starter, and to do this the night before making the dough. The goal is to have 140 grams of the starter to add to the dough the next day.

  • Hi Kim, made my first loaf of Sourdough Bread yesterday and it turned out awesome. I had never made any type of sourdough bread before. Thank you once again for all these wonderful recipes and flour blends. I had given up on all of the GF flour blends that where commercially available and just started researching how to make my own when I found yours, thank you for the hours and days of research I know you had to do to come up with a blend that gives us something that most people will never know the difference between wheat and GF. I have been baking since I was 7 and love the way the house feels and smells on a baking day. I’m ecstatic to have that back once again. You’re the best, keep rocking out these amazing recipes. 🦋🌞

    • Oh my gosh, Shari! Thank you SO much for your kind words!! I’m so glad you’re able to enjoy baking again and I’m happy to be a source of gf recipes for you 🙂

  • I have made the bread with your flour recipe and starter. I had to let the bread rise for 6 hours the first day. The dough was back to normal size when I removed from the fridge the next day. Was this to be expected?
    On the bake day I let the dough rise for 4.5 hours. There was some rise but not a lot. The bread tasted good but I feel it may be heavier than it should be and made a small loaf. I used my cast iron Dutch Oven pot to bake the bread.
    Have I done something wrong?
    Thanks

    • Hi, Chris! It sounds to me like your starter wasn’t active enough. It is normal for the dough to fall after being in the fridge overnight. Did you get any oven spring at all (the initial rise in the oven)?

      • Hi Kim.
        My initial rise after many hours was very good. More than doubled. After kneading the following day I had minimal rise. When baking I had next to no rise.
        If my starter isn’t active enough how can I fix it?
        Thanks

        • Oh, okay. Maybe it’s not your starter then. I’m wondering if you’re not allowing it to rise long enough for the final rise. Also, I’ve found that some failures with my breads are because the proofing area isn’t warm enough. Here’s what I do: I have a “warm” function on my oven. I think it goes to about 170 degrees. I turn that on and allow it to warm up very briefly (like a minute) and then turn it off before placing the bread in the oven to proof. After one hour, if still not looking like it’s doing anything, turn the oven on again to the warm function and quickly turn it off. I’ve noticed that with gluten free baking, the proofing temp needs to be higher than with normal gluten-filled baking.

          I’m crossing my fingers that you’ll find success, Chris! I’m so sorry it hasn’t worked for you yet, but I’m confident it’ll happen and you’ll be left with a glorious loaf of gluten free bread 🙂

          • Hey. I’m struggling with the same thing. Great initial rise and overnight. Kneading gets rid of all the previous rise and even after leaving for 3.5 hours at around 25/26, very little rise in the banneton and not much in the oven.

            Can the kneading step be skipped and if so, how do you go from fridge to oven?

          • You could skip the kneading. I prefer it with the kneading because I like the final texture, but you’re welcome to try it without. To go directly from the fridge, I would scoop it out and put it directly into the banneton with extra flour sprinkled in the banneton to avoid sticking.

            Hope this helps 🙂

    • Hello! I built my GF starter 3 weeks ago and it is ready for baking! I want to make this bread but have a question: your recipe calls for 1 C of active starter. And then says discard all but 1/3 of it when using it. So are you saying to take 1/3 C of starter and feed that the 100 grams of flour and water in the evening? Thanks in advance for the help. I also just created 5 C of your flour blend so I’m ready to go! 😉

      • Sort of. I reworded my recipe to hopefully make a little more sense. I’m stating to discard all but about 1/3 of your starter the night before and add 100 grams of flour and 100 grams (or a little more) of water, all done the night before. The goal is to have enough of your starter the next day to equal 140 grams. So if your starter is huge and you don’t want to discard all but 1/3 of it, then discard however much you’ve been discarding when you feed it. When I wrote this recipe, it was based on using my own starter recipe. I do understand, however, that everyone has different starter sizes so I’m rewording this to accommodate.

  • Made this sourdough bread for my picky teenage grandson and he LOVED it! Thank you so much for the recipe – you don’t know how many recipes I’ve tried that hasn’t passed his taste test!!!!
    He asked if I could make hamburgers with this recipe as he hasn’t had hamburger in a bun for a very long time! So can I make the dough into buns and what changes do I have to make?

  • FANTASTIC! I made my bread today (tagged you on Insta) and my sister and I are amazed! I’m so happy! Thank you, so so much!

    • Sure! It makes a pretty large loaf, though. You’d definitely have to adjust your baking time, probably to close to double the time.

      • I decided not to double it and just make it more often so we eat it fresher. I was wondering if it would be possible to add cheese and herbs to make a savory bread with this recipe.

          • I was thinking about doubling this recipe and baking it in my very large cast iron pot. My friend loves the bread, and asked that I make her a loaf with fresh dill. Any thoughts on how much dill and when I’d add it?

          • Oooh, dill sounds so good!! If you’re doubling the recipe, I would go with at least 1/4 cup but maybe even 1/2 cup. And I would probably add it at the kneading stage.

            Please let me know how it turns out 🙂

  • I can’t wait to try this. I’ve made the GF Artisan bread and cinnamon rolls.and it was delicious. I have switched to mostly GF and it is helping my arthritis a lot. I also have several extended family members with celiac. Have you tried sourdough with your rye bread recipe? That was the next recipe I planned to make.

    • I haven’t tried any other recipes for the sourdough yet, but plan on it as I love using it! I need to try the rye bread soon, though. That and bagels/pretzels 🙂

  • Kim, I just wanted to confirm that after preheating the dutch oven at 500F, you drop the temperature down to 450F once the bread is added. You mentioned it in the video, but it’s not in the written recipe. Actually, this is the first time I realized you had videos on your blog because it seems my ad blocker had been hiding them from me all this time! 🙁 I’m so very excited to see you posted this recipe, as I have been experimenting with GF sourdough baking the past few months with lukewarm results, and I know this will be fantastic because I have NEVER had a bad recipe from you! So thank you so much!!!!

    • Thank you for catching that, Colleen!! Yes, you do drop the temp down to 450 as soon as you put the bread in the oven.

      If you want to see all the videos you missed in one spot, check out my Youtube channel here: https://www.youtube.com/channel/UCBIMroJp0URZoYGbTilnVSg

      Thanks so much for the kind words, Colleen! I hope you like the sourdough 🙂 It has now become my favorite bread I make 😋

      • Thanks for sharing, I never get the videos either so I will definitely check out your YouTube channel!

      • Thanks for getting back to me so quickly (this morning is baking day, yay)! I just subscribed to your YouTube videos channel as well so I can easily find your videos in the future. May I ask what size banetton you use? I bought a 9″ round thinking that was a standard size (ironically it’s the same one you have linked above), but it is too big inside of a gallon-sized ziplock bag.

          • I’m so sorry, Colleen! I had the wrong banetton link on my Youtube video. Thanks for catching that! However, no need to buy another one. You could just use plastic wrap to cover yours. It doesn’t have to be in a ziplock bag.

    • Recently had to go wheat free for my 2yo who has an allergy. I have a regular sourdough starter which has been so fun to explore the past few years but now haven’t baked much since he can’t have any.

      Found this recipe and cannot wait to try it! I’ve tried making a GF starter without any luck but after reading one of your comments, I think that I just turned in the towel too soon because of the smell.

      Do you sell any of your starter? I’ve been looking at one’s online and they seem like they have mixed results

    • I don’t know anything about bread machines, so I can’t say for sure but I bet it would do just fine 🙂

      • Hi Kim, I am not sure how to start a new comment, but what I am wondering is, my dough is very runny. It is more like pancake batter. Suggestions?

          • I did. Does altatude affect consistency? Maybe I didn’t add the correct amount of flour or too much water. It happens sometimes…hahah..I will try again.

          • It may, Heather. I wish I knew more about high altitude baking. I’m crossing my fingers it works next time 🤞

    • Thank you so much for sharing your recipe with the world. We always go to restaurants that make their own GF bread and of course the recipe is a secret that they say took them 200 times to get right. After years of being deprived, thank you for letting us bring this masterpiece into our home.
      The bread was crunchy on the outside and soft on the inside. Perfect artisan sourdough bread! I did undercook it by maybe 3 minutes and it was way more sour than I thought it was going to be. I only refrigerated it overnight, but I guess my sourdough starter is VERY mature. I do want to tone it down a bit, but other than that I am amazed I only have to do a couple little tweaks on my part. I did it with the baking soda and loved the way it turned out. Next time I will do without just to see the difference in taste and texture. Thank you for blessing our home! I can’t wait to try more of your recipes.
      Also, my dutch oven was buried in the garage somewhere, so I used my cast iron pan, threw in a few ice cubes, grabbed the parchment, threw it in, slapped foil over the top and topped with my le creuset lid and it worked like a charm. I guess I could have just put it in my le creuset, but I didn’t want to risk it flattening out in a larger pan. I can’t wait to find my dutch oven and put it to good use!

Leave a Reply

Your email address will not be published. Required fields are marked *

Recipe Rating