Once you make this AMAZING Gluten Free Pizza Crust Recipe, you'll never buy another prepackaged one again! If you're missing a great New York style pizza in your gluten free life (that folds!) look no further. You've found it!
What Makes a Great Pizza?
There are all kinds of pizzas out there: thin crust, thick crust, Sicilian, etc, etc. I'm not a pizza snob. I will eat just about any pizza that's put in front of me. But I WILL NOT eat cardboard with sauce and cheese! And that, my friends, is sadly what is offered to us gluten free people.
Even if we felt like risking everything (with cross contamination) and ordering a gluten free pizza from a local pizza place, it's nothing more than cardboard with sauce and cheese.
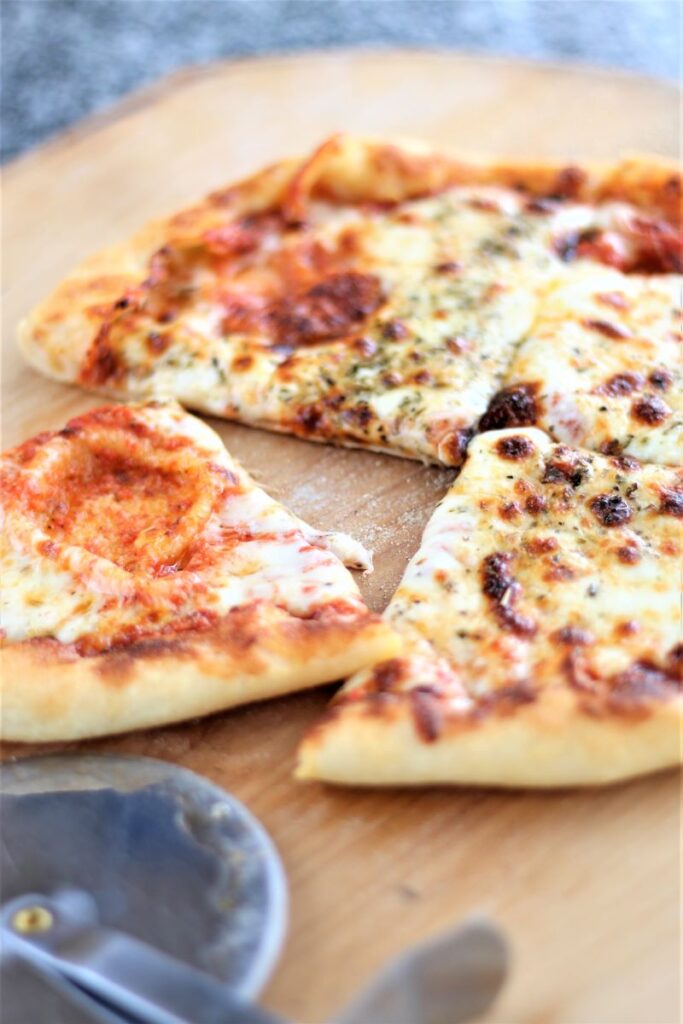
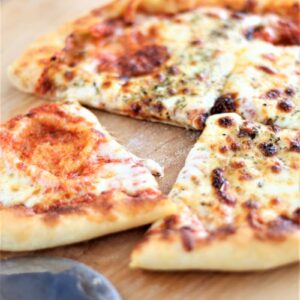
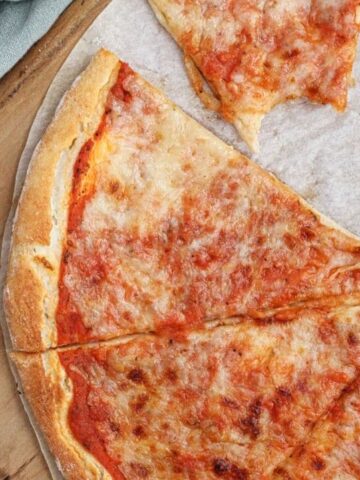
I LOVE my own gluten free pan pizza, but I also love New York style pizza. You know, the kind that you can fold over (if you choose to) that is slightly crispy and chewy at the same time, with bubbles of dough that have risen and created craters. This pizza has all of those wonderful traits and you can make it at home!! No more cardboard for us. Woohoo!!!!
Ingredients You'll Need to Make Gluten Free Pizza Crust
Creating a great gluten free pizza crust recipe is no easy feat. One of the very things that makes pizza crust chewy is the very thing we're missing--gluten! But, with a few ingredients and my gf bread flour blend, we're able to create a gluten free pizza crust that is JUST LIKE its gluten-filled counterpart:
- Kim's gluten free bread flour blend -- there really is NO substitute for this flour blend. If you need to make things dairy free, there are suggestions right on my flour blends page.
- Additional xanthan gum -- this helps with the stretch of the dough.
- Instant yeast -- if all you have is active dry yeast, you'll need to "bloom" it in the water for the recipe. The water will need to be warm, not over 110 degrees F.
- Psyllium Husks--you can make this pizza crust without psyllium husks. However, adding them makes the dough a dream to work with and helps with the stretch.
- Kosher salt
- Honey--you can sub equal amounts of sugar (1 tbsp) if you can't have honey or want to make this vegan.
- Olive oil -- use extra virgin
- Water -- it doesn't need to be warm, unless you're not using instant yeast.
Add the dry ingredients to the bowl of a stand mixer and mix with a hand whisk until combined. On low speed and with the dough hook, slowly add the liquids (water, honey, and olive oil). Turn the speed up to medium high and knead for 5 minutes.
Scrape the dough with a bowl scraper like this one (one of my favorite kitchen tools) or a spatula. Cover the bowl and allow it to rise in a warm, draft-free area until doubled in volume, about 1-2 hours. If your rising area isn't warm enough, turn your oven on to the lowest setting. My oven has a "warm" function that heats to 160 degrees F. Allow it to heat up, turn it off, and place your dough in the turned off oven. Don't be afraid to make the proofing area nice and toasty to allow the dough to rise properly. This is one of the biggest mistakes people make when trying to bake my gluten free yeast recipes.
The Dough Gets Better with Age
You can double or even triple this recipe, and the longer it sits in the fridge the better it gets! You can make the dough one day and have pizzas the following day, or even up to 10 days afterward!! How great is that?
Letting the dough sit in the fridge actually increases fermentation. Fermentation is when yeast feeds off the sugars in dough and creates gas, which helps the dough rise. The gasses produced by the yeast during fermentation is what gives bread its flavor and aroma. Generally, more fermentation means tastier bread, or in this case, tastier pizza dough. It also helps with the stretch of the dough. It's similar to the effects of sourdough without fiddling with a starter!
Rolling out the Dough and Building a Pizza
Dump the dough onto a well-floured surface and knead it briefly, until it comes together into a fairly smooth ball. With a bench scraper, cut the dough into portions about 5-6 ounces each. Roll each of these into a somewhat smooth ball. Roll the pizza dough into about 10-inch rounds . You can make larger pizzas, but you're limited by the size of your steel/stone and your pizza peel.
Be liberal with the flour on your counter because this dough has a tendency to stick. Constantly roll and lift the pizza crust so it doesn't stick, adding more flour as necessary. You're looking for it to be a thickness of about ⅛th of an inch. Cover your pizza crusts while you prepare your oven for baking.
Making Your Home Oven Behave Like a Pizza Oven
I used to make pizzas quite often from scratch before I became gluten free. So I always tried to recreate the effects a pizza oven would give for the best possible outcome. I've found a pizza steel (affiliate link) to be the best option. I've had other pizza steels that were cheaper, but they were never as good as this one so look at it as "you get what you pay for." They're great for mimicking the effects of a pizza oven because they conduct heat 20 times better than a stone would. I'd also be lost without my pizza peel (paddle) (affiliate link) for launching the pizza into the oven.
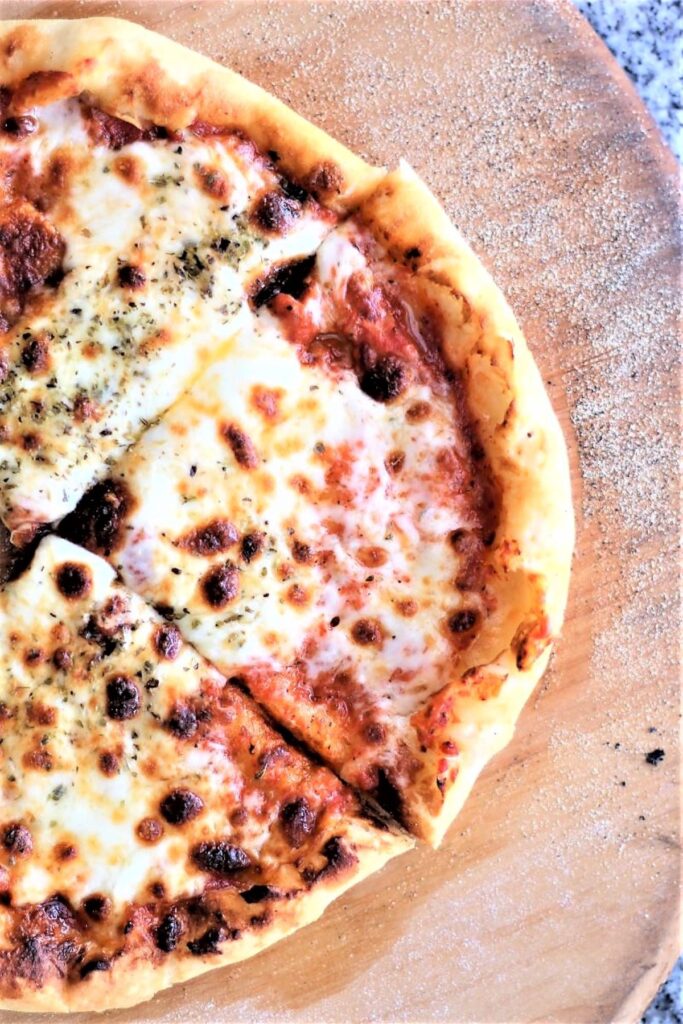
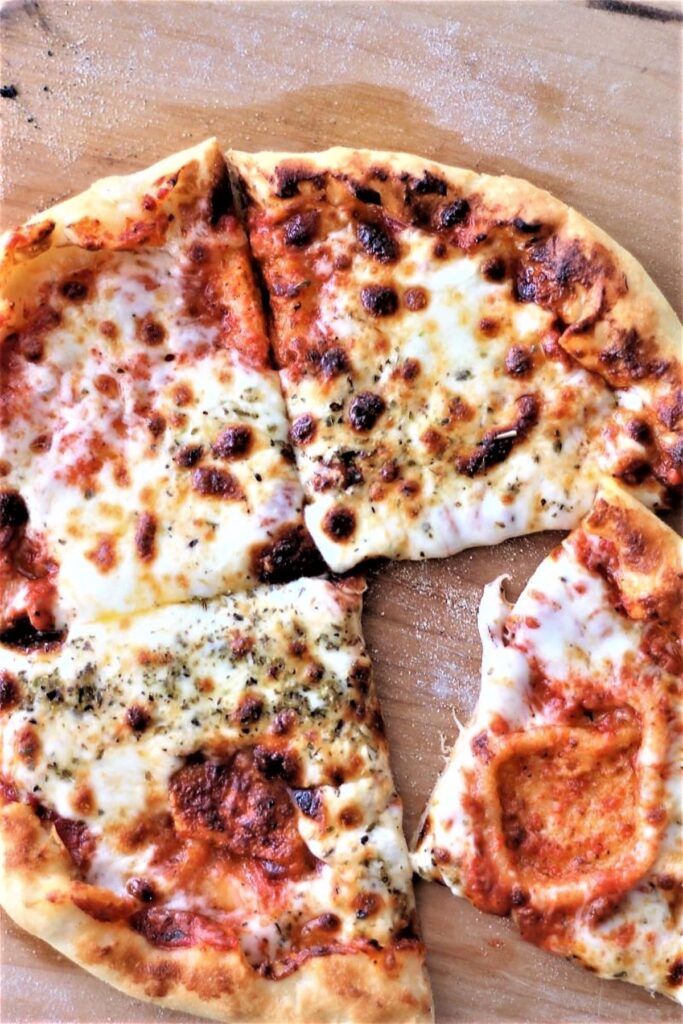
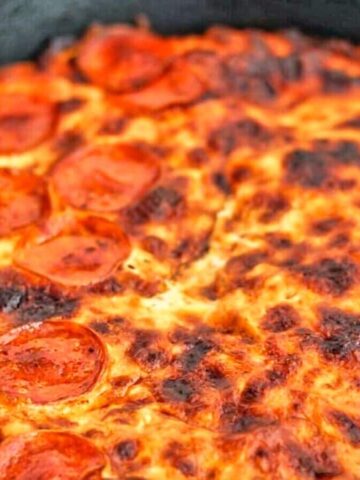
Put your pizza steel on the middle rack of your oven and preheat it to 500 degrees F. Allow it to preheat for at least 30 minutes. When you slide the pizza onto the steel, the crust will bake first at 500 degrees, for about 6-7 minutes. Then you'll switch to broil to melt the toppings until bubbly, creating the best gluten free pizza you'll ever have!!
Gluten Free Pizza FAQs
I get this question a lot and the answer is YES!! You can bake the crusts without any toppings beforehand and load your freezer with them! To do this, bake for only 3-4 minutes without broiling, remove from the oven and allow to cool. Wrap well and freeze. Of note, the crusts without any toppings tend to puff up and get bubbly. I personally love those craters, but if you don't, feel free to prick them with a sharp knife or skewer to allow the air to escape. When ready to make a pizza, pull out a crust from the freezer, load it with toppings, and place it in the oven under the broiler for a few minutes. The crust is already mostly baked, so you don't need to bake it much further and you're just heating up the toppings and melting the cheese until crusty.
YES!!! I love this idea because you can have a hot pizza on the table in minutes with no prep work! Roll out the dough onto parchment, add the toppings, and place the pizza on a flat surface (or baking sheet that will fit in your freezer). Freeze the pizza until solid enough to wrap in plastic wrap and freeze. I like to put mine on a cardboard round, such as a cake round like this one. Preheat your oven to 450 degrees F with your pizza steel (or stone) on the middle rack. Slide the pizza onto the steel (or stone) and bake for about 10 minutes, or until the crust is puffed and the cheese is melted.
Although I highly recommend purchasing a pizza steel, especially if you're going to be making pizzas often (and you will once you taste this pizza crust), you can use a pizza stone. If you don't have a pizza stone, an overturned baking sheet can be used in a pinch, although you may need to bake the pizza for 5 minutes longer (or more).
Get ready for the best gluten free pizza of your life!!! You will be blown away by how much this pizza crust is just like a New York style pizza!
Amazing Gluten Free Pizza Crust
Ingredients
- 3 cups (420 g) Kim's gluten free bread flour blend
- 1½ teaspoon xanthan gum, in addition to what's already in the blend
- 1 tablespoon whole psyllium husks, or 1½ teaspoon psyllium husk powder *THIS IS OPTIONAL, BUT IF YOU DON'T USE PSYLLIUM HUSKS, YOU'LL NEED TO DECREASE THE WATER DOWN TO 1½ CUPS
- 1 tablespoon instant, or fast-acting, yeast
- 1 teaspoon kosher salt
- 1¾ cups (420 ml) water
- 2 tablespoon extra virgin olive oil
- 1 tablespoon honey
- 1 tablespoon corn flour, for sprinkling on pizza peel
Instructions
Mixing the Dough
- In the bowl of a stand mixer fitted with the dough hook, add all the dry ingredients and whisk to combine. Add the water, honey, and olive oil. Turn the mixer on low, using the dough hook, and mix just until combined. When fully incorporated, turn the mixer up to medium high and mix for 5 minutes. It will be sticky and stretchy and seem like a thick batter.
- Scrape the sides of the bowl to mound the dough into one large heap of dough. Cover the bowl with plastic wrap. Place in a warm, draft-free area to proof for 1-2 hours, or until doubled in size.
- Put the dough in the refrigerator overnight or up to 10 days.
Shaping the Dough
- Remove the bowl from the refrigerator and flip it over onto a heavily floured surface. Knead for a few minutes, adding more flour as necessary, until the dough is fairly smooth. It will still be a slightly sticky dough.
- Using a knife or bench scraper, cut the dough into approximately 3-4 pieces that are roughly 6 ounces each.
- Roll out each piece into about a 10-inch pizza (using extra flour as necessary and constantly moving the dough to avoid sticking). Cover the dough with a tea towel or plastic wrap and set aside to rest while you prepare your oven.
- Position your pizza steel (or stone) on the middle rack of your oven and preheat it to 500° F for at least 30 minutes.
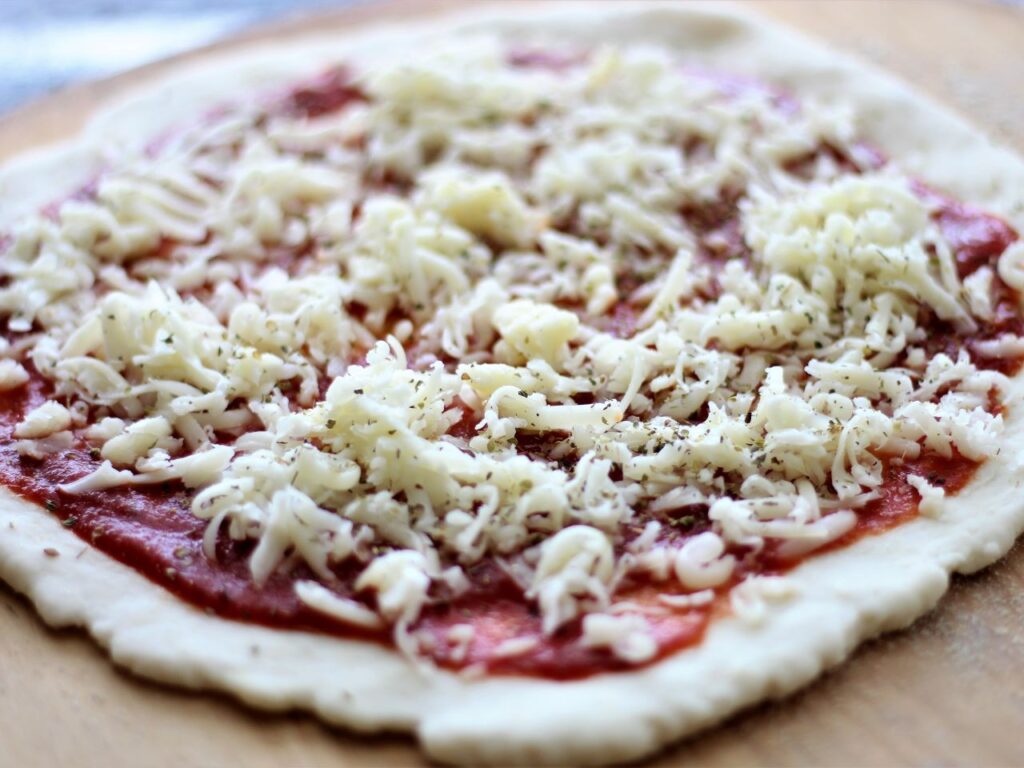
- Remove the plastic wrap from the top of the pizza crusts and sprinkle your pizza paddle (peel) with corn flour or cornmeal to keep it from sticking to the peel. Place dough onto peel and spread with sauce. Sprinkle with cheese and any other toppings of choice. Don't go overboard as you'll weigh the pizza down and it could possibly stick to the peel.
- Slide pizza onto steel (or stone) and bake for about 6-7 minutes, or until the crust appears set. Switch oven to broil (on high) and broil for about 1-2 minutes, checking after one minute, to melt the toppings. Remove carefully with tongs onto pizza peel. Enjoy!!
Notes
- These pizza crusts can be parbaked if you want to stock your freezer with them to make pizzas later. Bake them at 500 degrees F for only a few minutes and cool. Fill a gallon freezer bag with a couple of them, and place in freezer. To bake from frozen, turn broiler on to high and broil until toppings are hot and cheese is melted.
- Whole pizzas can also be made ahead of time. Roll out the dough, add sauce and toppings, and place on baking sheet or any flat surface. Freeze until firm enough to wrap in plastic wrap on a cardboard round (such as a cake round). Freeze for up to two months. When ready to bake, preheat oven to 450 degrees and bake (removing cardboard) on pizza steel or stone set on middle rack until crust has puffed and cheese is melted, about 10-12 minutes.
- For a different flavor and texture experience, instead of mozzarella cheese try shredded white American. It sounds crazy, but it is unbelievably creamy and so yummy!
This recipe was originally posted on September 17, 2018 and has been updated with new information, new photos, and a video.

Dylan Fichera
Hi Kim! My 6 year old was recently diagnosed with celiac disease so I’m doing everything in my power to make all his favorite things taste as good as possible! I’ve been reading and watching everything on your site. My question is the pizza tastes deliciious but I’m having a problem with there being like a gummy layer. The crust is great and crispy but where the sauce and cheese are, it’s like a clear little gummy layer. Am I undercooking it? If so, how can I cook it longer without burning the top? Thank you for all you do!
Kim
Most likely it was just rolled too thick to get baked all the way through. If you're going for a thicker crust, drop the temp down to 450 and bake the pizza for 5-10 more minutes. You'll have to experiment with the time as it really just depends on how thick you're rolling the dough as to how long it will take to bake. Let me know if this helps!!
Julia D
Kim, have you tried replacing some yeast with sourdough starter? I would love to avoid yeast as much as possible.
Karlie Himle
I just want to thank you for putting your recipes out here for us all. My 12 year old son was diagnosed with Celiac a year ago and I've tried many flour recipes and store bough blends, but yours is so much better than what I've tried in the past and my very favorite to use. It works so well and I'm so excited that I found your website so my son can start enjoying more of the things that he likes. Thank you from the bottom of my heart!!
Kim
Awe, you are so sweet! Thank you so much for your kind words 🥰
Bernice Wiger
This is a great recipe! I too have problems with sticky dough. Using Anthony's White Rice flour. I just put my parchment paper on my pizza peel and put a piece of olive oiled cling wrap over the top than press it out. Slid my pizza with the parchment on my cast iron pizza pan and it turned out beautifully. The crust is so nice and chewy that I leave a "rim" on the edge and brush with olive oil and sprinkle garlic salt and dried basil on before baking. Makes a yummy little "garlic bread". Kim has the BEST recipes! Super easy, always yummy, and turn out like the gluten counterparts. Kim needs her own cookbook!
Heather
This is the pizza crust recipe of my dreams. It was so delicious, definitely the closest I've ever come to making a new york pizza at home! I also used your sauce recipe which I'd also highly recommend. I have the Breville pizza oven so cooked the pizza on the new york setting for 10 minutes and it was amazing. I will be sharing this crust recipe with all of my GF friends 🙂
Kim
Oooh, I'm so glad it worked in the Breville! I would love to get either a Breville or an Ooni. Haven't decided which yet, but one of these days I'm gonna splurge 🤗
Dawn DeRosa
I just tried this dough in my Ooni. The top was perfect, but the bottom was a bit pale. I think that next time I will dock the bottom with a fork and place in the Ooni for a few minutes before adding the toppings. Kim thank you so much for all of your amazing recipes. My husband was newly diagnosed, and replacing his favorites has been easy with your mixes and recipes. ❤️
Pat drobnick
Kim,
Do you think this recipe will work in a wood fired pizza oven.
It only cooks for a minute at 900 degrees
Pat
Pat drobnick
The pizza stone is no longer available at your link or anywhere I've looked. Any good runner ups.
Kim
Thank you for alerting me. I updated it with a different one that is available.
Kim
I haven't tried it yet because I don't have a pizza oven (an Ooni has been on my wish list for quite some time), so I can't say for sure, but I would like to think that it would work. If I can ever afford the one I want (the Karu multi-fuel 16" one), I'll be SURE to try it out and post about it! Check the comments of this post as I feel like someone told me they did try it at some point.
Pablo
Thank you very much Kat for the recipe. The pizzas have been very tasty, the best I've had so far. The only detail was that I couldn't roll them out with the rolling pin, because the dough wasn't elastic enough, and it broke apart, so I had to roll it out by hand in a pre-oiled pan. The only substitution I made was the protein for the egg protein. Maybe that was the problem? What would you recommend me to do next time? Maybe reduce the water a bit or add more xanthan gum? Thanks a lot again!. Greetings from Argentina!
Yvonne Barber
Hey I was looking at the bread flour recipe, a lot of the links are defunct. Can you update them with better sources? I really want to try these recipes because you actually use ingredients I can eat!
Kim
Ooooh, thank you so much for letting me know! I'll get started on that. 🙂
Natalie
Hi Kim, my husband is GF and I made this for him today. He took one bite and said "yum, gluten..." he was so shocked to find out it wasn't! Thank you so much for making GF carbs fun again.
Kim
That's awesome, Natalie! So glad he liked it!!!
Billy Kuhn
OK, I have now made this twice. Family LOVES it!!! So, I tried making your pasta. NO ONE can tell it's gluten free!! Can't wait to tackle more of your recipes!!!
Marisa
Amazing recipe! Can you freeze dough balls though and let them thaw on the counter before using?
Kim
Thank you, Marisa! Yes, you can freeze dough balls. Just wrap them in plastic wrap and then put them in a ziploc bag. To thaw, remove them from the plastic wrap and place them in a bowl or on a lightly floured surface, covered loosely, and let them thaw. Thawing times will depend on the temperature of your kitchen. 😊
Pinky
I wondered if you could freeze this dough before shaping and/or baking? If so, would you do it after the first rise by knocking back, dividing into balls and freezing or after at least 24hrs in the fridge after the first proof/rise? Thank you in advance for your thoughts.
Kim
I personally like to freeze it after it's been in the fridge because it's so much easier to shape into balls, but I suppose you could divide it with a scoop or something else before the fridge time.
Kat
Delicious! It was exactly like you described - chewy on the inside and a crispy crust on the outside. The only issue I had was that I found the dough incredibly sticky, even after following the recipe to a T (using your flour blend, weighing out ingredients, psyllium husk, etc.) to the point that I couldn't figure out any way to get it onto the pizza stone fresh. Even after using plenty of flour and corn flour, it was still not a dough that could be moved once it was rolled out.
My solution was just to roll it out onto parchment paper, top with ingredients, then throw it in the freezer until it hardened enough to slide off the sheet and onto the pizza stone. Weird because I've made so many of your recipes and the dough has always been so easy to roll out. Not the end of the world though, I'm definitely still gonna be making it many more times to come!
Kim
I'm so baffled why some of you are having problems with the stickiness of the dough. What white rice flour are you using? Are you refrigerating the dough for the length of time I've suggested in the recipe? I'm trying to get to the bottom of why half the people who make this dough recipe have really sticky dough and half of them do not.
Kat
So strange, I wish I knew the reason too! I'm using the Authentic Foods superfine white rice flour you suggest, and I refrigerated it for over 24h! I usually use psyllium husk powder in your recipes but this was the first time I went out and bought the whole husks to try. Maybe I'll try reducing the water a bit next time and see if that helps!
Pamela price
Kim- my dough raised beautifully . Put in fridge over night. Put it on the bench with a lot of flour and found myself adding more and more and more flour. I was getting worried cuz it was still so sticky I couldn’t touch it . I was able to move it better with my scraper instead of hands. So after about another cup of flour I was able to divide into 3 balls. But even during the process of trying to make a round pizza it still took a lot of flour! I finally got it onto the underside of my cookie sheet with corn meal.
But it stuck there too!
I couldn’t get it to slide onto the hot pan in oven so I had to just put the cookie sheet into the oven. Never thinking it would ever come out as a pizza. But …. It did!!! It was good in spite of ALL the extra flour. You should have seen my kitchen… it looked like a bag of flour blew up in my kitchen!!! So very long story short, it was delish. I have some dough left over and don’t want a pizza . What else can I do with the dough. I know you have some crossover ideas with your recipes so I was wondering if it could be used for something else.???
Kim
That is baffling that it was so sticky. I've had other people say the same thing and I just don't understand why because I've made this too many times to count and it never comes out so sticky that I can't shape it. What rice flour are you using? Are you weighing your ingredients or measuring with cups?
If you can manage to shape it into a loaf, then you can make my artisan bread with the leftover dough.
Pamela price
Kim- you’ve taught me well. I have learned to measure with a scale not cups. I’m very accurate with that. I buy all your listed products . So it’s as much of a mystery to me as you. Bottom line is everything ends up tasting good. Even with the extra flour.
I got your recipe for strawberry short cake and I’m making that for Easter. Is there a video for that ? I love watching you even when I’m baking. I just made your Tiramisu and OMG💕👏. Had to make 3 batches of lady fingers cuz we kept eating them!
Thanks for being there for us.
Adam
Are you able to freeze pizza dough you haven't used?
Kim
Yep! Just wrap it in plastic wrap and put it in a ziptop bag (or sealed container) and freeze for 2-3 months. Thaw in the fridge overnight and proceed with the recipe as instructed.
Ann
Just a comment to say that I thought I'd followed everything to the letter -- only to realize that I'd gotten Bob's Red Mill Potato Flour instead of Potato Starch. I had pulled the stuff up on Amazon, then decided to go to Whole Foods in person two weekends ago. So apparently they were out of potato starch and the bag for potato flour was close to that, and I didn't notice the difference. I reasoned, potato's not a grain anyway, so what difference could there be? But, I think it came out gummier because of that. I'll try again when I have all the right ingredients. Also will order the rice flour because I think the one I had wasn't quite right either. It still came out pretty well, though required more water than the original recipe, and we'll keep trying.
Kim
Oh, no! Potato flour is VERY different from potato starch and that definitely would be the reason for the gumminess. The superfine rice flour also makes the dough so much better in terms of kneading and texture.
Ann
Well, I look forward to round two then! I'm trying low FODMAP, so that also means I'm cutting out lactose, and my beloved garlic and onion, until I figure out what is aggravating me and what isn't. So naturally pizza is a challenge to reproduce. I've read about Expandex tapioca starch elsewhere, but see you don't use it and have only mentioned it in passing. Not a fan? - It really wasn't terrible even with the wrong potato product, but I wanted to post in case anyone else made that same mistake. 🙂
Kim
When I was first diagnosed with celiac, I used someone else's flour blend that contained Expandex and I didn't like the taste or smell of it. Plus, it wasn't always easy to come by (at the time at least). When I created my own bread flour blend, I didn't want to include it because of those reasons and found that it wasn't needed at all.
Ann Carrigan
Kim, thanks for your thoughts and advice. I ordered the right potato starch and superfine rice flour, and made the dough yesterday. While I still haven’t made pizza with it, I pulled out some and baked with the chicken I made last night, and it was so incredibly light and airy. My partner almost didn’t believe it was gluten free. Will have to definitely make some for my friend who has been GF for a good while!