Gluten Free Pan Pizza was originally posted on Feb 7, 2020 and has been updated with new pictures, a new updated video, and plenty of new tips and tricks.
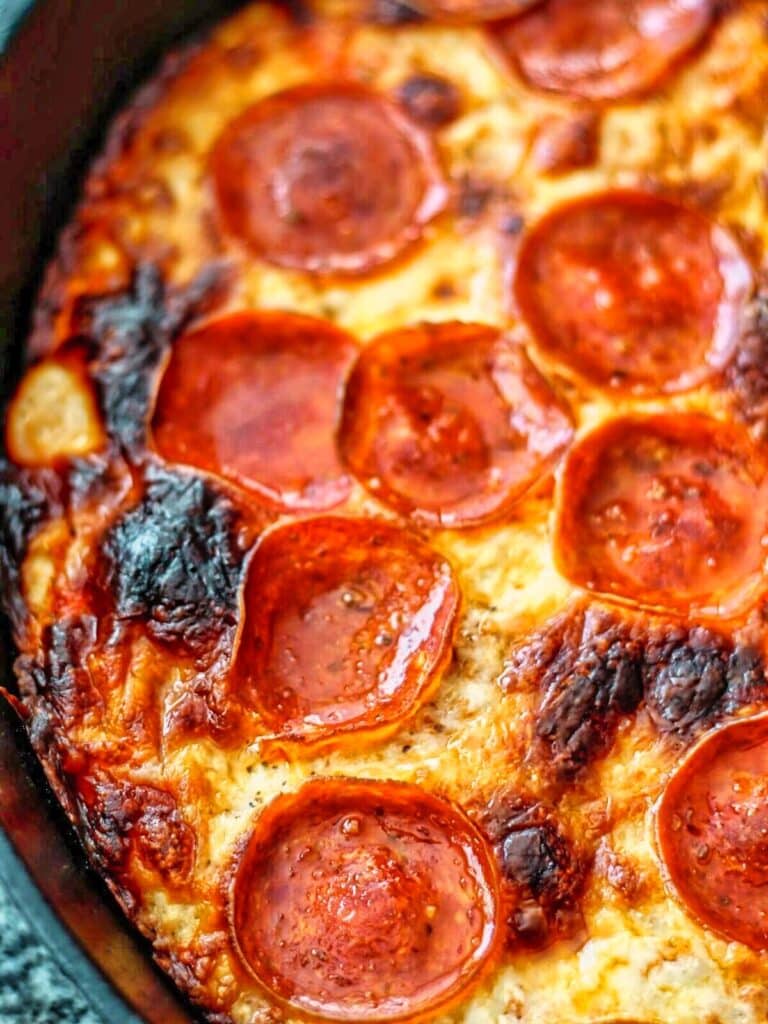
This is hands down the BEST Pizza hut gluten free pan pizza copycat you will ever have! Just like the thick crust almost-fried-on-the-bottom pan pizza we used to get back in our days of delivery!!
Some of the items linked in this post are affiliate links, meaning, at no additional cost to you, if you click through and make a purchase, I will earn a small commission.
Ya'll are not gonna be-LIEVE how good this pizza is!!!! It seriously took me back to a time when I was able to order delivery pizzas from Pizza Hut. Back when everything was so much simpler, especially when I just.didn't.feel.like.cooking.dinner! Am I right?
I heard a while ago that certain Pizza Hut locations were coming out with their own gluten free pizza, but of course my area wasn't part of those. We do have some delivery gluten-free options here, but they all use Udi's gluten-free crust. If you're anything like me, you'd rather eat cardboard than Udi's.
As much as I love to cook and bake, there will always be times when I wish someone would make ME dinner! I hope someday the city I live in will have more gf options, but for now I have to cook all my own meals. At least if they taste like this pizza, I can handle it on my menu on the regular! Plus, there's no worry about cross contamination in my own kitchen.
what you'll need to make this pizza
- Gluten Free Focaccia Bread Dough -- this dough is the perfect base for a Pizza Hut gluten free pan style pizza, just like what we remember.
- Sauce -- you can use store bought, but it's so easy to make your own pizza sauce and it's worlds better than anything you'll find in a can or jar.
- Olive oil -- you can use vegetable oil or canola oil instead, but I really like the flavor that the olive oil imparts.
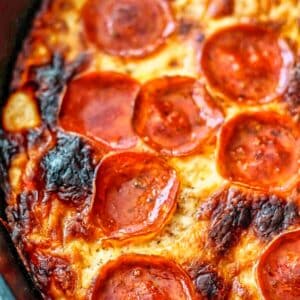
- Gluten-free toppings -- you can go crazy with whatever you normally like on your pizzas. Some ideas include cheese, pepperoni, mushrooms, Italian sausage (or regular pork sausage), grilled chicken, peppers, red onions, roma tomatoes, Jalapeno peppers, bacon, spinach, mediterranean black olives, banana peppers, etc, etc. You can even make this dairy-free and, therefore, vegan by using water and olive oil in the dough and vegan cheese on top.
How To Make Pan Pizza?
When I first made my gluten free focaccia bread and it came out beautifully, I had an immediate hunch that it would also work perfectly as the crust for a pan pizza. And that hunch was spot on!
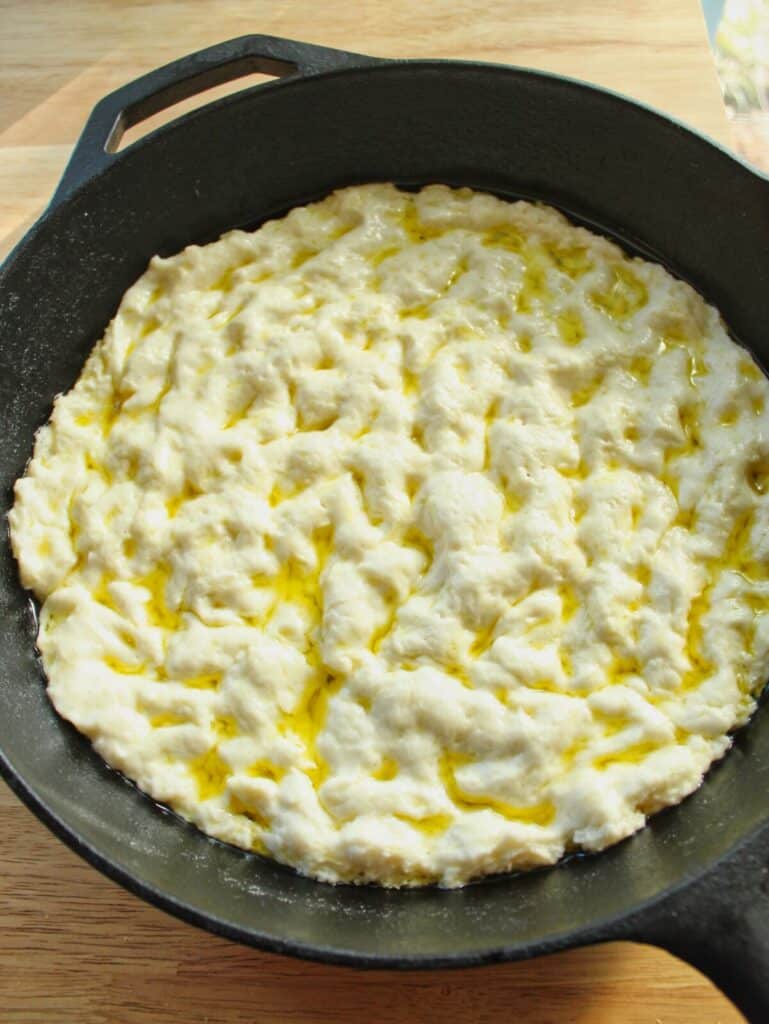
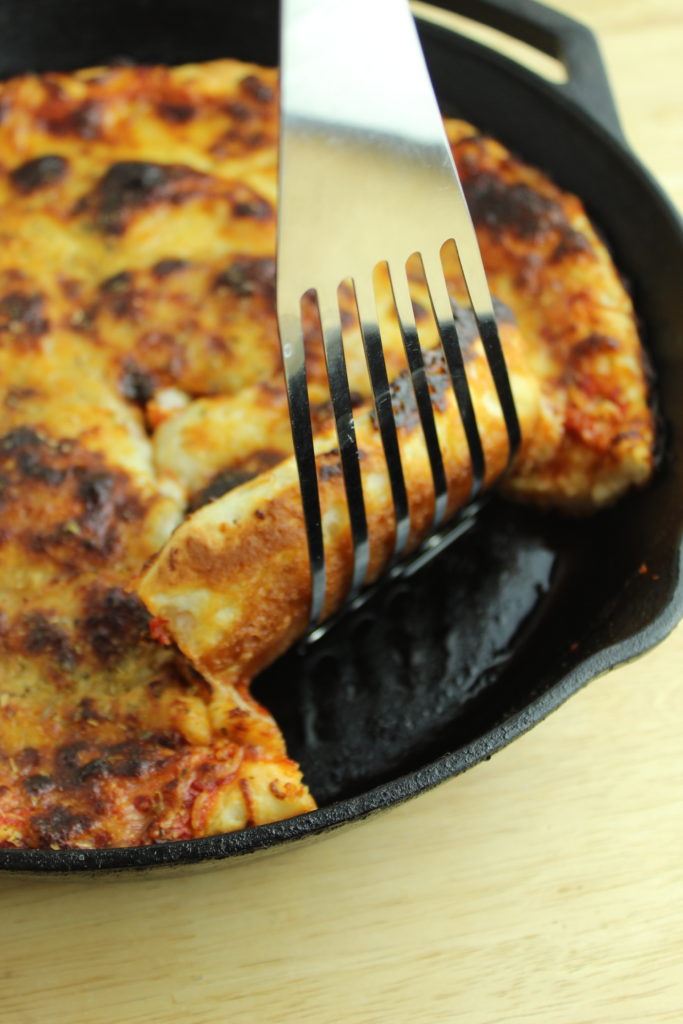
It all begins with the dough. It's so easy to mix up in the morning and be ready to go for dinnertime, or even within 4 hours! Half of the dough will fill a 12-inch cast iron skillet. You can also use the whole recipe and fill two skillets. Or you can use a large baking sheet (17 by 11 inch) and make one large rectangular pizza. Another option is to make mini (personal) pan pizzas! These are great for when you want just enough to feed yourself. For that, you'll need a small 8-inch cast iron skillet (affiliate link) or an 8-inch round cake pan (affiliate link).
- Pour olive oil into a cast iron skillet (affiliate link) (or pan as above) and dump the dough right on top. Add a little more oil on top of the dough and, using your fingers, spread the dough to the edges of the pan. It's fine if there are holes in the dough as they'll fill in when the dough rises and bakes.
- Cover the skillet with a tight-fitting lid or plastic wrap and allow the dough to rise for about 30 minutes. You won't be looking for the dough to double in size, just be slightly puffed.
- While the dough is rising, preheat your oven to 400 degrees F.
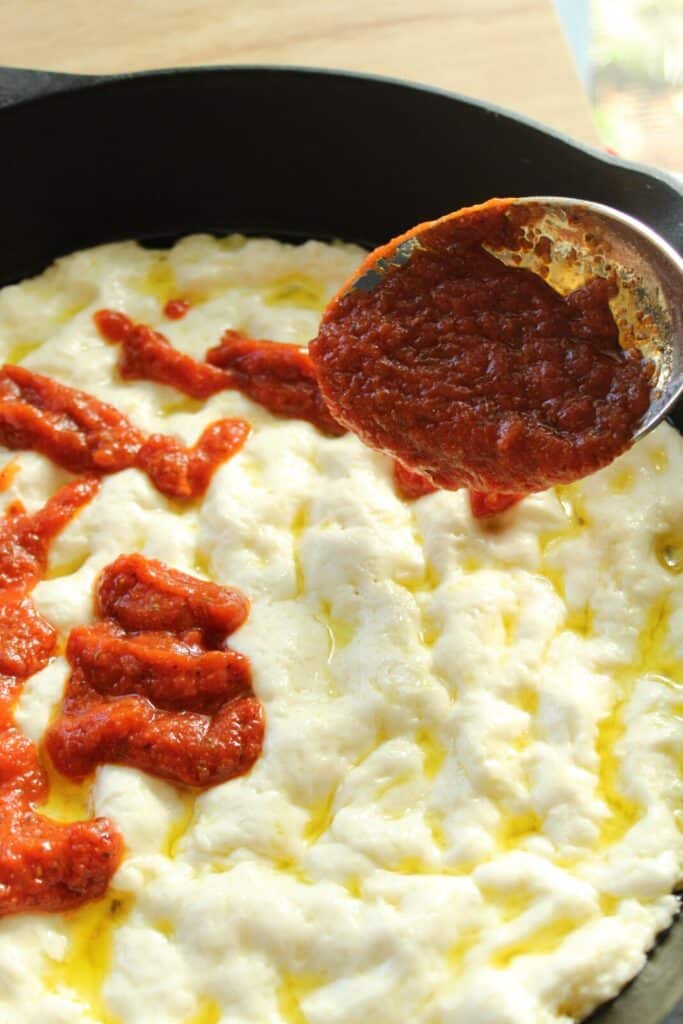
- Carefully add the sauce so you don't deflate the dough (try my Pizza Hut copycat sauce recipe!). If you're using a baking sheet, just add the sauce without heating on the stove.
- Then add the cheese and any other toppings of your choice.
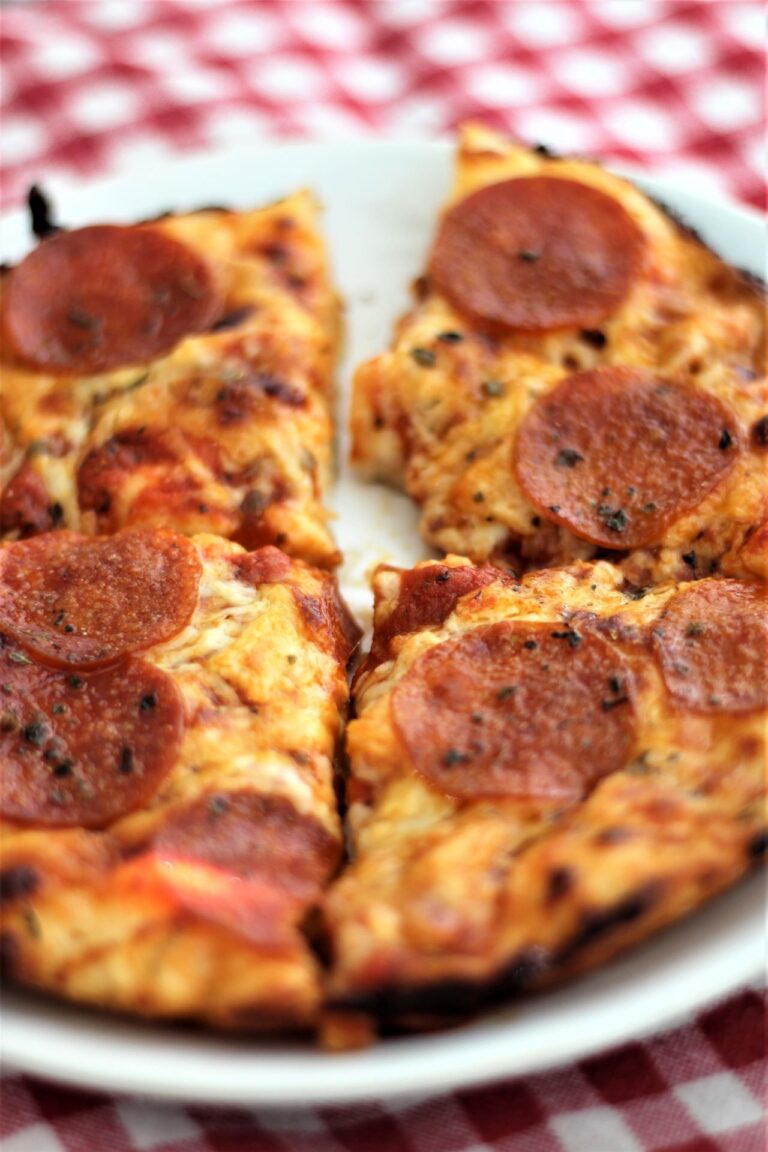
- Bake for about 25-30 minutes, or until the cheese is melted and bubbly.
pan pizza FAQs
Certain participating Pizza Hut restaurants do have a gluten free pizza option made with Udi's gluten free crust. However, as of this date, they do not offer a gluten free pan style pizza.
As the name suggests, pan pizza is made in a pan, but that's not the only difference. Usually pan style pizza is thicker than a regular (New York or hand tossed) pizza and has an almost u0022friedu0022 bottom, making it crunchy on the bottom and soft and bouncy in the middle.
No, there are several common household pans that will work great for making pan style pizza. A cast iron skillet, ¼ sheet pan, round cake pan, or any oven-safe skillet are plenty of options.
more gluten free pizza ideas
Make this pizza tonight for dinner! Your whole family will love it, even the gluten eaters 🙂
Pizza Hut Gluten Free Pan Pizza
Ingredients
- one recipe gluten free focaccia dough (recipe follows)
- ½ cup (60-120ml) olive oil
- copycat Pizza Hut pizza sauce (or your favorite recipe or brand)
- shredded mozzarella cheese or several slices (about ½ pound) white American cheese
- any other toppings of choice
Focaccia Dough
- 3¼ cups (455g) Kim's gluten free BREAD flour blend
- 1 tbsp plus 1 teaspoon (29 g) granulated sugar
- 2 teaspoon kosher salt
- 2 teaspoon instant yeast
- 2½ cups (600ml) whole milk
- 4 tbsp (56g) butter, melted
Instructions
- NOTE: This entire dough recipe makes 2 12-inch pizzas, but if you only want one pizza, you can either halve the dough recipe or store the other half of the dough in the fridge until the next time.
- In a large bowl, weigh bread flour, sugar, salt, and yeast. Whisk to combine. Using a stand mixer with the beater blade or a handheld mixer, turn on low and slowly pour in the milk and butter. Increase speed to medium and beat for 5 minutes.
- Cover the bowl and place in a warm, draft-free area until doubled in volume, about 2 hours. You can use it immediately after rising, or refrigerate the dough for up to 7 days.
- Divide most of the olive oil between the two 12-inch cast iron skillets, 2 ¼ sheet pans (9 by 13 inch), or any oven-safe skillets (or use half the amount for only one pizza). Divide the dough between each skillet and add the rest of the olive oil on top. Using your fingers, gently spread the dough out to the edges of the pans. It's okay if the dough is dimpled from your fingers.
- Cover with a tight-fitting lid or plastic wrap and allow to rise for about 30 minutes while preheating the oven to 400° F. The dough won't look much different, but will be slightly puffy when fully risen.
- Carefully add the sauce and cheese and any other optional toppings. Bake for 25-30 minutes, or until cheese is melted and bubbly. The baking time will depend on your skillet size and your oven, so begin checking at 20 minutes, but it may take as long as 35.
- Allow to cool slightly before cutting and serving.


Ivy Huber
A fantastic recipe. Delicious pizza, one of the best gluten free pizzas I have ever had.
I've tried several of your recipes with good success. Several of your recipes have become a part of our regular meal rotation, including the pizza dough recipe! Thank you for taking the time to create these delicious foods, and for sharing them with us!
Kim
Awe, thanks so much for your kind words! It is my pleasure and I appreciate you following along with me and my gf baking endeavors 🥰
Jennifer Barbier
Omg, Kim, you have no idea the pleasure you brought to my house. My family has been looking for that true pizza feel and, I'm in serious tears from seeing everyone mhmmm the pizza as they eat. I wish I could send you pics of what it looks like. My daughter is celiac and has been missing good pizza. You fulfill her wishes. ❤️❤️
Kim
Awe, I'm so happy for you and your family. I've been there (in tears of joy) when I finally feel I nail a recipe that I've been wanting for so many years to work.
If you happen to have an Instagram account, you can upload your pics to IG and tag me @letthemeatglutenfreecake. I'd love to see them!!
Jesse
Hey there Kim, thanks so much for all the recipes and information you've provided!
I am curious, I see you can put half the dough in a 12-inch cast iron skillet, and to use about a fist full of dough for a personal 8-inch cast iron skillet...If I have a 15-inch cast iron skillet and want to make a large pizza, how much of the dough would you recommend? Is there any other changes you'd recommend for this large of a skillet?
Thanks so much for all you do! You are making my family very happy!
Kim
Hmmm, maybe 3/4 of the dough? That's a tough one to estimate, but I don't think you'd need to change anything else within the recipe.
I'm so glad you and your family are enjoying my recipes 🥰
Pat Drobnick
I can't wait to try this. I just recently found your website Kim on a pop-up. Everything I made has been great. As far as the white American cheese....many years ago I was working a little mom and pop pizza shop. That is all the owner used was Fisher white American cheese in a block and she would shred it... that was my job ...her job was making the crust in the sauce. It is still my all time fav pizza.
Kim
So cool to hear this! May I ask where the pizza shop was? I know in some parts of Pennsylvania they use either American cheese or a combination of American and mozzarella and I just love how creamy the cheese gets on top!!
Lynn
This was a dead ringer for Pizza Hut pizza. My family loved it. The crust did not get soggy, but I did the stove trick. Also it didn’t stick the second time—I used beef tallow instead of olive oil to grease the skillet. It didn’t stick much even with the olive oil! Thank you for devising the wonderful recipe!
Brad Johnson
We tried this twice today.
Both times we couldn’t get it to not be soggy.
It could be the toppings. Here in Australia we like a good amount of toppings like ham, salami, capsicum, mushrooms, prawns. Maybe that prevented it from cooking properly.
The second time we even baked it first for at least 15 minutes with no toppings. That looked promising because it rose, well likely inflated.
So I’m wondering a couple of things specific to what we did that we need to change.
1. Make sure the dough is up to room temp before we start. Cold dough out of the fridge sitting in a cold skillet for proofing.
2. Maybe your finger method when you spread the dough where you leave holes through to the pan provides lots of vertical surface area for the dough to cook. Maybe this is actually a key part of the method for it not to be soggy in the middle.
We will try again!
Pamela Price
Kim- made the English muffin dough like you suggest.
But I have to ask, why that dough instead of your regular pizza dough for this PAN pizza?
It is a sweeter dough. Can it be made with your regular pizza recipe and perhaps adding sour starter?
It can sure fool a gluten eating person ( my husband )
And for me much easier to make than using pizza peels and steels🥴
Kim
The English muffin dough offers more pockets of air that I thought would be more similar to that of a pan pizza. But you could certainly try to use the regular pizza dough to make a pan pizza. I'm sure you'd still get great results 😊
Dennis Jordan
Your recipes are great, but my pet peeve is the misspelling of y'all. It is never, ever ya'll.
Joan
This is a nonsense comment
Annie
This doesn't work for me. I followed the instructions thoroughly but I can't get the pizza to not stick to the bottom of the cast iron skillet. The pizza was doughy from inside & I had to scrape the crust off of my pan afterwards. Any suggestions?
Stacy Sheffer
I have a 10 inch cast iron skillet. I know you said that 1/2 English muffin dough recipe is good for 12 inch skillet. Can I put all dough in 10 inch skillet instead of 12 inch or if not all how many ounces should I use for 10 inch skillet? I could save little left over dough for something else. Just don’t want to mess it up.
Kim
A 10 inch skillet should work fine with half the dough, but might need a little extra time in the oven. I would start at 5 minutes more and check it at that point for doneness. If not done, add another 5 and check again.
Jenny Grabert
I made the dough last night and baked it today. The only difference I made to the flour was using hemp protein instead of whey. I made it a Detroit style pizza with a steel pizza pan. It turned out ALMOST perfect! I think I will parbake the crust for about 15 minutes before I put the toppings on, because it turned out a tiny bit doughy for me. The cheese was starting to burn so I didn't want to bake it any longer. My last Detroit style pizza recipe had me parbake it so it's not a surprise. It was still super tasty though and the dough texture was better than the last recipe I used! Thanks for the great recipe again Kim!
Kim
Thanks for the info, Jenny!! I'm going to try it very soon 🙂
Denel Wardell
I made this with the English Muffin recipe you used to have for it. It was awesome. But I'm going to try the par-baking so I can pre-make some and freeze for future use. Do you have a suggested way to do it for freezing instead?
Btw, why did you change it from using English Muffin dough to the foccassia?
Kim
The English muffin and focaccia dough are actually one and the same, so I just interposed the two. I'm working on all of my old posts to include the recipe for the dough so viewers don't have to click on another link to get to the actual dough recipe, if that makes sense.
Meg Mayo
Marone’s - the one in Ardmore? If so, I loved their pizza in my pre GF days. I was under the impression that they used only provolone cheese on their pizzas and that’s how I typically e mine. I might have to try American cheese!
Kim
No, this one is in Scranton and it's spelled Maroni's with an "I". The white American is unbelievable and you should definitely try it!
Deb Horns
The recipe for English Muffin Bread says it needs to be refrigerated for at least 4 hours. Do I need to put my dough for pizza in the frig for four hours too?
Kim
No, it's not necessary. Although they're the same dough, they are used for different applications so the pizza dough doesn't need to be refrigerated at all 🙂
CHERYL A SMITH
Kim - Is this dough able to be fried like you would make a "fried dough"? If not, which of your gluten free doughs do you recommend for that? My daughter-in-law found out that she needs to be gluten free about a year ago and the ONLY recipes I have had success with are yours. I trust that if I follow them carefully the end result with be gobbled up by everyone!
Kim
Awe, thank you so much, Cheryl!!! I appreciate your kind words 😍😍😍
I honestly have never tried this dough fried (or any of my doughs). Are you looking for something like Indian or Navajo fry bread? I would think maybe my tortillas would work better for that. I will have to put fry bread on my list of things to attempt to make as it's something I haven't had in years, but fondly remember it.
Connie
Can you freeze this dough for later?
Kim
I've honestly never tried this particular dough because it's a very loose dough, but you could try it. The others freeze very well, so it should work just the same. I would put it in a container with a tight fitting lid.