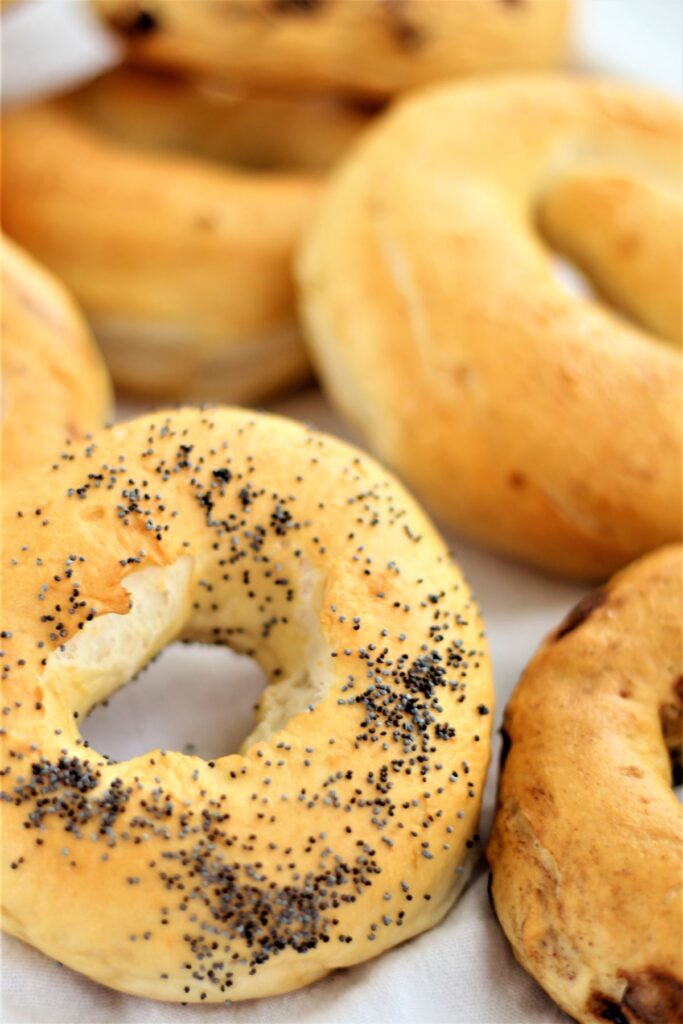
Missing the taste and texture of a REAL bagel? These homemade gluten free bagels have just the right chew you've been looking, so you won't believe they're gluten free!!
Living in Virginia Beach since I was 5, I can't say that I've had a true New York bagel as I've never actually been to New York City. It's sad I know, but one day I'll get there and maybe enjoy a gluten free bagel. I've heard there are some fantastic gluten free bakeries up there.
Until then, these homemade gluten free bagels will just have to fill the void, but I'm totally okay with that. They have the wonderful chew that I remember from a great bagel.
Ingredients Needed to Make Gluten Free Bagels
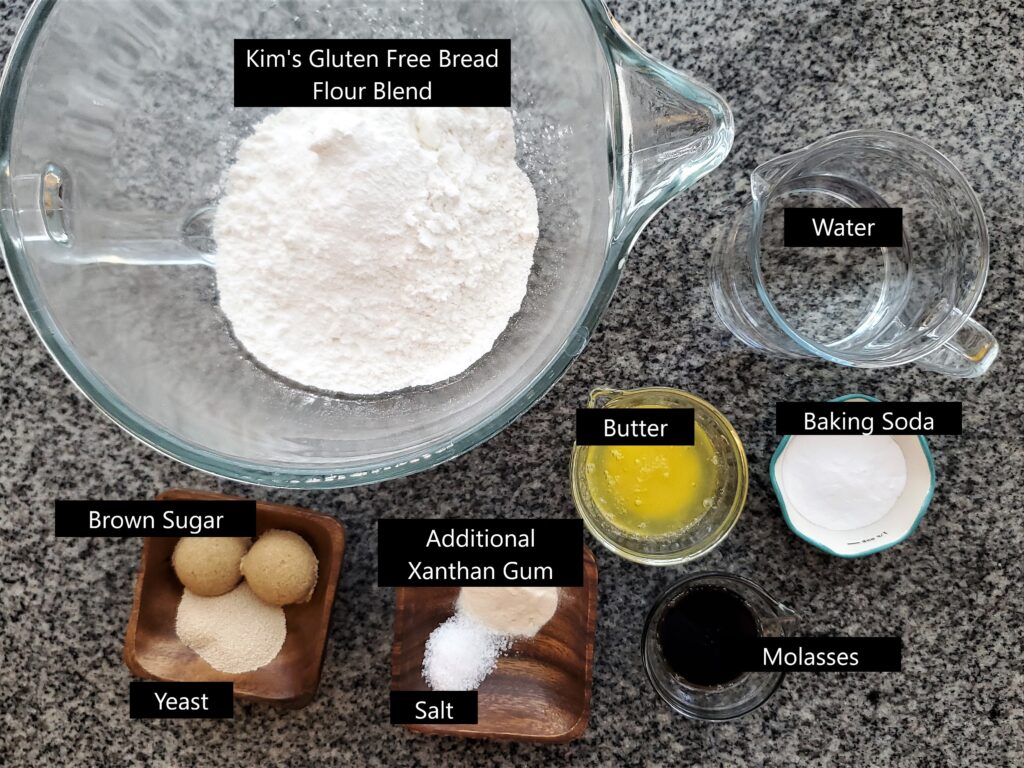
- Kim's gluten free bread flour blend--there really is no substitute for my bread flour blend.
- Butter--you can substitute with a non-dairy (vegan) butter for dairy free. You may also be able to sub with canola or vegetable oil, but you may need to add slightly more flour.
- Baking soda and molasses--for the boiling water.
- Egg--this is only for an egg wash, but you can skip it if you need to be egg free. To add toppings without an egg wash, simply remove the bagels from the boiling water and immediately dip in or sprinkle on the toppings.
How to Shape the Bagels
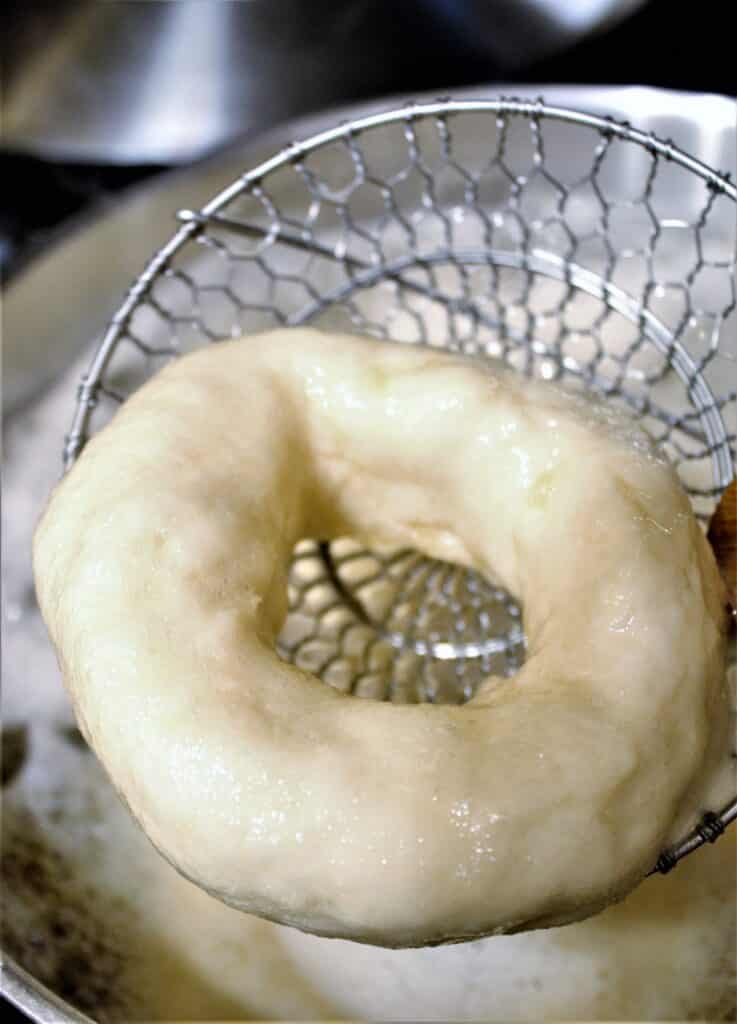
Before shaping, put a large Dutch oven (or a wide pot) filled with water on the stove to begin boiling.
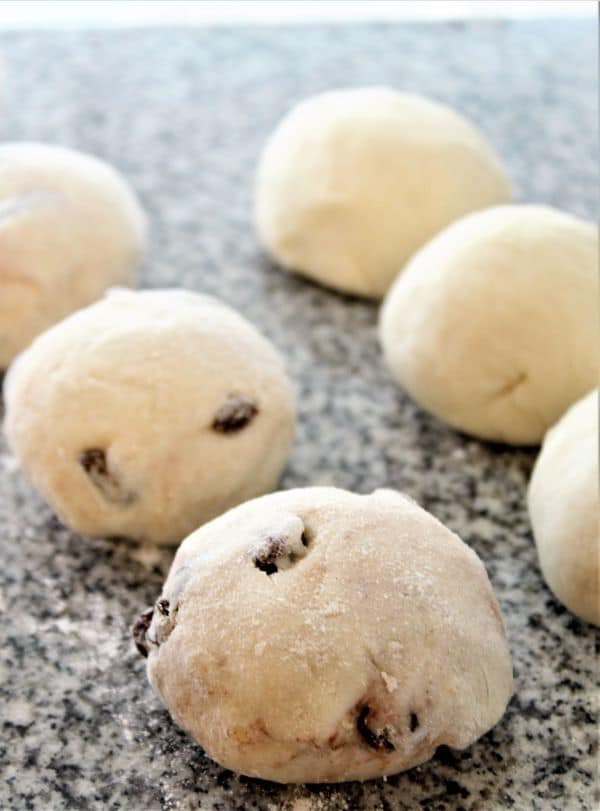
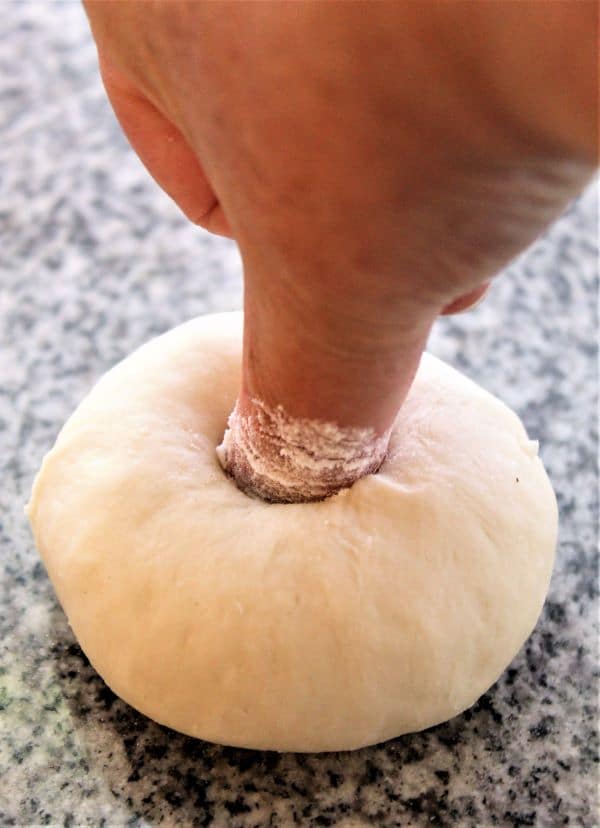
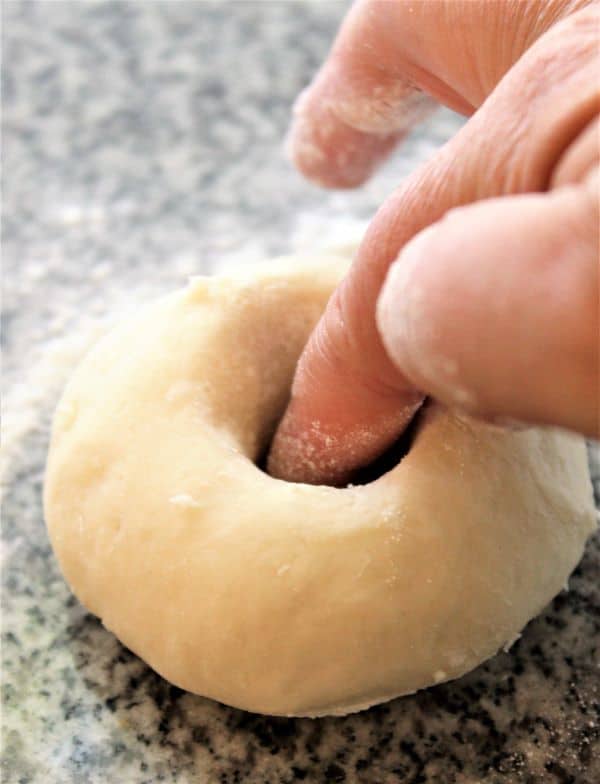
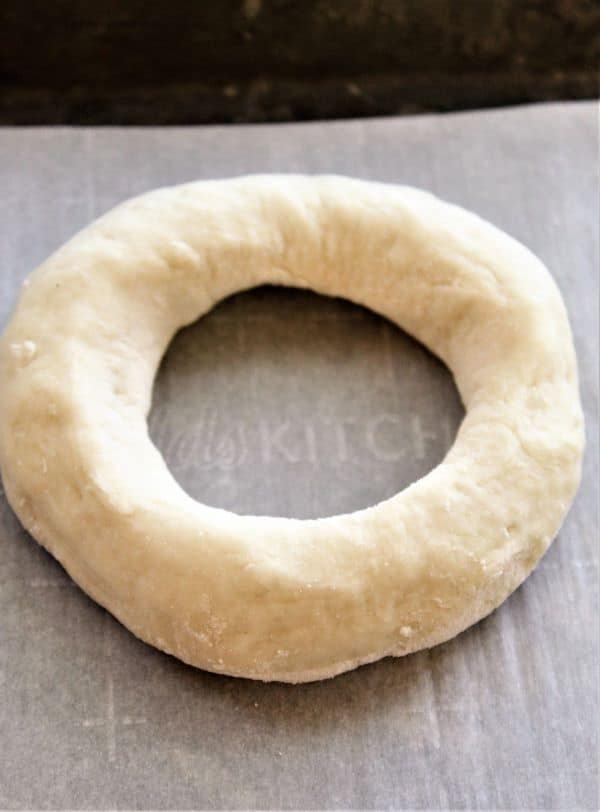
Knead the dough until smooth. This dough kneads really well and isn't sticky at all (thanks to the lower hydration), so you shouldn't need much (or any) extra bench flour. Divide the dough into 9 equal-sized pieces (about 3-3 ½ ounces each) and roll each into a ball. Dip your thumb into a little bit of extra gluten free flour blend and poke it through the center of each ball. Then begin spinning it on the surface to widen the hole (I use my pointer (index) finger to do this). Making the hole larger works the best because the hole will shrink as the bagel is boiled and baked. Place each bagel on a parchment-lined baking sheet and cover with plastic wrap until water bath is ready.
Poaching Bagels Before Baking
Once the water has come to a boil, add the baking soda and molasses and stir briefly to combine. Carefully lower a few bagels at a time into the water bath (I use this spider/strainer). Boil for about 20-30 seconds on each side and then remove to the baking sheet.
Flavor Suggestions
- Plain--for plain bagels, you don't need to add anything, but you could brush an egg wash on the bagels before baking (optional)
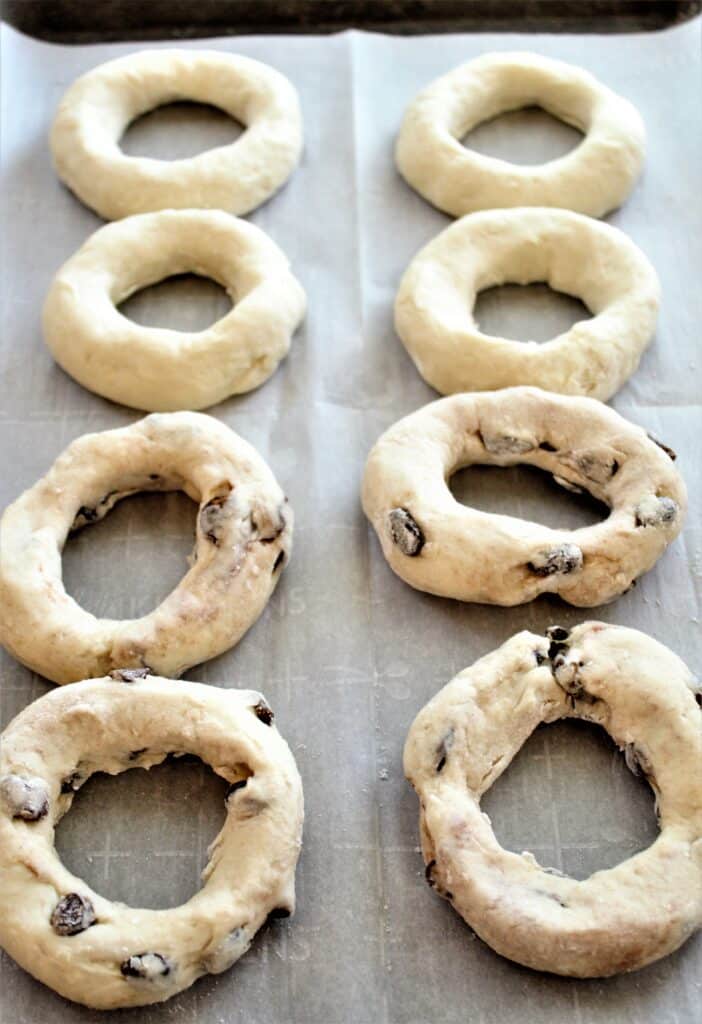
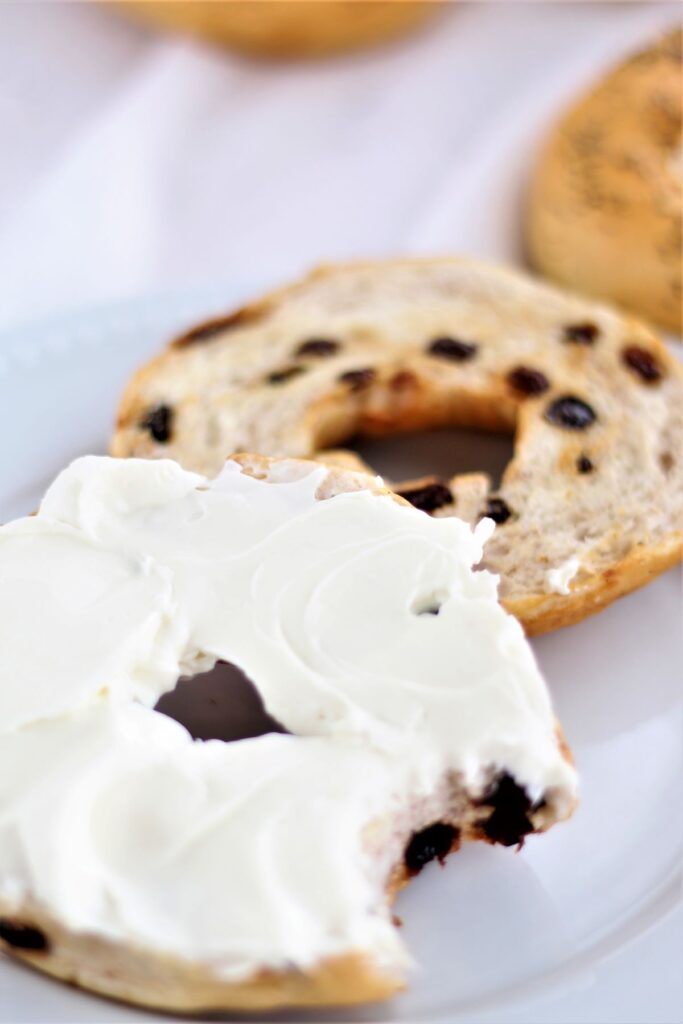
- Cinnamon raisin--add ½ cup raisins and 2 teaspoon cinnamon to dough before rising
- Everything--sprinkle with everything bagel seasoning as soon as you remove the bagels from the water bath. Alternatively, you can dip the bagels in a shallow bowl filled with everything bagel seasoning
- Blueberry--add ½ cup dried blueberries to dough before rising
- Sesame--sprinkle or dip the bagels in sesame seeds right after they come out of the water.
Gluten Free Bagel FAQs
Bagels will keep at room temperature in a large ziptop bag for a few days. If storing longer, they can be frozen for a few months. Cut bagels in half before wrapping individually in plastic wrap and placing in a large ziptop freezer bag. This makes it easier to pull them apart for toasting without thawing. Otherwise, thaw whole bagels at room temperature while still wrapped.
Yes, I do it all the time! Divide dough into however many sections you're making flavors. Reduce the amount of add-ins or toppings to compensate for how many flavors you're making.
Get rolling and bake up a little slice of New York with homemade gluten free bagels!

Homemade Gluten Free Bagels
Ingredients
Bagel Dough
- 3 cups (420g) Kim's gluten free bread flour blend
- 1½ teaspoon xanthan gum (in addition to what's already in the blend)
- 1 teaspoon kosher salt
- 2½ tsp (8g) instant yeast
- 1¼ cups (300ml) water
- 2 tbsp (25g) brown sugar
- 2 tbsp (28g) butter, melted
Boiling Solution
- 2 tablespoon baking soda
- 1 tablespoon molasses
- toppings or add-ins of choice (see above in post for suggestions)
Instructions
- Place dough ingredients in bowl of a stand mixer (or handheld mixer) in the order in which they are listed. Using the dough hook, knead the dough for 5 minutes on medium speed. Cover and let dough proof in a warm draft-free area until puffed, but not doubled in size (1-2 hours). Refrigerate for at least 2-3 hours. (This dough is a stiffer dough and doesn't require as much refrigeration time as most of my doughs).
- Knead dough on lightly floured surface, adding more gluten free bread flour as necessary to avoid sticking. Divide dough into 9 equal pieces (about 3-3½ ounces each). Roll into smooth balls.
- With thumb dipped in gluten free flour, make hole in center of ball. Using thumb or index finger dipped in gluten free flour, place finger on surface and twirl bagel around in circle to increase size of hole in the middle. I like to make a large enough hole (about 1½-2 inches in diameter) as this hole will fill in considerably when bagels are boiled (poached) and baked.
- Place on parchment-lined baking sheet. Finish shaping the rest of the bagels and add them to the baking sheet. Cover bagels with plastic wrap and set aside.
- Preheat oven to 450°F.
- When water has come to a boil, add molasses and baking soda and gently stir to combine (you can use the spider for this). Lower about 3 bagels at a time (depending on size of pot) into boiling water and "poach" for 20-30 seconds before carefully flipping over and poaching for another 20-30 seconds. Remove from the water with spider and place back on parchment-lined baking sheet. If topping, add toppings now while bagels are still damp from the water.
- Bake for 12-15 minutes and then check. If they are puffed up considerably and well browned, remove from the oven. If they aren't, give it another 5 minutes and check again.
- Remove from the oven and allow to cool on wire rack before cutting and serving.


Anna Cameron
These bagels were a hit for my husband who has celiac! I made them 4 days ago and I'm already making another batch as I write this. He was so tired of hard frozen crumbling gluten free bread and with your recipes he no longer has to settle. Thanks Kim!
Kim
So glad you and your husband enjoyed them!!!
Heather Giove
Will any gluten free flour work
Naomi Litchfield
Thank you so much for all your hard work in developing these amazing GF recipes and flour blends! I came across your website within the last year and it has been such a blessing to find GF recipes that actually turn out delicious! My husband has been GF for years and was finally diagnosed with celiac last summer...I'm sure you understand the challenges. I'm just so pumped to be able to make GF baked goods that taste so good! I love to bake and it's so satisfying to get great results. I just made your bagels....they're beautiful! I've had great success with your cinnamon rolls and pie crust as well. I've also been baking the potato bread and it works well for toast and sandwiches. We live in Thailand and the GF options are even less here than in the US so I'm so glad I can make tasty food at home for my hubby. And thankfully I can find all the ingredients to make your flour blends....best GF flour that I've used yet!
Kim
Awe, that is fabulous!!! I'm so thrilled you've been having success baking my recipes 🥰
Leah
Loving this recipe, only issue was after boiling and baking my bagels turned wrinkly, any idea what would make this happen?
Kim
You might have boiled them a little too long.
Katie
Hi! My boyfriend has celiac and I work in a bakery so I’m always trying new recipes for him. Our house is 100 percent gluten free for his safety. I’m absolutely loving all of your recipes and he and I are both obsessed with everything I’ve been making. I reduced the water slightly and soaked some psyllium husks and added to the recipe. They’re unreal! Just like regular bagels. Everyone that has tried them can’t believe they’re gf! I just made a batch of egg bagels by reducing the water and adding egg yolks…WOW! Sooo good! Thank you for all of the amazing recipes!
Kim
Awesome! Thanks for trying my recipes and I appreciate your feedback. I created this recipe before I discovered psyllium husks, so I may go back and update the recipe eventually to add psyllium husks.
Amanda
Hi Kim!
I have a question--I am in the middle of making these bagels but I made the dough yesterday and stored it in the fridge overnight to make them this morning. First, I felt like the dough didn't rise as much as normal when I make things with your bread flour mix, but after I put them in the fridge, they deflated even more! I covered with plastic wrap both times, I let them rise for over 2 hours, continually checking on it, and I checked back on the ingredients and the steps and it looks like I did everything right. Is this dough not supposed to rise as much? (It was definitely a little sticky when I shaped the bagels also). I'm just not sure what I did wrong?
Thanks!
Kim
It definitely won't rise quite as much as my other doughs. And the bulk dough will also fall when it goes in the fridge. But you shouldn't have that much of a problem getting them to rise after that, so I'm not sure. Is your proofing area colder than usual? At this time of year, I find I have to turn my oven on to the lowest setting for a few minutes and then turn it off and put my bread in the turned off oven to rise. Also, this is not a very sticky dough so could you have measured your liquid incorrectly? Did you make any substitutions within the flour blend itself?
Sue
Hi Amanda, I had the same problem with the dough not stiff enough. In Kim's video she uses 300 ml of water and no psyllium husk. In the printed recipe kim says to use the pretzel recipe with the milk/water total 360 ml with psyllium husk . I found the pretzel recipe still too loose so I decreased the liquid to 200 ml milk and 100 water ml and then if too stiff added more liquid if needed. Dough turned out much better.
Aubrey
Just made these with rosemary and flaky salt... oh. my. god. I'll never make another gluten-free bagel besides this one. Your flour blend is legendary.
Kim
That's awesome, Aubrey! Thank you so much 😍
Mark Frankel
When I make sourdough bagels I use a lye bath, which I think is critical for bagels or pretzels. I have not tried it with gluten free bagels as I am not sure how they would stand up to it. Have you tried lye instead of the molasses and baking powder?
Kim
I haven't tried lye because I feel the molasses and baking soda do a great job, and I'd prefer not to mess with lye personally, especially when molasses and baking soda are so readily available. I've seen many others use lye, however, so if you feel comfortable with it, I assume it would work okay.
Antoinette
Hi, Kim. First, I'd like to say thank you for all the work you put into these recipes. I've never made one of yours that didn't work or wasn't great. Currently, i am working on these bagels right now. Somehow after the water bath they all came out lumpy and knobbly. Any ideas as to what would cause that?
Kim
Awe, it's my pleasure! Thank you so much 😍
It's possible they were boiled a little too long, but it's hard to tell without being there. Another possibility is overproofing or underproofing or even not kneading long enough to remove any large air pockets in the dough.
Cheryl Smith
Every time I make these, I marvel at how much they are exactly like regular bagels. The texture and flavor are perfect. I wish I could post a picture for you to see. Absolutely amazing recipe. Thank you so much Kim!
Kim
Awe, thank you so much for your kind words, Cheryl! If you're on Instagram, I'd love for you to post a pic and tag @letthemeatglutenfreecake so I can see 😍
Sheila
Kim, what temperature is best for the warm water with the fast rising yeast? The first time I made these the rise time was just about an hour. Unfortunately I can’t remember what temperature I used for the warm water. This time I’m at the 2 hour mark and the dough isn’t doing nearly as well. This time I used 115 degree water.
Kim
I never heat up my water. I just use it straight from the tap. It's not necessary when using instant yeast. I would suggest, if it's taking longer to rise, turn your oven on to the lowest it will go, heat it up for a few minutes, and then turn it off and place the dough inside. I find that in the winter months, all of my yeast breads take much longer to rise because my house is so cold. Yesterday I was proofing dough in the oven and it took over 3 hours and I had to restart the oven about 3 times! So if it's cold in your area, that's probably what's happening.
Sheila
Thank you. I had it in a proofer at 85 degrees which was the same temp as the
Last time. It was the only thing I could think of that was different since I was still on the same batch of your awesome bread flour! They still turned out wonderful and taste great even tho it took so much longer and they didn’t seem to rise as much. Thank you so much for all your recipes. Each one we’ve tried has been delicious. I’m so glad my friend introduced me to your website!
Michele Rogers
I wish I could post a pic....but these were a dream come true. I made one batch just to see how they turned out. Since then, I've made plain, cinn raisin, asiago, cinnamon crunch, everything and blueberry. They were all perfectly chewy, like a real bagel. My non-celiac husband actually likes them better than Panera. My celiac daughter finally had her first bagel and is now addicted. This recipe is a god send!
Kim
Oh wow, Michele!! I'm so happy for your daughter to finally taste a great bagel! All of your flavors sound absolutely delicious, too! I miss Panera's cinnamon crunch the most. How did you do it?
Beverly Jones
Cinnamon Crunch bagels at Panera spread with hazelnut cream cheese were my favorite until I had to go GF
Please share your recipe for the Cinnamon Crunch topping
Becky
I am a Long Island, NY native, and these are just like eating the real thing!! I tried making another recipe 1st, created by another LI born & raised creator, and they do no even hold a torch to these. Even my husband, who is not GF, ate 2 today after they finished baking! Thank you so much for all of your hard work and amazing recipes, it has been really life changing! 😀 <3
Kim
Awe, that's so awesome, Becky!!! Thank you so much for your kind words 🙂
DANAE HEYWOOD
Kim, this is an outstanding recipe. I tried another g/f bagel recipe from a g/f cookbook from another blogger. The bagels were flat and dense and not like bagels at all. These are the. Best. Bagels. Ever. I hail from NJ and we're used to chewy bagels. These are better than any bagel shop's non g/f bagel. My husband was almost in tears! Thank you so much!
Kim
Awe, you are so welcome!!!!!! Thank YOU for the wonderful comment! I'm so glad you and your husband liked them 😊😊😊
Leah Kawczak
My 2yr old and I are both gluten free. I just made this dough as bagels and pretzel bites this morning for us. I’m obsessed! Your bread flour mix has been nothing but amazing in everything I have tried. I’ve even pulled other bread recipes I’ve found and use your bread flour mix instead of the one that’s listed to make those recipes.
Kim
Aww, that's wonderful!! I'm so happy to hear this, and this is what I hope for everyone (that eventually we can all take any bread recipes and convert them to gluten free easily). I must make pretzel bites soon, too 🙂
Patty Hudson
In the Portland, Oregon area, we're not dry like Denver or the desert, but we certainly never have the humidity of the southeast. I'll plan to add a bit more liquid if my doughs look dry. This morning I'm heading to the store for raisins for biscuits. I'll let you know the outcome.
Kim
Oh, you're going to make the cinnamon raisin biscuits? I hope you love them!!!
Patty Hudson
Fabulous! I used to take cookies to my BFF in New York, but she developed an allergy to wheat a few years back, so I’m always looking for interesting things to bake. Next month I’ll take these bagels, along with packaged recipes of your artisan bread, so she can bake herself fresh bread in her tiny Manhattan kitchen. Thank you!
Kim
What a wonderful BFF you are!!! I bet your friend really cherishes your friendship as much as you seem to!
Thanks for trying my recipes 🙂
Patty Hudson
Just wondering: why do you freeze cut bagels? Just for convenience?
Kim
I suppose you don't have to, but I don't always want a whole bagel and want just one half, and it's impossible to cut a frozen bagel.
Patty Hudson
Hi, Kim,
Now I need a little guidance. The first batch I made turned out perfectly. I tried making the dough a second time, and it was so dry/crumbly it wouldn't hold any shape. I made a third batch, making sure to measure out the water more carefully, and though better, the dough was still a little crumbly...certainly not a smooth as yours and as I remember my first batch.
Did I over/undermix? Should I add more water/butter? Should the dough be sticky before the first proof? This second/third batch were dry. Also after the room temperature proof, a dry skin seemed to form and the dry bits wouldn't hold together.
FYI All were made from the same batch of your flour mix and I weighed the flour.
Thanks for any suggestions.
Patty
Kim
Oh, no! I'm so sorry you're having problems today Patty! It's hard not being there to see myself, but I would start going through the ingredients and make sure everything is well mixed first. If it worked once for you, it HAS to be something is missing somewhere. There have been times when a dough I've made 100 times doesn't come out right and I go back through and find out it's that I forgot an ingredient or over or under measured something simple, like water. It's so hard to tell not being there myself and seeing it done step by step.
I'd hate for you to have to do yet another batch of dough,but the dough is definitely not normally dry or crumbly. It's soft, not too sticky, but firm enough to roll into a log for pretzels or a bagel shape. After mixing it in the mixer, it should be very similar to a gluten-filled yeast dough.
I hope this helps, Patty. I know it's got to be frustrating for you.
Kim
Patty Hudson
Going in with an understanding of how the dough should look before proofing, I made new batch with warmed water, plus a little extra because it seemed a little dry. The final dough was still a little drier than I'd hoped, but it was so was much better than attempts 2 and 3. And more importantly, I gave some bagels to a local friend for his new wife and I got the thumbs-up this morning. Yay! And Thanks!
Kim
I'm so glad you had some success this time around! I didn't even think to ask, do you live in a dry environment? Maybe that has something to do with it. It certainly does with gluten-filled baking. I've always lived in a very humid environment (Virginia Beach) so maybe you need more water than I do!!!
DANAE HEYWOOD
Hi Patty,
Anytime my favorite TV cook (Alton Brown) talks about flours, he talks about how they are agriculture products and therefore the cultivation and milling could affect outcome depending on the crop. These variations may be a reason why your flour needed more water. Typically when I bake, I add water, or flour, or something else if it doesn't look or feel right, keeping in the back of my mind that this is true and may impact the final outcome. This usually creates outcomes with which I am pleased.
Pat
I would like to know how long you can store your bread flour recipe and what conditions such as a airtight container at room temperature. I signed up for your newsletter and I have been searching on your website to find how the best way to contact you is and so I decided to ask the question in this venue. Also I never received any notifications that I did sign up for the newsletter. That surprised me. Pat
Kim
I'm so sorry, Pat! I would like to figure out how to change that on my newsletter software. It's me, myself, and I and there's definitely a learning curve when it comes to all this technology.
I store my flour in an airtight container at room temperature. I go through it quite frequently, but I feel that it should last for six months if stored airtight. Here is the container I use: https://amzn.to/3DrbMxf You have to purchase the lid separately: https://amzn.to/3TTmMsT