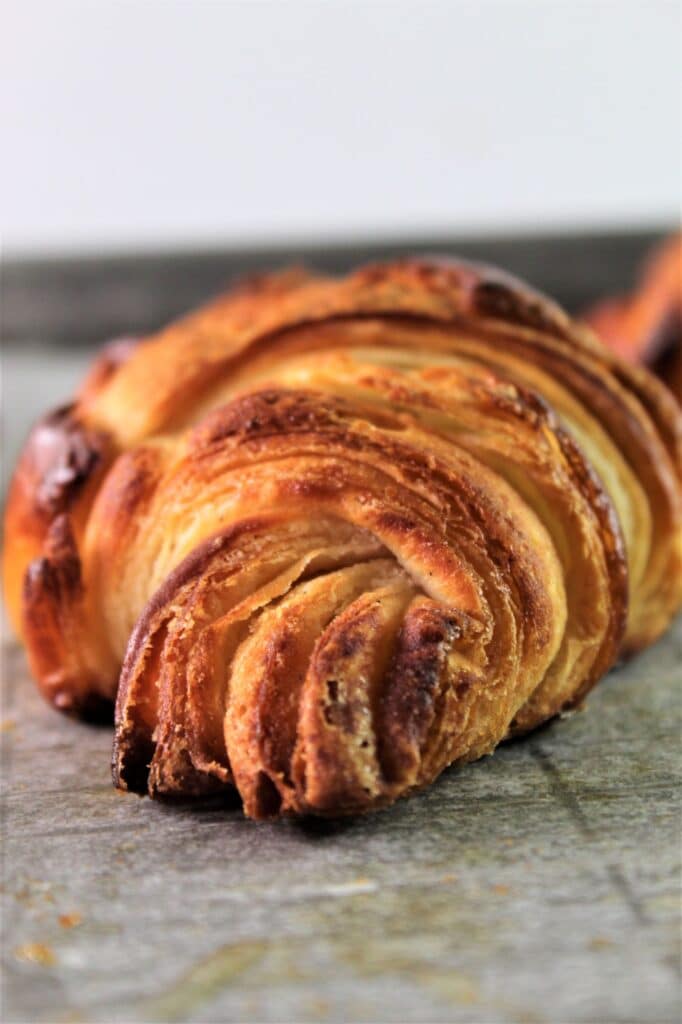
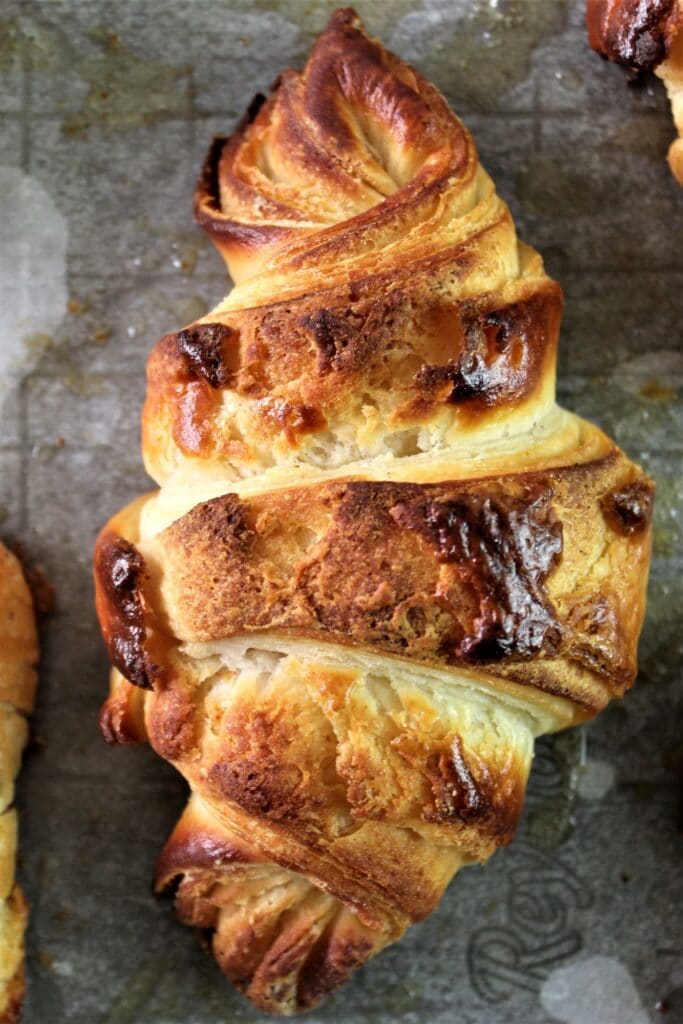
Buttery, flaky, feathery, and light. We didn't think these gluten free croissants could get any better, but yet here they are in all their glory!!
It took me YEARS to create my very first gluten free croissants and they were glorious in their own rite. I really didn't think they could get any better. But I was WRONG!!!! These new and improved gluten free croissants will ROCK YOUR WORLD!
AAAANNNNNNDDDDD, would you believe it if I told you they are EASIER than the original ones???? Well, believe it because not only are they easier, they'll take you less than half the time to make. You'll be eating your new and improved gluten free croissants in no time!
Like all my recipes, I will walk you through making them and they aren't as daunting as you might think. I did all the hard work for you so now you just have to follow through the recipe. You will be rewarded with these PHENOMENAL gluten free croissants made with your own two hands!!!!
When I found out I had celiac, one of the things I knew I would miss the most was croissants. Not that I ate them every day. I hardly ate them every month. But it was nice to be able to make my chopped chicken salad and serve it on a croissant every once in a while.
So I set out to find a really great gluten free croissant. I found Schar's gluten free croissants at my local Whole Foods. While they actually tasted pretty good, they were more like a crescent roll and not a croissant. And they were way too tiny to make a sandwich with and way too expensive to settle for.
How I Reformulated My Gluten Free Croissants to Make Them the Best Ever!!
I consider myself a pretty decent self-taught baker, but I had never made croissants, even in my gluten filled world. After many years of trial and error, I finally developed what I thought to be the be all end all to a gluten free croissant. It was light, flaky, and buttery. How could it get better than that?
I started experimenting with using psyllium husks (affiliate link) in my breads. Not necessarily as a replacement for xanthan gum (I like to pre-mix my gluten free flour blends with the tiny amount of xanthan gum). But as an addition to the recipe.
I found that adding psyllium husks (affiliate link) to some gluten free bread dough helps with the extensibility of the dough itself, even more so than xanthan gum in most cases. Using it in my gluten free hamburger and hot dog buns was revolutionary, so I just HAD to try it in the croissants.
But I also watched Youtuber Bruno Albouze from the Real Deal Cooking Channel and found yet another technique that I knew would work wonders. By putting the dough in the freezer first, before locking in the butter, I was able to create a similar consistency of the dough and butter. This made it easier to roll the butter block into the dough without breakage!
Before Beginning--Please Read This!!!
Please read through these tips before beginning. You must understand that any croissant making, gluten free or not, is not something to jump right into without knowing all the information. There are very skilled gluten bakers who have never made their own croissants or have failed miserably, so don't be surprised if you don't get it right the first time.
- Read through the recipe a couple of times before beginning.
- Make sure you have the time to make them. Plan croissant making as a weekend project, at least at first, until you've made them once.
- I researched and researched to come up with what I believe to be the PERFECT gluten free croissant. Taking into account how gluten free dough works, I had to modify a few things. For instance, there is more sugar in this dough than usual. Please know that in gluten free yeast baking, sometimes up is down and down is up.
- PLEASE use the ingredients I recommend. If you don't, most likely you won't have success and you'll wonder why your croissants aren't all they were cracked up to be. Trust me on this. Veering from the recipe may NOT get you the flaky croissant you long for. That being said, if you yourself want to experiment with ingredient substitutions for dairy free, egg free, etc, be my guest. Just know the only thing I substituted is gluten so I DON'T KNOW if any other substitutions will work.
- Gluten free croissants usually take 1-2 days to make. The rising times are what take up most of the time. Once all the folds and turns have been done, you can keep the dough in the refrigerator for a few days before shaping it into croissants and proofing and baking.
Let's Talk Laminated Dough for Gluten Free Croissants
Croissants are made up of two parts--the beurrage, or butter packet, and the detrempe, or dough.
Laminating is simply layering the butter between the dough. When the butter hits the heat, it creates steam as it's melting and this, along with the yeast in the dough, pushes up the layers. What we're left with is an ethereally light croissant that's flaky on the outside with soft, buttery layers on the inside!
Making the Dough (The Detrempe)
Add the flour, sugar, psyllium husk, salt, yeast, and baking powder to the bowl of a stand mixer. Whisk together before attaching to your stand mixer.
Begin mixing on low with the dough hook and add the butter, milk, and beaten eggs. Let the dough come together and then turn up the speed to medium high and mix for 5 minutes.
When done mixing, use a plastic scraper (like this one) or a flexible spatula to scrape the sides and mound the dough into one cohesive mass in the bowl and cover it with plastic wrap. You can also transfer it to another bowl or a container with a lid.
Place the dough right in the fridge. We're skipping the warm rising for this dough and opting for cold fermentation. Refrigerate the dough overnight. During this time, it will rise some but we're not looking for noticeable rising. We want most of our rising to be at the end when it matters most.
Making the Butter Block (Beurrage)
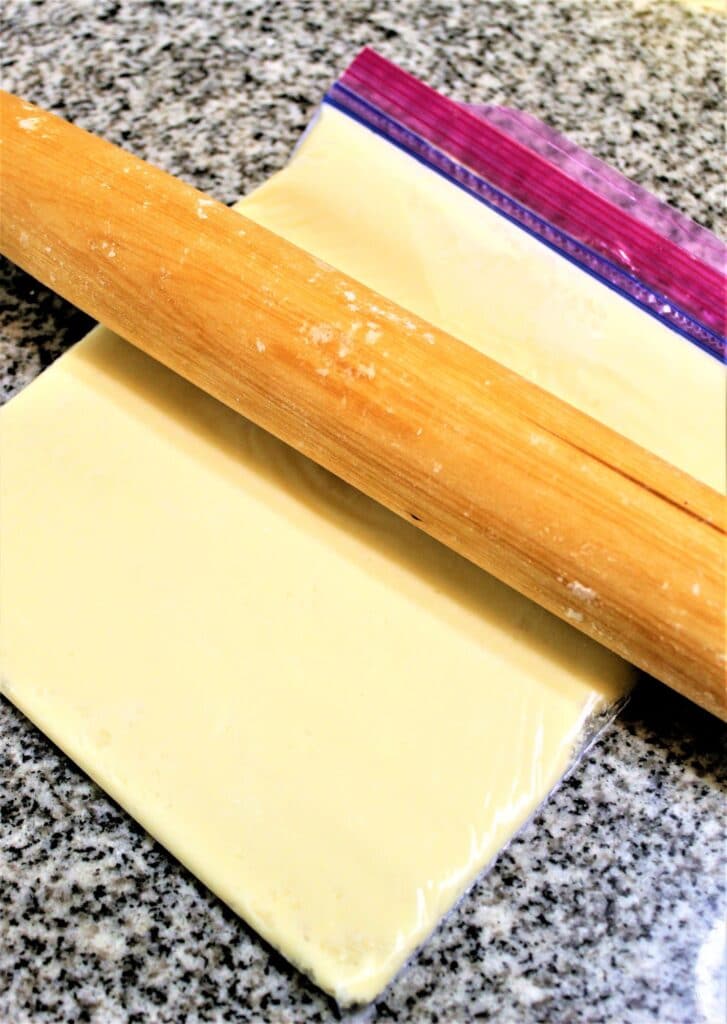
The next morning, mix the butter and two tablespoons of bread flour in a small bowl until smooth and well combined. Scrape it into a quart-sized ziptop baggie and push it into the corners, then take a rolling pin to roll it into an even block. Place the butter block in the refrigerator while you work with the dough. Please note: this butter block is for HALF the dough. If you plan on using all the dough at once, you'll need to double the amount of butter and flour and put it in a gallon bag.
Preparing the Dough
When ready to begin, remove the dough from the fridge. Note--I STRONGLY suggest using only half of the dough at first, until you get a feel for how these croissants are made. Once you are successful, you can then pull out the rest of the dough, make another butter block, and make six more croissants!
Knead the dough on a lightly floured surface until smooth. Roll it into a rectangle that's a little smaller than a ¼ sheet pan (9 by 13 inches). Place it on the sheet pan, cover it with plastic wrap, and put it in the FREEZER for 10 minutes. After the first 10 minutes, flip it over and put it back in the freezer for another 10 minutes.
Locking in the Butter and Making the First Fold
Remove the butter block from the fridge. It should be cold, but not completely solid. A test to make sure it's at the right consistency is to roll it along the edge of your counter. If it bends easily without breaking, it's perfect. If it's too soft, keep it in the fridge for another 10 minutes.
Taking kitchen shears, cut down the sides of the baggie to expose one side of the butter block. Set it aside while you prepare the dough.
Remove the dough from the freezer and roll it out to a rectangle large enough to fit the butter block with about ½-inch of an overhang on either side (the butter block will be facing width wise on the dough--the zip top will be to the right or left, not on top).
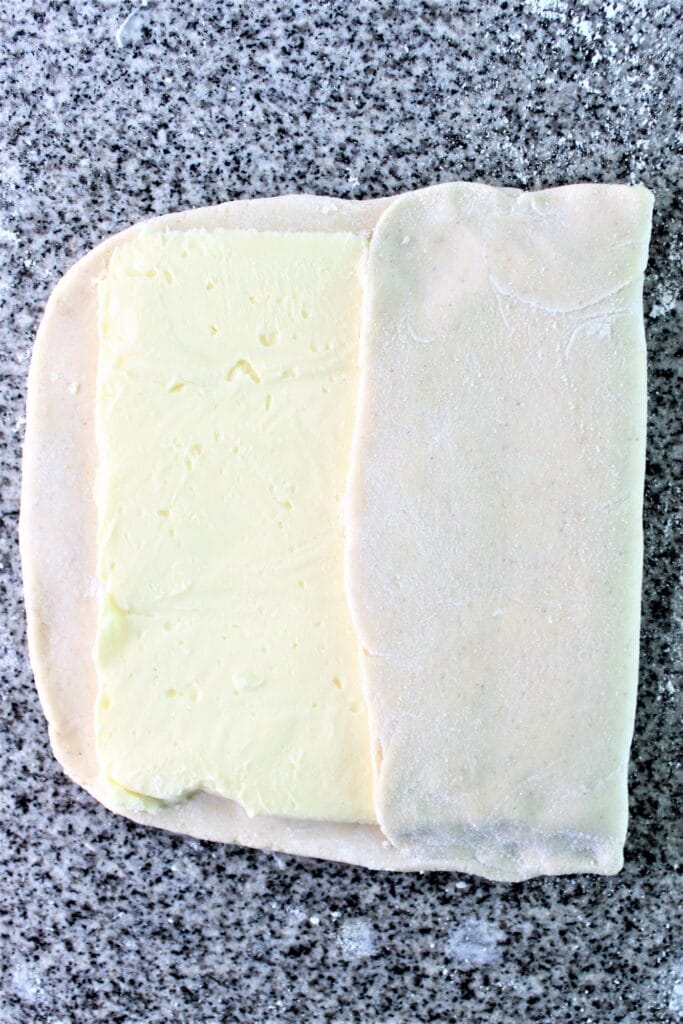
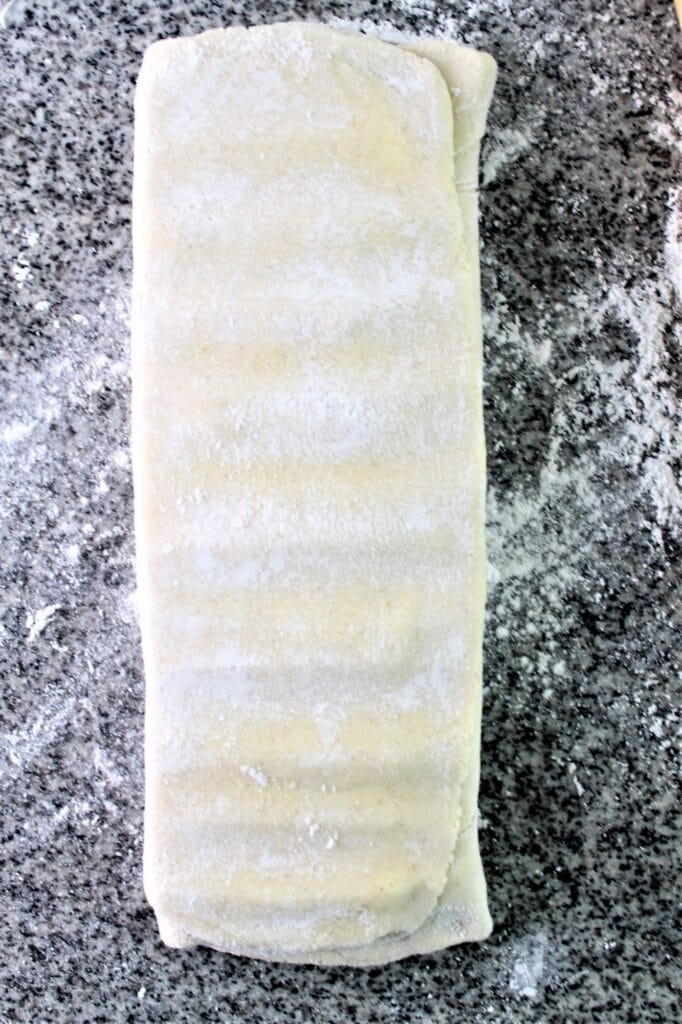
Flip the exposed side of the butter block over onto the top two thirds of dough. Peel away the baggie and toss it. Fold the bottom third of the dough over top of the middle third of butter. Then fold the top third of the dough and butter together over the bottom third of dough, like a letter fold. Press and pinch to seal the edges of the butter into the dough.
Turning the Dough
While most (including my first) croissant recipes call for refrigerating between turns, you don't have to refrigerate this dough AT ALL if you work quickly enough to keep the dough cold. If at any point the dough gets too warm, place it back in the freezer for 10 minutes.
Turn the dough lengthwise (the short end is toward you) and begin "pressing" the rolling pin along the length of dough. This will elongate the dough without pushing all the butter out of it.
Then start rolling from the center to each end, but don't roll too firmly, just glide over the dough with the rolling pin. You're still striving to lengthen the dough and the butter, not completely flatten it and push the butter out.
Constantly move the dough and check for sticking on the underside. If you find that it's sticking, use your bench scraper to scrape the dough, lift it, and add more flour underneath. If you find a tear in the dough, take extra flour, sprinkle it over the tear, pat it carefully with your fingertips, and brush the excess flour away.
I don't like to give measurements of the dough because I don't think it's practical to constantly have a ruler in hand while rolling out dough. I think going by the thickness of dough is a better observation, so you're looking for about ¼-inch in thickness.
Making the Second Fold
This second fold is what's called a book fold. I saw it on some YouTube channel (I can't remember which one) and thought it might remove a step from my gluten free croissant recipe.
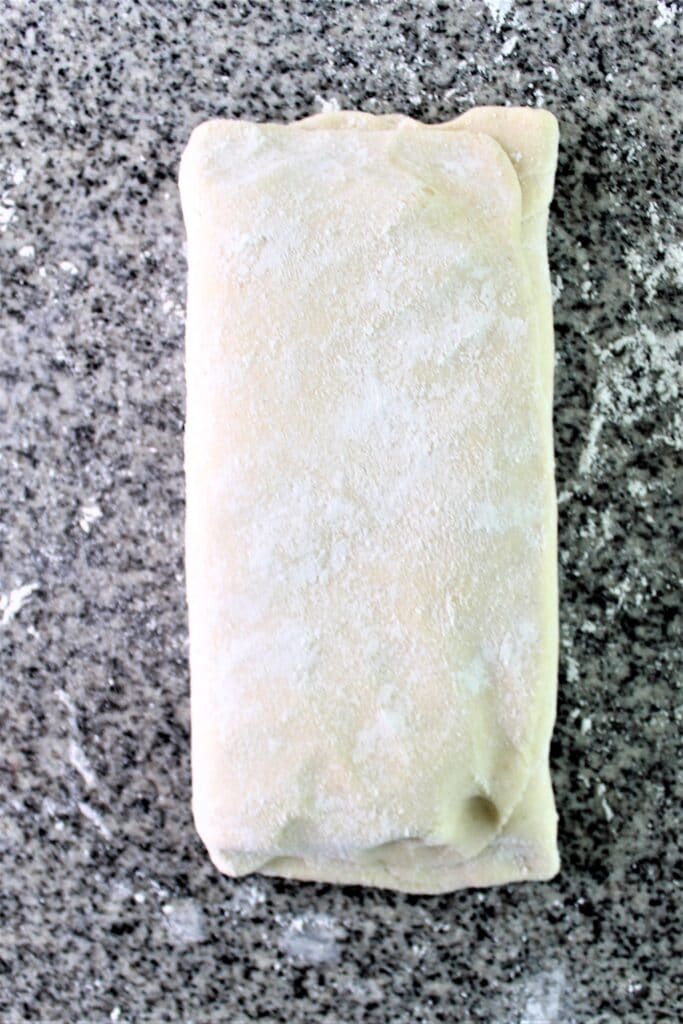
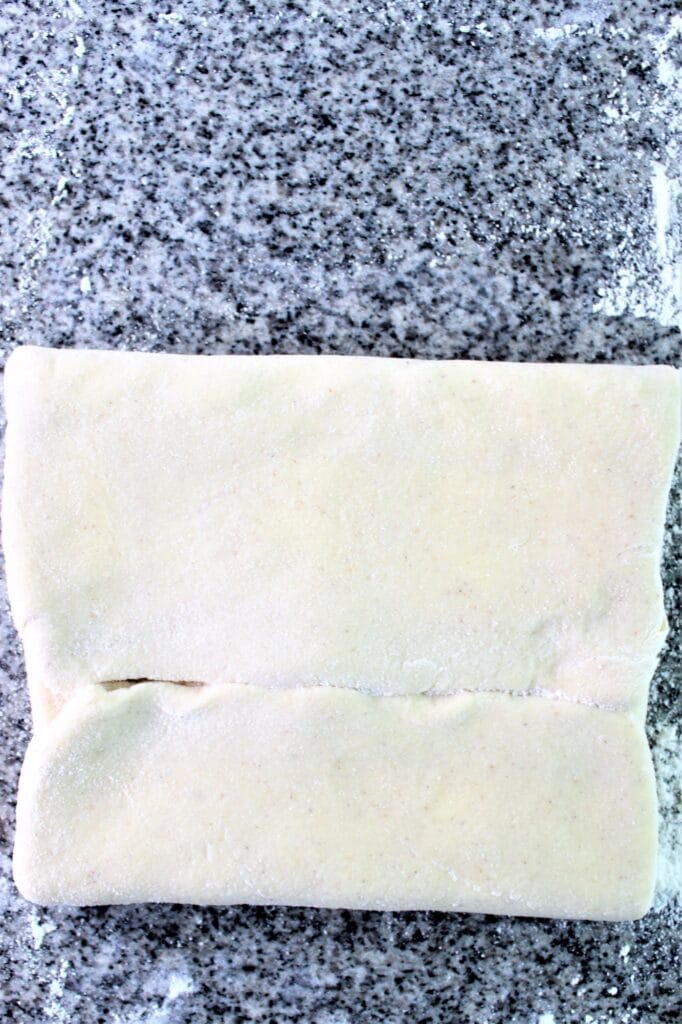
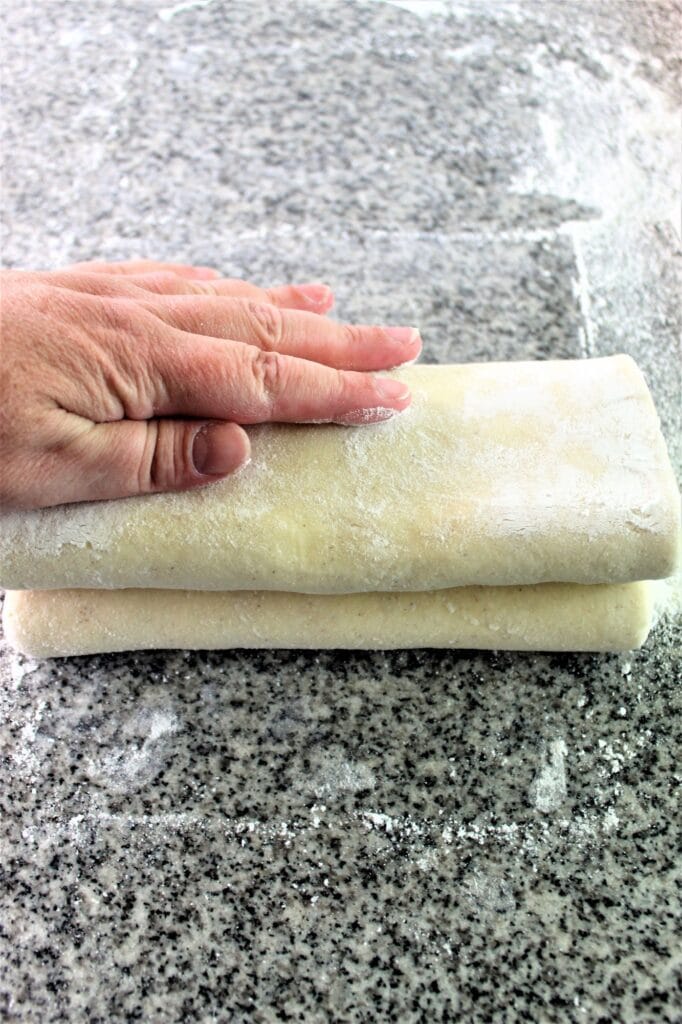
Fold the bottom third of the dough up (see pictures and video). Then fold the top two thirds down to meet the bottom Brush away any extra flour. Now fold the top third to reach to the bottom edge. You'll be left with four layers of dough.
Turn the dough 90 degrees counterclockwise so that the long opening of the dough is on your right side and the short end of the dough is closest to you.
The Final Fold
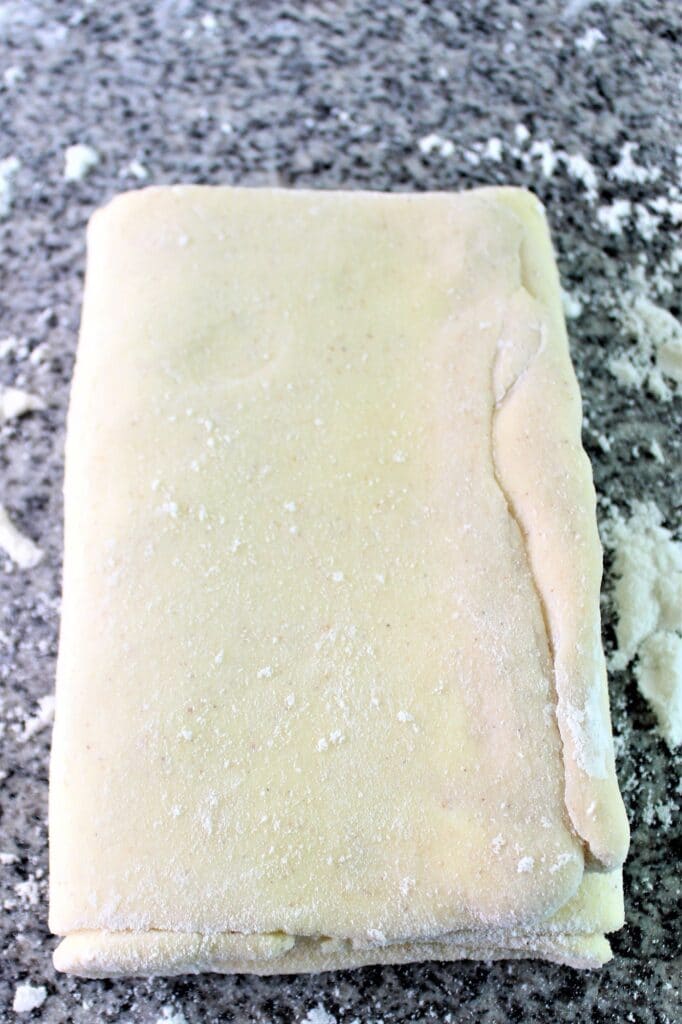
Again, roll out the dough into a rectangle using the press and roll method (explained above). Now we'll do the final fold, which is going to be a simple letter fold. Fold the bottom third up to the top third, and then fold the top third down to cover the bottom third.
Turn the dough 90 degrees and again roll it out, but this time roll it to roughly the size of a quarter sheet pan (9 by 13 inch). Place the dough onto your sheet pan, cover it with plastic wrap, and chill it in the fridge for about 30 minutes.
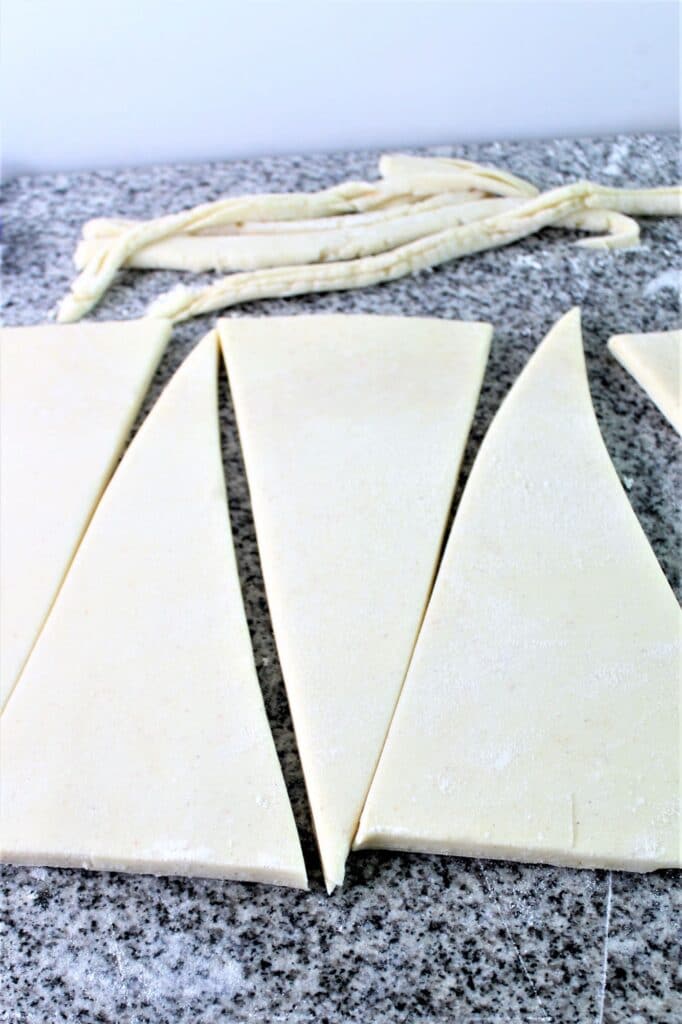
Cutting the Triangles
Remove the dough from the fridge and roll out into a little bigger size to be able to cut out 6 large triangles, about 10 by 12 inches in size (but again, you don't have to be beholden to this size). Anything close to that will work, as long as it's about ¼-inch thick.
If desired, trim the edges (not necessary, but it does help in the final lift of the dough and to expose the layers). Using a ruler, mark a few notches across the bottom of the dough, about 4 inches apart from each other. Then take your ruler and cut out triangles as shown. You should get a total of 6 triangles from ½ batch of dough.
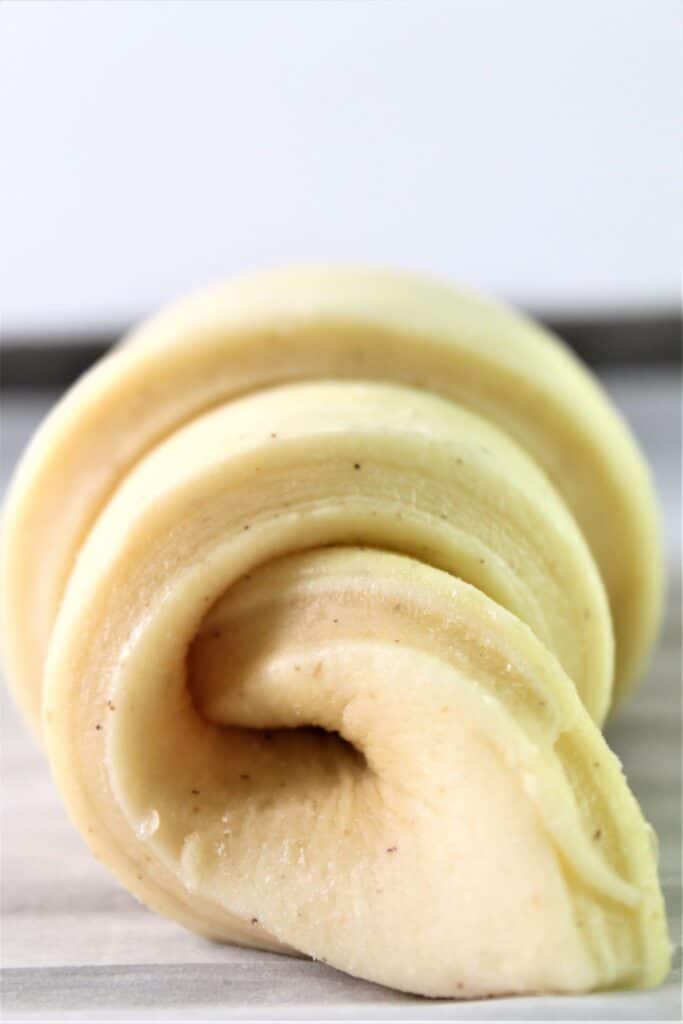
Shaping the Croissants
Shaping the croissants is very easy. And with the added psyllium husk in the dough, it's more extensible and is able to be rolled a little tighter than my old croissants.
Cut a notch about an inch long in the middle of the 4-inch base of each triangle. With your fingers on each side of the notch, pull it apart slightly and begin rolling up the triangle. Of note, don't put the point of the dough on the underside of the rolled croissants. This is a tip that's always suggested when making gluten-filled croissants, but remember these are gluten free croissants. When rising, they will pull too much and tear the dough. Ask me how I know this 😉
Proofing the Croissants
Place the croissants at least 2 inches apart on a parchment-lined baking sheet and cover loosely with plastic wrap. Proofing croissants is tricky. If the temperature is higher than 80 degrees F, the butter will leak out and you'll be left with a dense roll. Here's my trick:
- Place the croissants in your oven that is turned off. Don't preheat it to the warm cycle like we do when proofing other dough.
- Fill a small saucepan with water and bring it to a boil on the stove.
- Place the small saucepan in the oven on a rack that is much lower than the croissants (or even on the oven floor).
- Shut the oven door and allow the gluten free croissants to proof until visibly larger in size, although not doubled. You may need to reheat the water a second or even third time. They should look like they've puffed up and maybe some of the layers will start separating. A marshmallow-like appearance is what you're looking for. This could take anywhere from 1 ½-4 hours. Don't rush it!
Baking Gluten Free Croissants
I've tried every combination of temperatures and times and believe this is the best method for baking gluten free croissants. It's nothing like baking regular croissants, though. Remember everything that's up is down and down is up in gluten free baking sometimes 🤪
Before doing anything else, place the baking sheet filled with the croissants on another baking sheet. This will insulate the bottom of the croissants while baking so they won't burn before the rest of the croissant is done.
Preheat the oven to 475 degrees F. Brush your croissants ever so lightly with an egg wash, being careful not to deflate them. Place the croissants in the freezer for about 10 minutes (or fridge for 20).
Once the oven is preheated, open the door and throw 2-3 ice cubes right onto the oven floor. Place the croissants in the oven and quickly shut the door. Set a timer for 5 minutes.
Lower the temp to 450 degrees F and set a timer again for 5 minutes. Lower the temperature yet again to 425 degrees F and set another timer for 5 minutes.
Remove the croissants from the oven and check to see if they're done. Carefully lift up one croissant (with a gloved hand). If it feels relatively light for its size, it's done. If it feels at all heavy, place the croissants back in the oven to bake for another 5 minutes at 375 degrees F.
The Tools I Use for Making Gluten Free Croissants
You don't absolutely need these tools (affiliate links) to make gf croissants, but they definitely make it easier:
- Dough scrapers--these are so cheap, but are one of my favorite kitchen tools EVER! They make it so easy to get any dough completely out of bowls.
- Bench scraper--another priceless tool to have in the kitchen, bench scrapers make it easier to keep dough from sticking to your counter and can also be used as a cutting tool in many instances.
- Pastry wheel--the one I use is old and no longer available, but this one is exactly the same (other than the black handle).
- Pastry brush--I purchased the pastry brush I use from our local Restaurant Depot, but this one is just like mine.
- Acrylic ruler--I also can't live without this ruler! It helps to keep the edges of the croissant dough straight, you can see through it (which helps in pastry making), and it offers a straight edge when cutting triangles for croissants (or anything you're cutting in the kitchen).
- Quarter sheet pans--I recently purchased these stainless steel quarter sheet pans because I got sick of my aluminum pans warping and discoloring. These are so sturdy and come in a 2-pack.
- Half sheet pans--these are the ones I have, although I would opt to purchase these stainless steel ones in the future (for the same reason as above).
- Pre-cut parchment sheets--I use these ALL THE TIME for anything and everything. So convenient!!
- French rolling pin--I have THREE rolling pins and I always gravitate to this one.
Frequently Asked Questions
Can I Double the Recipe? Why Go Through All of This for Just Six Croissants???
Although it can be done, I strongly recommend against using all the dough the very FIRST time you make croissants. The small number of croissants is more manageable when just starting out. Your best bet, when first starting out, is to make two batches of 6 croissants. I recommend trying the smaller version with only half the dough first so you can get a feel for how the croissants are made.
If you don't feel like making more croissants right away, wrap the other half of the dough well in a double layer of plastic wrap and place it in a freezer baggie and put it in the freezer. It will keep in the freezer for up to one month. Thaw it overnight in the fridge before proceeding with the recipe.
As you feel more comfortable and have made the croissants once or twice, then you can think using all the dough. You'll need to double the recipe for the butter block and use a gallon bag.
Can I Make Smaller Croissants?
Yes, you can make smaller croissants (although I wouldn't recommend it your first go round). You'll need to adjust the size of the base of each croissant. You'll get more croissants out of one recipe, but you will need to adjust the baking time. Start with the same temperatures and work your way down, checking after 10 minutes.
Do I Have to Use European Butter?
I've made these croissants with both European and American butter and I've found that European butter works best. European butter has a higher fat content and a lower water content. This produces more flakes and the layers separate more definitively, causing a higher rise. However, American butter will still produce a nice gluten free croissant if you don't wish to splurge on the good stuff.
Can I Make The Croissants Ahead of Time?
Unbaked croissant dough can be frozen up to one month, well wrapped. Unbaked shaped croissants can also be frozen up to one month. Line the unbaked croissants on a baking sheet. Cover and place them in the freezer until they are frozen. Place them in a freezer bag, removing as much of the air as possible. Label and date the bag.
Thaw unbaked croissants by removing them from the freezer the day before you're going to bake them. Place on a parchment lined baking sheet, covering them with plastic wrap, and let them thaw in the refrigerator overnight. The next morning, remove the croissants from the refrigerator and start the process of proofing them.
You can also freeze baked croissants. Thaw baked croissants at room temperature for a few hours (or in the refrigerator overnight). Refresh them in the oven at 350 degrees F for 5 to 7 minutes before serving.
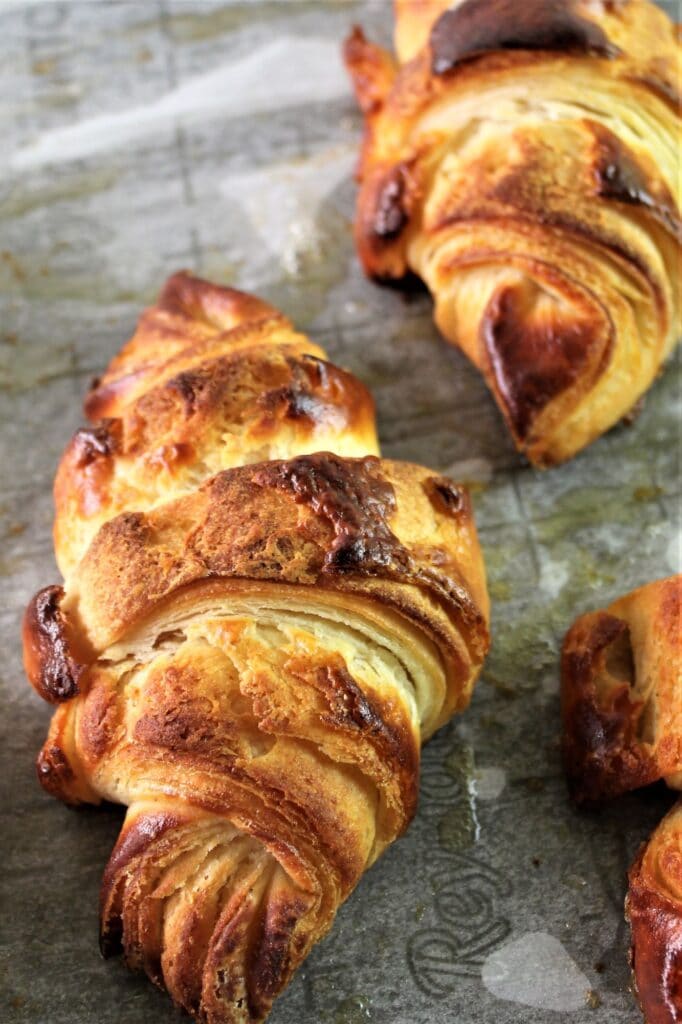
If you've been missing a great croissant, these gluten free croissants will blow your mind!!! After one bite, you'll be transported back to those pre-gluten free days 🙂

New and Improved Gluten Free Croissants
Ingredients
BUTTER BLOCK (BEURRAGE) FOR HALF THE DOUGH
- 1 cup (2 sticks or 226 g) high-quality unsalted butter, such as Irish butter or other European butter, at room temperature
- 2 tablespoon Kim's gluten free bread flour blend
DOUGH (DETREMPE) FULL RECIPE (it's highly recommended to use half your first time)
- 3 cups (420 g) Kim's gluten free bread flour blend ***
- 2 tablespoon whole psyllium husks or 1½ tablespoon psyllium husk powder
- 1 teaspoon fine sea salt
- 1 teaspoon baking powder
- 1 tbsp plus ¾ tsp fast acting (instant or bread machine) yeast
- ½ cup (100 g) granulated sugar
- 1 cup (240 ml) milk
- 6 tablespoon butter, softened
- 2 large eggs, beaten
EGG WASH
- 1 large egg, beaten with 1 tablespoon water and a pinch of salt
Instructions
FOR THE DOUGH (DETREMPE):
- In the bowl of a stand mixer, add all the dry ingredients and whisk to combine. Place the bowl on the stand mixer and turn it on to low while slowly adding the milk, followed by the beaten eggs and softened butter.
- Turn the mixer up to medium high and knead the dough for 5 minutes. Scrape down the sides of the bowl and mound the dough in the middle of the bowl, cover it with plastic wrap, and place it directly in the refrigerator overnight and up to 48 hours. Alternatively, you can place the dough in a container with a well-fitting lid.
FOR THE BUTTER BLOCK (BEURRAGE):
- The next day, mix the softened butter with 2 tablespoon Kim's gluten free bread flour blend in a small bowl until well combined and smooth.
- Place a quart-sized baggie into a large coffee cup or wide-mouthed glass and fold the top over to hold the bag up. With a spatula, scrape the butter mixture into the baggie. Unfold the top of the baggie and seal almost all of it. Using a rolling pin, press and roll the butter inside the baggie into an even thickness spread throughout the entire baggie, up to the zipper (be careful not to push the butter out of the small opening). Push out as much air as possible and seal the rest of the baggie. Place the baggie on a flat surface in the refrigerator. This butter block is to be used with half the dough. Once you get better at making these croissants, if you want to use the entire amount of dough you'll need to double the amount of butter (1 lb of butter and 4 tablespoon flour) and place it in a gallon-sized baggie.
LAMINATING THE DOUGH and MAKING THE FIRST FOLD AND TURN
- Remove half the dough** from the refrigerator and knead it on a floured surface until smooth. Roll it out into a rectangle about the size of, or smaller than, a quarter sheet pan (9 by 13 inches). Place it on a parchment-lined pan, cover it with plastic wrap, and put it in the freezer for 10 minutes. Remove it from the freezer, flip the dough over, cover it, and put it back in the freezer for another 10 minutes.
- Remove the dough from the freezer and the butter block from the fridge. They should both be roughly the same temperature and consistency (firm but not too firm). Make sure the butter isn't too firm by running it along the edge of the counter. If it bends somewhat easily, it's perfect. If it breaks, leave it set out for about 5 minutes before using.
- Using a pair of kitchen scissors or a sharp knife, cut down the sides of the ziptop baggie to expose the butter block. Set it aside while you prepare the dough.
- Roll out the dough until it's about ¼-inch thick. It should be a rectangular shape that will fit the size of the butter block width wise. Place the butter block on the top two thirds of the rectangle. Fold the bottom third over the butter and press to seal the edges. Then fold the top two thirds of dough with the butter over the bottom third. Pinch and press to seal the edges and turn the dough 90 degrees.
SECOND FOLD AND TURN
- Using your rolling pin, press along the dough to lengthen it. Then begin rolling out the dough until it's an even ¼-inch thick throughout (the size of the dough isn't important, just as long as it's ¼-inch thick). Make a book fold by folding the bottom third of the dough up and then folding the top ⅔rds of the dough down to meet that bottom third. Then fold the dough over once more to the bottom edge of the dough. You should have 4 layers of dough. Turn the dough 90 degrees again. The short edge should be closest to you.
THIRD FOLD AND TURN
- Press and roll the dough as above into a ¼-thick rectangle. Now make a letter fold by folding the bottom third up and then the top third down. Turn the dough 90 degrees.
PREPARING THE DOUGH FOR CUTTING
- Roll the dough out once more to a size that's roughly 9 by 13 inches, enough to fit on a quarter sheet pan. Place it on the sheet pan, cover it with plastic wrap, and place it in the fridge for 30 minutes.
SHAPING THE CROISSANTS
- Remove the dough from the fridge and place it on a lightly floured surface. Roll out the dough to a rectangle that's about 10 inches high by 12 inches wide (¼-inch thick). Trim the edges (not necessary, but definitely helps with the rise of the dough and showing the layers).
- Cut notches about 4 inches apart along the bottom edge of the dough, and then cut triangles using these notches as guides. See the video and pictures for how to do this. You should end up with 6 croissants.
- Cut about an inch slit in the middle of the base of each triangle using your pastry cutter. Using your thumb and forefinger, gently pull this slit apart and begin rolling the croissants up very loosely. If they're too tight, they may split open as they rise and bake.
- Place the croissants at least 2 inches apart on parchment-lined baking sheet. Cover loosely with plastic wrap.
PROOFING THE SHAPED CROISSANTS
- Bring a small pot of water to a boil on the stove. Remove from the heat and place the pot in your oven on the very bottom rack or even right on the bottom of the oven.
- Place the croissants on a rack in the upper third of the oven. Close the oven door and allow the croissants to slowly rise, which can take anywhere from 1 to 4 hours. Don't rush it. If the temperature of the croissants rises above 80 degrees F, the butter can leak out. When the croissants are well risen, they should be puffy and marshmallow-like, but not doubled in size. They will be noticeably larger and you may begin to see layers.
BAKING THE CROISSANTS
- Place the baking sheet of fully risen croissants on another baking sheet to insulate the bottoms of the croissants. Brush the croissants gently with an egg wash consisting of one egg whisked with about a tablespoon of water and a pinch of salt.
- Place the croissants in the fridge for about 20 minutes while you preheat the oven to 475° F.
- Take a couple of ice cubes and throw them onto the oven floor and place the croissants on the middle rack. Quickly close the oven door and set a timer for 5 minutes.
- Drop the temperature down to 450° F and set a timer again for 5 minutes.
- Again, drop the temperature down to 425° F and set a timer for 5 minutes.
- Remove the croissants from the oven. Using an oven mitt, carefully lift up one croissant. If it feels very light, they're done. If it still feels slightly heavy, put the croissants back in the oven and drop the temperature to 375° F and bake for another 5 minutes.
- Croissants are best freshly baked. See notes for storage options.
Notes
Featured on celiacsanonymous.com


Nani Colish
I just made these tonight, and it was a complete and utter fail. It was a complete mess. For the first half of the dough I used, I couldnt even get 1 fold without rips and tears and the butter melting and just becoming a mess. For the second half of the batch, I got to the second fold, and it started tearing and ripping and melting just like the first half. I don’t know where I went wrong or why it happened.
The three things that could have affected it are:
1.I don’t remember how much yeast I put in; it said 1 tablespoon and 3/4th of a teaspoon, I believe, and while making it, I stopped to double check something and couldn’t remember if I already added the 2nd 1/4 teaspoon or not. So it could’ve been A. 2/4 teaspoons or B. 3/4 teaspoon, and I’m not sure which one it was.
The second thing I did was use Smart Balance dairy-free butter, so that may have affected it.
3. I used hemp power as the whey substitute since I can’t have dairy, so maybe that messed it up? I’m really not sure, but it was disappointing because I spent $60 on ingredients (had to buy the stuff for the flour blend) and was so excited for 2 weeks to make this all for a big mess and a complete fail. I knew it would take a couple tries, but if I make it again, I’d like to know where I went wrong so I can fix it. Any ideas what it could’ve been? Thanks in advance!
Emily
Hey, Nani,
gluten free vegan chef here!
First off, I have never had great success using earth balance or other margarines in lamination recipes. I would suggest a hard cultured butter.
Second. Hemp protein powder dries out recipes quite a bit so when I mistakenly made a 20C batch I had to add extra liquid to everything.
I prefer using pea protein.
Hope this helps you in the future!
Kim
All three things you mentioned: not knowing how much of an ingredient you put in the recipe will definitely affect the outcome, not using real butter will definitely affect the outcome (I state in my post that you should make the recipe exactly as written at least once before trying to change any of the ingredients). "Fake" butter is nowhere near the same consistency as real dairy butter, so you won't be able to roll it out the same way and get the same results. Finally, I have not tried any of my recipes with hemp protein so I only offer alternatives to the whey protein isolate as suggestions, not something I have tried (as I state in the post) and not something I would recommend using the first time trying to make the croissants (as I also state in the post). I'm sorry the recipe was a complete and utter failure for you, but when you haven't followed the recipe hardly at all, I can't say that I'm surprised. I don't profess to be anyone but a gluten free recipe developer and blogger. I unfortunately don't have any expertise in dairy free AND gluten free baking (although I do have a few recipes that are both), and something like croissants, which can be intimidating for even the most experienced REGULAR (gluten eating) pastry chefs, is not something I would start with fresh out of the gates.
Kitty
It wad definitely the Earth Balance... that butter is just oil and does not stabilize like regular butter. I can't guarantee results but a better butter (for the recipe and for your health because hydrogenated oils are so bad for you) is Miyoko's Plant Milk butter, it's made in the European style and stabilizes!
Nathaly
Hi Kim,
I love your recipes, I have quiet of success with most of the once I tried... you are a great recipe developer !
Small question, so the 226 gr butter is for half recipe of croissants? or for full recipe? I used to made croissant when I could eat gluten free and 226 gr for 210gr flour is a lot ! that is the amount I would use for a whole recipe with 500 gr flour... But maybe it is because it is gluten free that needs to me more?
Thank you for your feedback 🙂
Kim
Yes, that is correct!
Josh
I made these this weekend... have a question. They turned grey during baking (?)
They taste great, they're flake and layered. Trying to figure out why they came out grey...
any help is appreciated.
Kim
That is baffling. The only thing I can think of is the dough and/or butter block oxidized in the fridge. How long was it in the fridge? If kept more than a few days, it definitely could have oxidized. Did you use my flour blend or have any substitutions within the flour blend? That could be another reason.
Next time you could try adding a half a tsp of lemon juice or vinegar to the butter block if you plan on keeping either the dough or the butter block longer than a few days.
Josh
I tried again, i did not do the boiling water in the bottom of the oven and that seems to have kept them the right color, i have no idea if those are related issues.
This time the middles of the croissants were underdone though. Going to try again with less temp / longer bake.
I'm in Colorado so I think the altitude is impacting the temp/times.
Kim
Oh no! I bet the altitude is the problem. I wish I knew more about high altitude baking. I am at sea level so I've never had a chance to try any of my recipes at high altitude. There might be a Google page somewhere that could help with that.
Vicki
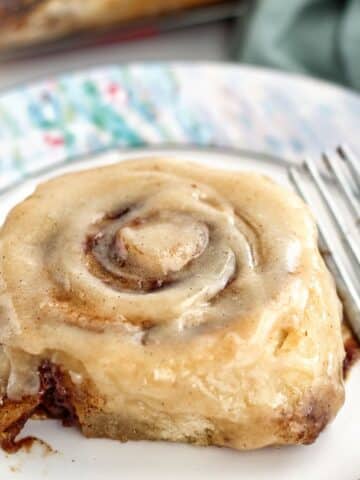
even though I really screwed up this recipe, it STILL produced the best gf croissants I’ve ever had! now that I know better what I’m doing, I know my next batch will be even better (which seems like an impossible standard right now)! also, this dough, without butter block, also makes totally delicious cinnamon buns. 🙂 you are such a genius!
Kim
You're too kind! I'm thrilled you enjoyed them 🥰
Christine R.
The sound is not working on the video.
Izabela Lois
This recipe for croissant is amazing! I'm in love with it! I also recommend everyone reading this comment to try this recipe for donuts- without the butter block.
Katy Springer
Hey! I'm just loving the recipes I've tried from herre. Just F.Y.I. psyllium husk is a far better thing to cook with than xantham gum or gar gum. It makes everything poofy!
Momster
My 17 year just made a half batch and they were delicious, but not light and flaky. Trying to figure out how to adjust the 2nd half of the dough as I try again. We used all the ingredients exactly except that I bought rice flour at an Asian grocery, the finest they had, but it didn't say superfine or anything on the bag. If that wasn't the problem then I think we had too much dry or not enough wet. Can I kneed in a few drops of water or milk when I start working with the dough? Or maybe a little more butter? Our dough was hard to roll without cracking and the butter layer broke through in many places to the point that patching with flour was kind of pointless and made the dough dryer.
Kim
I think I tried Asian rice flour a very long time ago, back when I was developing this recipe, and it didn't work at all. I seem to remember it being gritty and not anything like the superfine rice flour I use in my flour blends. Therefore, it most likely was the rice flour as it probably soaked up too much of the liquid.
That being said, you can attempt to add more liquid to the dough to compensate, but I don't know if it will help at this point. Your best bet is to use the ingredients I strongly suggest on my flour blends page to get the results that I obtain in my recipes.
Sadie
Finally getting back to this because we're going to try again - thank you for your reply about the Asian versus superfine rice flour!
bridgett sledge
I want to try these, but I am dairy free as well as GF so it should be okay with no salt dairy free butter ?
Kim
I haven't tried them with dairy free butter, but it's worth a shot!
Sarah
When these were baking in the oven, I yelled out, "IT SMELLS LIKE CROISSANTS!" My family thought I was crazy. Then I tried them, and thought that maybe I died and went to heaven. I haven't had a croissant in probably more than 10 years. But it was just as I remember. Thank you so much for this recipe!!!
A side note, I found it helpful to cover the croissants with foil about halfway through the 450 bake. Otherwise, they get a tad too dark and burnt-looking. The inside is still beautiful and flakey, though!!! Also, I just jumped right in and did the whole recipe and not half of it (we're a family of 6). I put the butter in a large freezer bag for the butter block, and then cut it in half to do half the dough, and then the other half of the dough.
Kim
Awe, I'm so glad you liked the croissants!!!!
Great idea for making the entire recipe at once 😊
Krista Johnston
I'm in love with these croissants and appreciate all the work you've put into refining the recipe! There was one time where I was able to watch the video of the folding process, but can't get it to pop up again (the butter block portion came up, but then it goes to a creme brulee video). Is there a link you could add to get back to the full video, or can you give me pointers on how to get to the folding portion?
Kim
Thank you so much! The reason the video goes to the next one is because you need to actually click the "stay" button when it asks if you want the "next" video or would like to "stay" on this one. You can also find this and all the videos I've ever made on my youtube channel, which is here: https://www.youtube.com/channel/UCBIMroJp0URZoYGbTilnVSg
tom fred
Greetings,
I am planning to make this recipe in stages.
I am wondering what you would recommend for
pausing overnight after laminating: put laminated
dough in fridge overnight, or freeze and then put
frozen laminated dough in fridge overnight to thaw?
Or would you recommend not trying to pause between
laminating and baking? Thank you.
Kim
I always put the dough in the fridge overnight after laminating because I'd prefer freshly baked croissants in the morning with breakfast, so that's what I would recommend. You CAN freeze the laminated dough, but if you're planning on making the croissants within the next 24-48 hours, that's not necessary. 😊
Chantal
These don’t have much flavour. I wonder if adding salt to the butter block mixture would help? I have seen this done in other recipes. Rice-based Gluten free flour suffers from lack of flavour in the first place (comparing to wheat flour which has a subtle flavour) so it might help.
Kim
Really??? Everyone who has ever had them around me (myself included) said they were some of the best tasting croissants they'd ever had! I guess to each his own.
Michelle Touma
I feel the same way. It needed a touch more of salt-Next time I’m going to try to make it with one stick of unsalted butter and one stick of salted or half stick of salted..
ThankYOU Kim for sharing your new & improved recipes and the comments are very helpful ! I’ve heard your ultimate cinnamon rolls are just like regular flour cinnamon rolls and people can’t tell the difference. Nice job perfecting your recipes. Can’t wait to try those and more of your recipes..
Gay Touma
I feel the same way. It needed a touch more of salt-Next time I’m going to try to make it with one stick of unsalted butter and one stick of salted or half stick of salted.
ThankYOU Kim for sharing your new & improved recipes and the comments are very helpful ! I’ve heard your ultimate cinnamon rolls are just like regular flour cinnamon rolls and people can’t tell the difference. Nice job perfecting your recipes. Can’t wait to try those and more of your recipes.
Gay Touma
Sorry Kim I thought I deleted the first comment under “Michelle”.
Liz T-D
I used the dough to make pain au chocolate and it worked magnificently. This dough is brilliant! My husband said he could not tell these were GF, and that’s true!
Gina Vieira
Quick question. In your cinnamon roll recipe the dough ingredients include "2 tbsp psyllium husks or 1 1/2 tbsp psyllium powder". Here it reads "2 tbsp psyllium husks or 1 1/2 TSP psyllium powder". Is there really that much diference between the two recipes using psyllium powder? Thanks so much.
Kim
Wow, great catch!!!! I can't believe no one has caught that until now (including myself)! It should be 2 tbsp psyllium husks or 1 1/2 tbsp psyllium husk powder, NOT teaspoons. I'm correcting that right now. Thank you for alerting me 😊😊😊
Ruth Frank
I would like to make these using your gluten free starter. Have you tried this or do you think it would yield an unfavorable result?
Annie
Do you have any tips on how to prevent butter leaking out while they bake?
Kim
A little bit leaking out is okay, but mostly it's in the lamination. It's all about the temperature and the texture of both the dough and the butter block. Sometimes it just takes practice. I've found there are so many things that are different between gluten-free and gluten-filled baking that I almost had to retrain my brain from what I knew about baking beforehand.