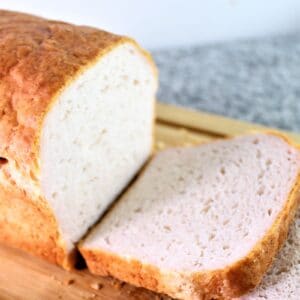
Best Ever Gluten Free White Sandwich Bread
This best ever gluten free white sandwich bread is so soft and delicious, just like that Wonder-ful bread we used to love!
Ingredients
Tangzhong
- ¾ cup (180ml) whole milk
- ¼ cup (35g) Kim's gluten free bread flour blend
Dough
- tangzhong
- 3 cups (420 g) Kim's gluten free bread flour blend***
- 1 tablespoon psyllium husk powder
- 2 tbsp plus 1 teaspoon (30 g) granulated sugar
- 2 teaspoon rapid rise (instant) yeast
- 2 teaspoon kosher salt
- 1¼ cups (300 ml) whole milk
- 4 tbsp (56 g) coconut oil, solid but soft
Instructions
Make the Tangzhong
- Put the milk and flour in a small saucepan and heat over medium heat and whisk until thickened and paste like, about 5-7 minutes. Set aside to cool slightly while making the rest of the dough.
Make the Dough
- In the bowl of a stand mixer, add the flour blend, psyllium husk powder, sugar, yeast, and salt and whisk to combine. Slowly add the milk and coconut oil and mix to combine using the dough hook. Add the tangzhong and continue mixing, increasing the speed to medium high and kneading for 5 minutes.
- Scrape the dough into a large mound in the middle of the bowl and cover it with plastic wrap (or try a shower cap or silicone lid). Allow the dough to rise until doubled in size, 1-2 hours. Refrigerate the dough until firm and easier to handle. This could take anywhere from 4 hours to overnight. To make the bread the same day, place the dough in the freezer for 20 minutes, which should firm it up enough to shape.
- On baking day, remove the dough from the fridge and knead until smooth on a well-floured surface, adding more flour as necessary to keep it from sticking. Shape the dough into a loaf shape long enough to fit into an 8.5 by 4.5-inch loaf pan. Spray loaf pan with nonstick spray and place the dough in the pan. Cover and let rise until the dough crests above the top of the pan about one inch. This could take 30 minutes or up to 2 hours. Be patient.*
- Preheat the oven to 450° F. When the dough has fully risen, slide the loaf pan into the oven and carefully throw a few ice cubes onto the bottom floor of the oven. Shut the door quickly. Bake the bread for 10 minutes and then decrease the temperature to 350° F. Continue baking for another 30 minutes, or until a thermometer inserted into the center reads 200° F. Remove the pan from the oven and place on a wire rack to cool for 10 minutes. Tip the bread out of the pan and allow it to cool completely before slicing.
- Serve bread within 24 hours for softest results. After 24 hours, slice bread and place individual slices on a parchment-lined baking sheet until frozen. Wrap the slices in plastic wrap and place them in a ziptop baggie. Suck out as much air as possible from the baggie before placing it in the freezer. Bread will keep in the freezer for about 3 months.
Notes
*My method of choice for proofing gluten free dough: Turn the oven on to the "warm" function, which is 170 degrees F. Allow it to heat up briefly (while shaping the dough) and then turn it off. Put the loaf in the warm oven, close the door, and allow it to rise. This may seem extreme for regular (non gluten free) dough, but gluten free dough can take it. It doesn't kill the yeast, like many say it will, and I actually find the #1 reason readers have problems with making my bread is not letting it proof long enough.
***DISCLAIMER: The reason I created my own flour blends is because I could not obtain the results I wanted with flour blends that were available in stores, online, or from other gluten free bloggers. My recipes have been developed to be used with my own bread flour blend that I created after painstakingly testing for, in some cases, YEARS to develop what I believe to be a superior gluten free bread like no other. If you do not use my gluten free bread flour blend for this recipe, I cannot speak for the results you will obtain. While store bought blends may give you a satisfactory result, they may NOT give you the results intended in my recipe.
Tried this recipe?Tag @letthemeatglutenfreecake on Instagram so we can see!