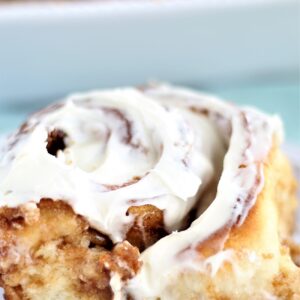
The Ultimate Gluten Free Cinnamon Rolls
You will feel as though you've died and gone to heaven when you make these ultimate gluten free cinnamon rolls! They truly are magical: warm, gooey, soft and feathery, they're everything a cinnamon roll should be, and then some 😋
Ingredients
DOUGH
- 3½ cups (490 g) Kim's gluten free bread flour blend
- 1 cup (200 g) granulated sugar
- 1¾ teaspoon baking powder
- 2 tbsp plus 1½ teaspoon (24 g) instant yeast
- 2 tablespoon whole psyllium husks (or 1½ tablespoon psyllium husk powder), optional (see notes below)*
- 1 tsp salt
- 1½ cups (360 ml) milk (or dairy-free alternative) (see notes below)*
- ¾ cup (1½ sticks or 169 g) butter, very soft or melted (or dairy-free butter alternative)
- 2 large eggs, lightly beaten
CINNAMON SUGAR FILLING:
- ½ cup (1 stick, 8 tbsp, or 113 g) butter, softened
- 1 cup (220 g) brown sugar
- 4 teaspoon cinnamon
CREAM CHEESE FROSTING:
- 4 oz (113 g) cream cheese, softened
- 4 tbsp (½ a stick or 57 g) butter, softened
- 2 cups (250 g) powdered sugar
- 1 teaspoon vanilla extract or vanilla bean paste
OR GLAZE:
- 2 cups (250 g) powdered sugar
- 3-4 tablespoon milk, or more as needed for desired consistency
- 1 teaspoon vanilla extract
Instructions
MIX THE DOUGH AND PROOF
- Blend the dry ingredients in the bowl of a stand mixer*** using the paddle or dough hook attachment. With the mixer running on low, slowly add the wet ingredients into the dry ingredients. Once completely combined, turn the mixer up to about medium or medium high and beat for 5 minutes. The dough should be smooth and somewhat stretchy, but still pretty fluid and not at all like bread dough should be.
- Remove the dough hook or paddle attachment. Scrape the dough together into a rough ball or mound using a bowl scraper or spatula. Cover the bowl and place it in a warm, draft-free area for about 2 hours, or until at least doubled in volume (see the pics above). Turning your oven on to the warm function (about 160-170° F) and then turning it off before placing the dough inside is a great area for dough proofing. It should be fluffy looking and almost look like buttercream frosting. Chill for at least 4-6 hours. See within the post for my timeline to make overnight cinnamon rolls.
MAKE THE FILLING
- Mix together the filling ingredients with a stand mixer or handheld mixer until fluffy, 3-4 minutes. Cover and set aside.
KNEAD THE DOUGH, FILL, ROLL, AND CUT
- On baking day (or the night before baking), remove the dough from fridge. On a well-floured surface (using extra gf bread flour blend) knead dough into a smooth ball, adding extra flour as needed until dough is smooth. Roll out to a rectangle that's about ¼-inch thick.
- Spread the filling over the surface of the dough, leaving a ½-inch border at the far edge to seal. Roll up jelly roll style and place seam side down. Using a piece of dental floss, position it underneath the roll and pull it up on both sides. Crisscross it and pull down to cut each roll. You can also use a serrated knife if you don't have dental floss, but first place the entire roll in the freezer for 15 minutes. This will allow you to cut it cleanly.
- Place rolls into a greased baking dish (depending on the size of your rolls, you'll need either a square 8 by 8 inch or a rectangular 9 by 13-inch pan or similar). Cover with plastic wrap and proof again until noticeably larger, but not quite doubled in size. (If baking the rolls the next morning, place them in the refrigerator overnight at this point).
- If rolls have been refrigerated overnight, remove from the fridge about an hour before you plan to bake them (to allow them to come to room temperature and finish their second rise). They should rise until puffed and noticeably larger, but not quite double in size.
- Preheat the oven to 350° F. When the rolls have risen sufficiently (they will rise more in the oven), remove the plastic wrap and bake for 20-25 minutes (larger rolls may take 5 minutes longer), or until golden brown. Frost as desired.
MAKE CREAM CHEESE FROSTING
- Beat together frosting ingredients until smooth.
...OR GLAZE
- Use this glaze instead of the cream cheese frosting for an easy, quick and pourable topping. Whisk all glaze ingredients in a small bowl and drizzle over warm rolls.
Notes
*I've had great results with stretchiness of the dough and a slightly softer texture by using psyllium husks. My original cinnamon roll recipe is phenomenal and doesn't require psyllium husks to make it wonderful so if you don't want to use psyllium husks or powder, you will need to reduce the milk to 1 ¼ cups (300 ml).
**If you don't have instant (or fast-acting yeast), you can use active dry yeast by letting it bloom first in the milk. Heat the milk to about 100-110 degrees and add about 1 teaspoon of the sugar to the bowl, along with the same amount of yeast. Stir together and let sit until foamy on top. Proceed with the recipe as instructed.
***If you don't have a stand mixer, it might be difficult to get the proper consistency for the dough. If you have a handheld mixer, you could try to use one (I haven't tried it) but you most likely will need to beat it for about 5 minutes more (for a total of 10 minutes). If that doesn't work (or you don't have a handheld mixer), you could attempt to mix the dough vigorously by hand, maybe using a dough whisk like this one. I've never done it by hand so I can't say if it will work or not. You'll need to use your own judgement to see if this will work for you. Another option might be to use a food processor to mix the dough.
*****Rolls can be frozen up to the point right before baking. Freeze in the pan they are in, wrapped in a layer or two of plastic wrap and then foil. Thaw in the fridge, still wrapped, overnight. Proceed as above.
*DISCLAIMER: The reason I created my own flour blends is because I could not obtain the results I wanted with flour blends that were available in stores, online, or from other gluten free bloggers. My recipes have been developed to be used with my own bread flour blend that I created after painstakingly testing for, in some cases, YEARS to develop what I believe to be a superior gluten free bread like no other. If you do not use my gluten free bread flour blend for this recipe, I cannot speak for the results you will obtain. While store bought blends may give you a satisfactory result, they may NOT give you the results intended in my recipe.
Tried this recipe?Tag @letthemeatglutenfreecake on Instagram so we can see!