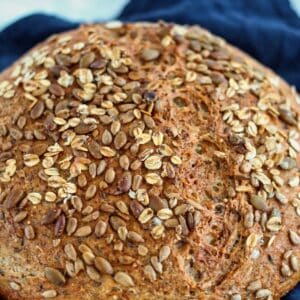
Gluten Free Multigrain Seeded Bread
After many attempts, I finally nailed Gluten Free Multigrain Seeded Bread and it was worth the wait! Soft, but hearty, and much healthier, I hope you enjoy it as much as we do!
Ingredients
Psyllium Husks Soak
- 2 tbsp (10g) whole psyllium husks** (see notes) (1½ tablespoon psyllium husk powder may be substituted)
- ¾ cup (180ml) hot water
Seed Soaker (these can be customized, but should total around 150-160g)
- 3 tbsp (30g) whole flax seeds
- 3 tbsp (20g) whole purity protocol rolled oats
- 3 tbsp (26g) raw sunflower seeds
- 3 tbsp (27g) raw pumpkin seeds (pepitas)
- 2 tbsp (24g) whole raw millet
- 3 tbsp (18g) flax meal
- 1 tbsp (12g) whole teff grains
- ½ cup (120ml) boiling (or very hot) water
Bread Dough
- 2½ cups (350g) Kim's multigrain bread flour blend
- 1½ tsp (5g) instant yeast
- 2 tsp (12g) kosher salt
- 1 cup (240ml) warm water
- 2 tbsp (26g) olive oil
- 2 tbsp (42g) honey
Instructions
Soak the Seeds/Nuts/Grains:
- In a small bowl, pour boiling water over seed soaker mixture and cover with plastic wrap. Set aside while you prepare the rest of the dough.
Soak the Psyllium Husks (this is not necessary, but allows you to make the dough and bake the bread all in the same day)
- Place psyllium husks in a small bowl and pour hot water over. Stir and set aside to gel.
Make the Dough
- Once psyllium husks have gelled, place all dough ingredients (including psyllium husks) into the bowl of a stand mixer and mix on medium high for a few minutes. Add the seed soaker (which by now should have soaked up all the water) and continue to mix for another few minutes. This can also be mixed using a handheld mixer or in a bowl with a good amount of elbow grease (a Danish dough whisk would help significantly if you want to mix this by hand).
- Scrape dough into a mound in the center of the bowl and cover the bowl. Allow to proof in a warm environment for 2-3 hours, or until doubled in size. Proofing time will vary based on the temperature of your proofing area.
- If you pre-soaked your psyllium husks, you may knead the dough immediately (or refrigerate it for a few hours before kneading). Otherwise, for best results, refrigerate the dough for at least 6 hours, preferably overnight.
- Knead dough on a well-floured surface until smooth, adding more flour as necessary to prevent stickiness.
- To shape into a boule, simply form into a round ball, pulling the dough up and under the ball and pinching on the bottom. If desired, add some seeds/grains to the counter, spray loaf with nonstick spray, and sprinkle seeds over the loaf. Place on parchment paper or put in a lightly floured banneton, smooth side down. To shape into a baguette, smooth the dough and roll into a rope shape, tapering it at the ends, adding more flour as necessary. Roll out as thick or thin as you'd like and as long as you're able to fit in your oven (make sure it will fit on your pizza steel or stone). Place it on a sheet of parchment paper.
- Place the loaf or loaves, covered loosely with plastic wrap, in a warm, draft-free area to rise until visibly puffed and slightly larger, but not doubled in size, about ½ to 1 hour. This time will vary greatly depending on the warmth of your proofing area and the time of year (summer loaves always proof quicker than winter loaves).
- BAKING STEEL OR STONE METHOD: Set up your oven for baking. Place a baking steel or stone (or overturned baking sheet) onto the middle rack with a shallow pan on a rack underneath. Preheat the oven to 450° F. DUTCH OVEN METHOD: Place a Dutch oven with a tight-fitting lid into the oven and preheat it to 500° F. You won't need the shallow pan with steam as enough steam will be created in the Dutch oven once the bread goes in. NOTE: This will only work with boules or loaves that can fit into the Dutch oven. If you're making a longer batard or baguette, you'll need to use the first method.
- When the dough has finished rising and is visibly puffed, run a serrated knife under hot tap water and cut slits in the dough swiftly but uniformly, about ½-¾ inch deep.
- BAKING STEEL OR STONE METHOD: Fill a measuring cup with one cup of very hot water (from the tap is fine). Using a pizza peel (paddle), slide the loaf (or loaves) onto the baking steel (or stone), parchment and all. Immediately pour the cup of very hot tap water into the shallow pan. Quickly shut the oven door. DUTCH OVEN METHOD: Remove the lid carefully and carefully lower the dough, parchment and all, into the Dutch oven. Replace the lid and shut the oven door. Immediately reduce the temperature down to 450° F.
- BAKING STEEL OR STONE METHOD: Bake for about 30 minutes for baguettes, or about 40 minutes for boules, OR longer for larger boules (some larger boules can take up to an HOUR or more). If the loaves are getting too browned, you can cover them loosely with foil. The loaves will look crusty and done on the outside, but will feel somewhat light when picked up. If they feel overly heavy, they're not done yet. However, because of the added seeds and bulk, they will be heavier than my usual loaves of gf bread. If necessary, allow them to bake for another 5-10 minutes and then check again, picking up the loaf with two gloved hands. If they're still feeling overly heavy, allow them to bake for another 5 minutes and check again. DUTCH OVEN METHOD: Bake the bread for 40 minutes with the lid on. Remove the cover and continue to bake for another 20 minutes. Check for doneness as above, adjusting time as needed.
- Remove from the oven and place on a cooling rack. Allow to cool COMPLETELY before cutting (or it will be gummy on the inside).
Notes
The recipe makes about 2-3 loaves of bread, depending on how large or small you make them. You don’t have to make them all in one day. You can leave the rest of the dough in the refrigerator for another day when you want freshly baked bread.
You can double or even triple the recipe (if you have a mixer big enough to handle the dough). A double recipe fits well in my 5-quart Kitchenaid artisan mixer.
Extra dough may also be frozen. Wrap in plastic wrap and then in foil and place in the freezer for up to 3 months. Thaw in refrigerator overnight and then use as normal.
The possibilities are endless with this dough. It can be made into so many different shapes and sizes of loaves and you can shape it in about five minutes a day. If you only want to make one loaf in a day, only take out the amount of dough you’ll need for that loaf (usually about a softball to grapefruit-sized amount). Again, it depends on the size and shape of loaf you’re making.
The dough will last in the refrigerator for about 10 days, fermenting even more (like sourdough) each day. It actually gets better with age 🙂
**If you don’t want to use psyllium husks or psyllium husk powder, remove the entire psyllium husks soak from the recipe and add ½ cup (120ml) to the dough water amount, totalling 660ml.
FOR HIGH ALTITUDE BAKING: Per Beth, who lives in Colorado and graciously offered some high altitude baking conversions, I followed Kim’s recipe for the flour blend. I then adjusted the following in the recipe: Yeast: 2.5 teaspoon + ⅛th teaspoon (reduced each teaspoon by ⅛th tsp). Salt: 1.5 teaspoon (added ½ tsp). Water: 1.5 c. + 3 tablespoon added 2 tablespoon per cup). I followed the rise times and baking directions exactly. I made 2 loaves: one baguette and one boule. I baked them on my baking stone as directions state. My loaves took 2 hours to grow noticeably larger during the rise after being in the refrigerator overnight. I turned the oven on then off, then put the loaves on a wooden cutting board covered with plastic wrap and also a light cloth while rising. I have a family member who has celiacs and I am gluten and dairy intolerant. I used the pea protein, by the way.”
Tried this recipe?Tag @letthemeatglutenfreecake on Instagram so we can see!