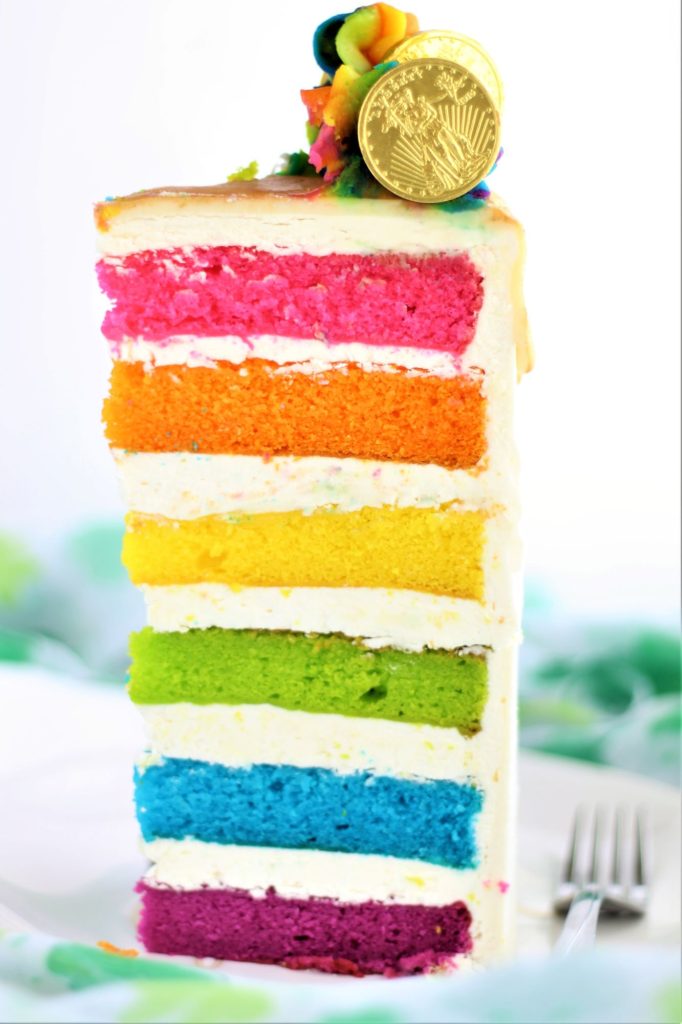
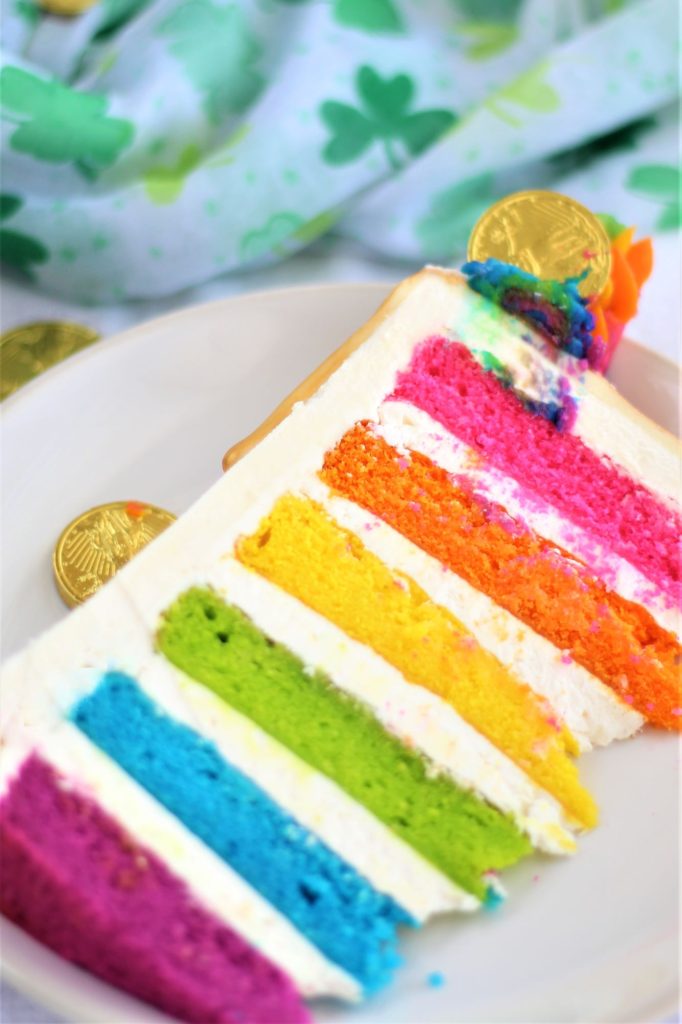
There's gold at the end of this gluten free rainbow cake! Swiss meringue buttercream and gf velvet cake make this cake as tasty as it is beautiful.
We don't normally do a whole lot for St. Patrick's Day. Sometimes I don't even cook anything Irish. I am part Irish, but I used to not really care for much Irish food. Thank God I grew up and eventually got over that (corned beef is the bomb!). But this year I really felt like going all out because why not? Why should Easter have all the fun? Any time I can celebrate a holiday that involves food, I'm in, haha!
So when I was considering making a cake for St. Paddy's Day, I really wanted to pull out all the stops. And that's exactly what I did! This cake is a monstrosity of a cake, but it's fun and colorful and the perfect cake to serve on the Irish holiday.
I got the idea for this cake from the cake queen, Liz from Sugar Geek Show. She is an extremely talented cake decorator and sculptor and her cakes are AMAZING (check out her Baby Yoda!!). I loved her rainbow cake and wanted to make a gluten free version, so that's what I did. At first I was gonna make a video of me making this cake. But I'm no pro when it comes to cake decorating and Liz is, so you can watch her video here. I kind of made it my own and changed a few things and I'll go over those below.
There are several components to this cake and I'll walk you through each one. But you can also pick and choose your level of cake decorating. The flavor is vanilla in both the cake and frosting so you can just make a lovely vanilla cake. It'll still taste amazing regardless of whether it's decorated or not. You can even halve the amounts so you don't absolutely need to make this ginormous cake! Or you can gild the lily (literally) and go for the gold and make ALL the decorations!
The Components in Gluten Free Rainbow Cake
There are a few components to this cake, but they're all pretty easy. Like I said before, YOU decide how far you want to take it. Here's a list of all the components:
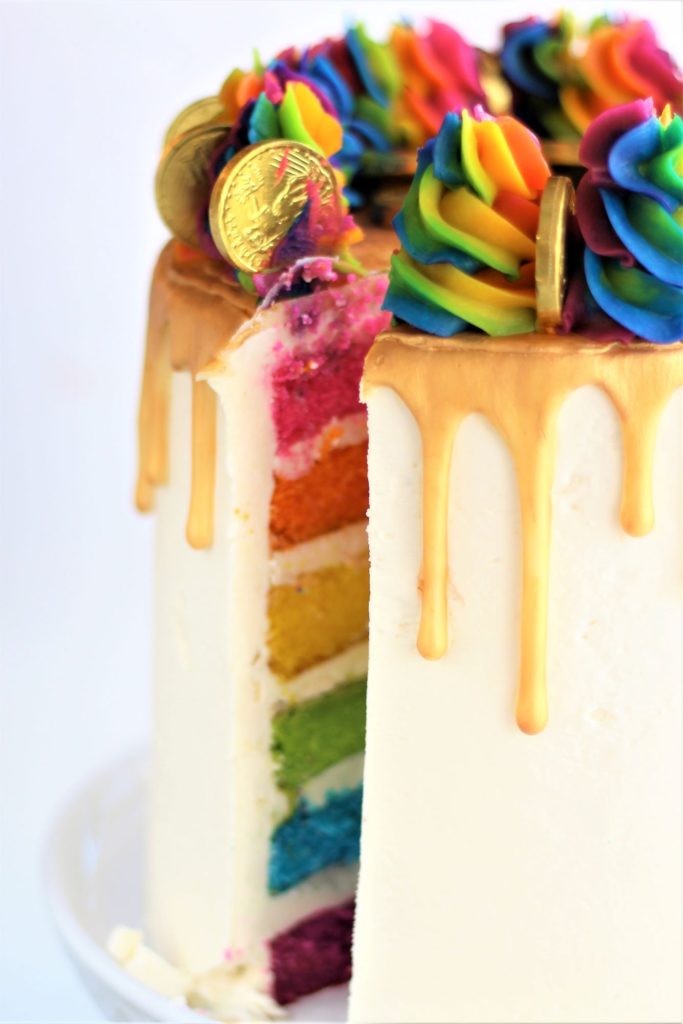
- Cake--I made Liz's cake into a gluten free white velvet cake.
- Frosting--Vanilla Swiss meringue buttercream is the perfect addition to a nice vanilla cake. Feel free to experiment and add flavors if you want (an Irish cream would be great for St. Paddy's Day!).
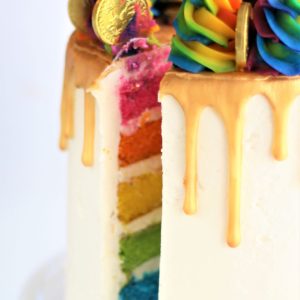
- White chocolate ganache drip--need I say more? Who doesn't love a thick white chocolate glaze over the top of any cake? Liz makes a thinner white chocolate coating glaze, but I wanted the taste of real white chocolate. Of course if you'd rather make dark chocolate, you can. However, it might need several coats of gold to get it covered completely (more on the gold "paint" later).
- Gold coins--Again, this is something I added to my cake that Liz didn't put on hers. I found these (affiliate link) gold coins on Amazon. They are real milk chocolate.
Make the Cake Layers
This cake, which is a white velvet cake, begins with the reverse creaming method. The dry ingredients and sugar are first mixed together. Then the butter is added and the mixture becomes sandy in texture before adding the liquids. Here's the ingredients you'll need to make this cake:
- Kim's gluten free flour blend--a store bought blend should also work, but hasn't been tested.
- Granulated sugar
- Salt
- Baking powder
- Baking soda
- Egg whites
- Vegetable or canola oil
- Buttermilk--for dairy free, try any of the dairy-free milks plus one tablespoon of vinegar or lemon juice.
- Butter
- Vanilla extract
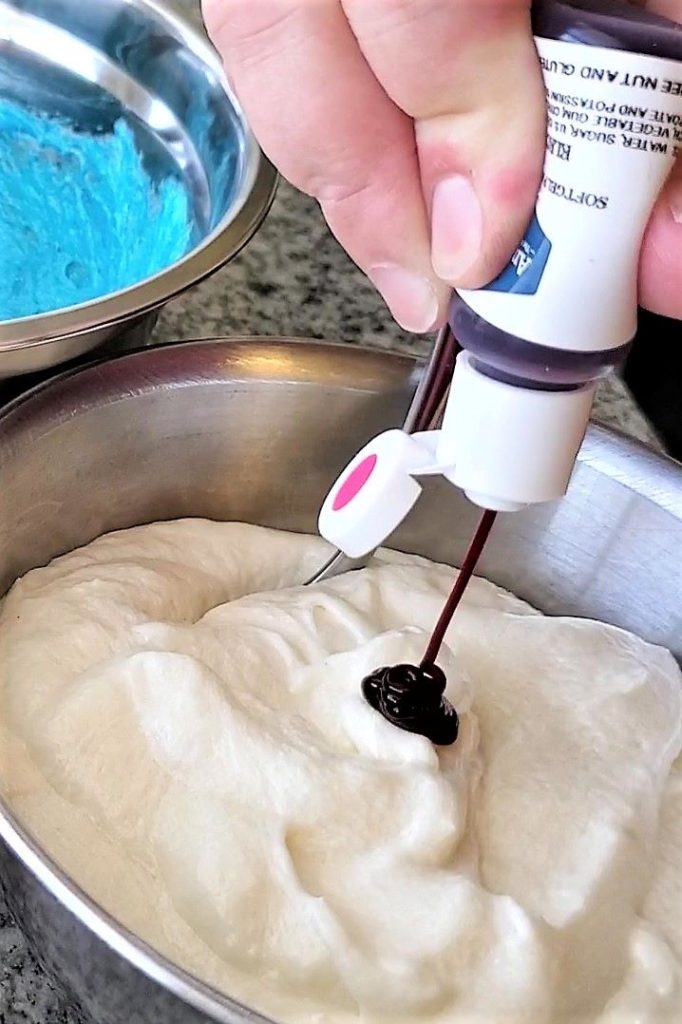
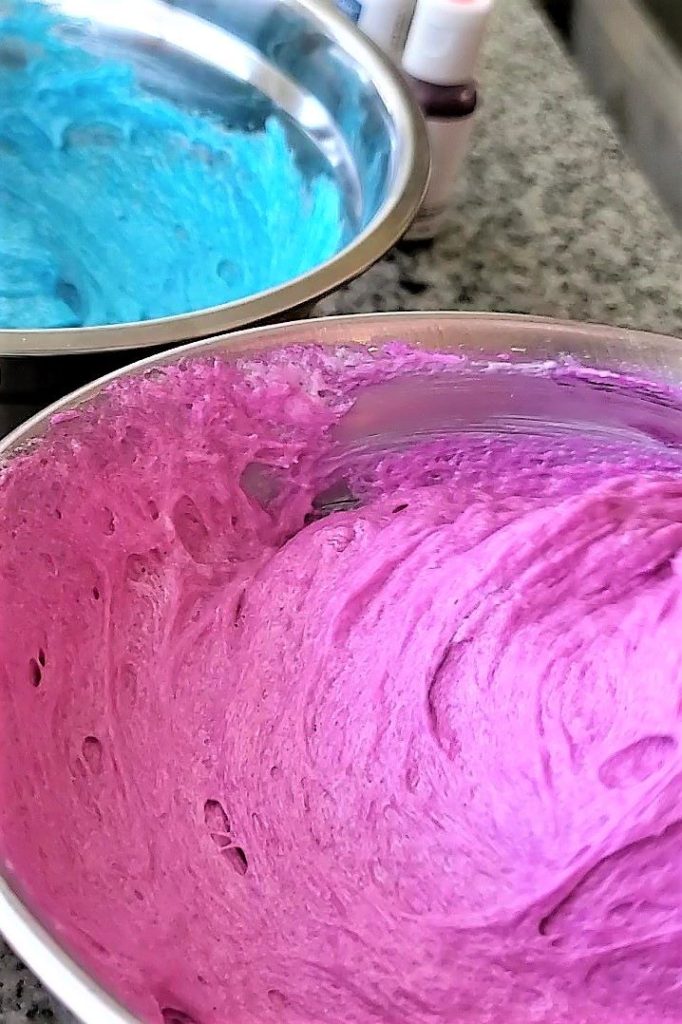
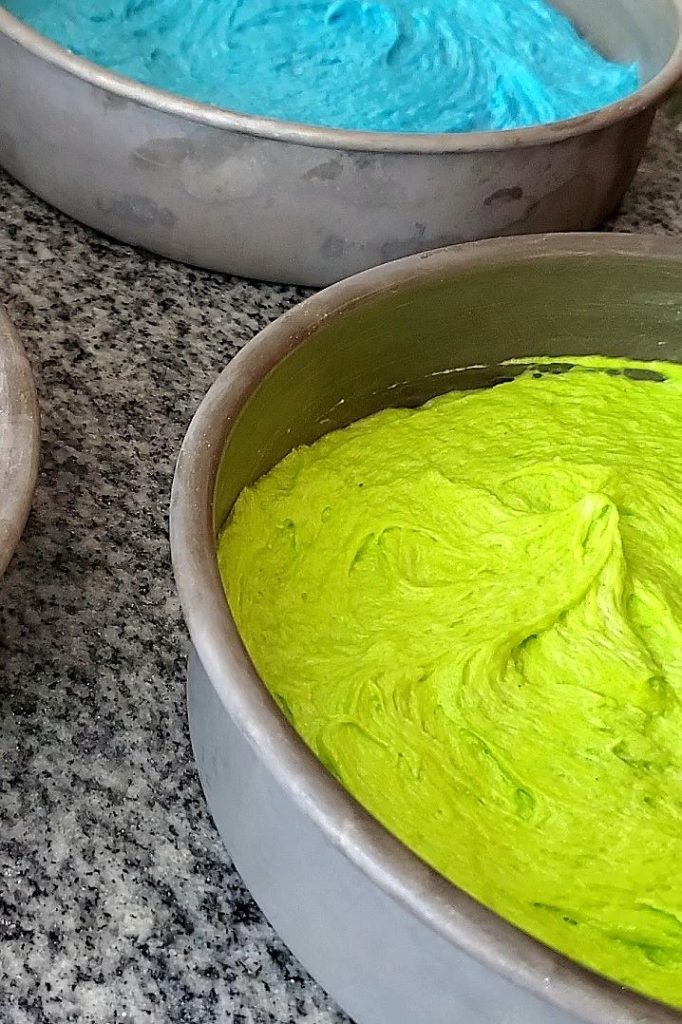
To make the colors, divide the cake batter between 6 small bowls. To help make them even, weigh each to 15 ounces (or 425 grams). The colors (affiliate link) I used were what Liz recommended for bright and beautiful. These aren't the traditional colors of the rainbow. And I really like the "electric" colors, but feel free to use whatever colors you'd like.
Divide the colors between six 8-inch round baking pans. I don't know about you, but I don't have six so I had to bake three at a time. They'll only be about one inch high, so they don't take too long to bake. The other colors can sit on the counter until the first ones are done.
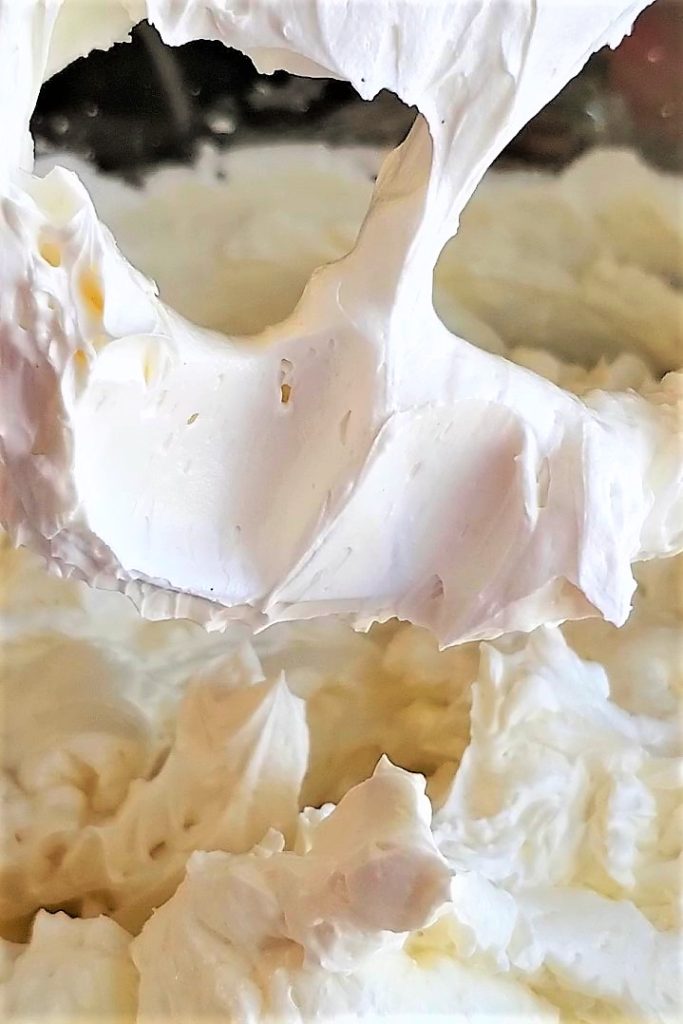
Make the Swiss Meringue Buttercream
I departed a little bit from Liz's recipe and made Swiss meringue buttercream instead of her easy buttercream. If you've never made Swiss meringue buttercream, it's actually also very easy. But you can also use Liz's easy buttercream, or my American buttercream (without cinnamon) or French buttercream. Here's what you'll need for SMBC:
- Egg whites
- Granulated sugar
- Butter
- Vanilla extract
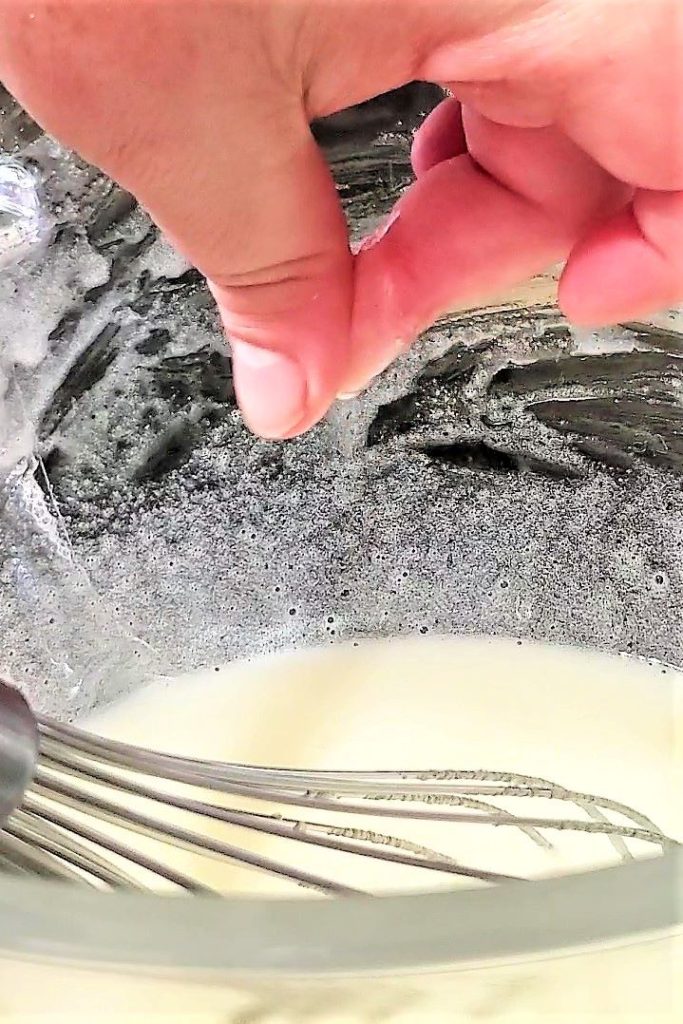
Measure the egg whites and sugar in your mixing bowl. Place it over a small saucepan with an inch of barely simmering water. Whisk constantly until the sugar has dissolved. To test this, rub a little bit of the mixture between your index finger and thumb. If you feel sugar crystals, it's not ready. You can also indicate when it's done when a thermometer registers 160 degrees F.

Take if off the heat and put it on a stand mixer using the whisk attachment. Whisk on high speed until it reaches firm peaks and has cooled down quite a bit. This will take anywhere from 5-10 minutes, depending on your mixer. Stiff peaks is when you take the whisk out of the egg whites and turn it upside down. If the peaks of the meringue stand straight up, they're at stiff, or firm, peaks.
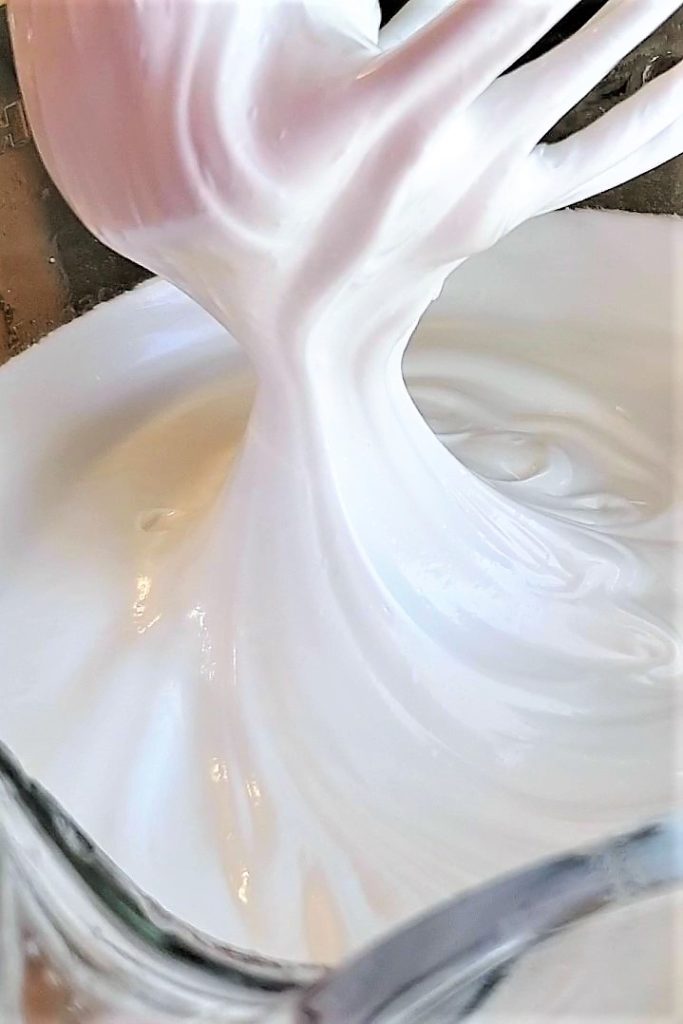
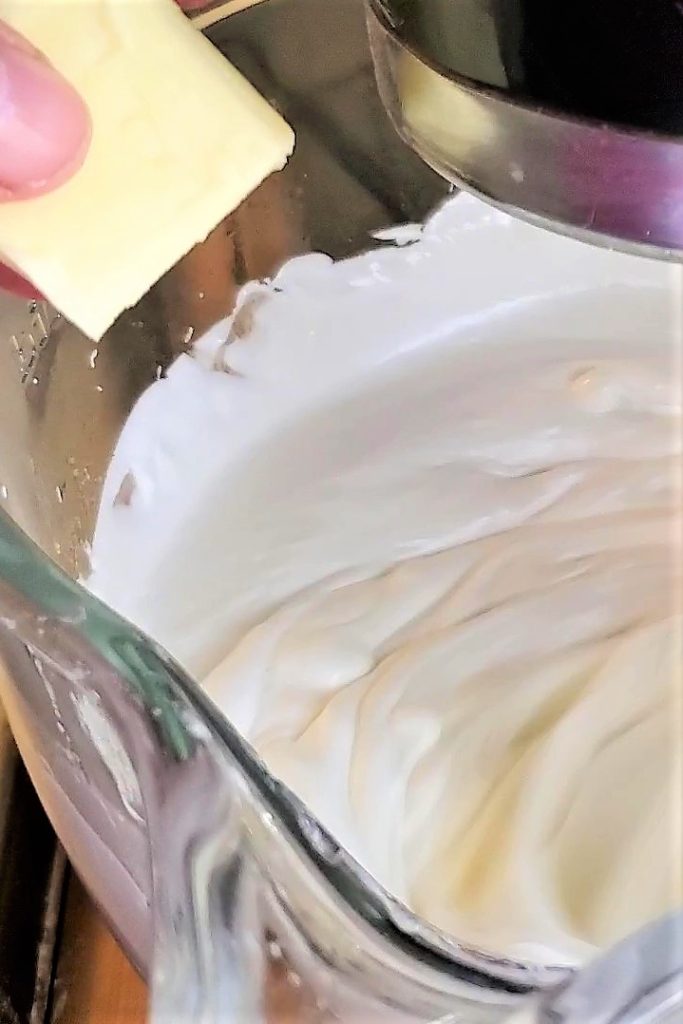
Add the butter, one chunk at a time, until it's all in the bowl. You may start to notice it look like it's curdled or soupy. This is totally normal. Just keep whipping and it will all come together. Add the vanilla and whisk until smooth. I like to switch to the paddle attachment and run it on low for a few minutes. This will knock out some of the air bubbles that have formed from all that whipping.
The Gold Drip
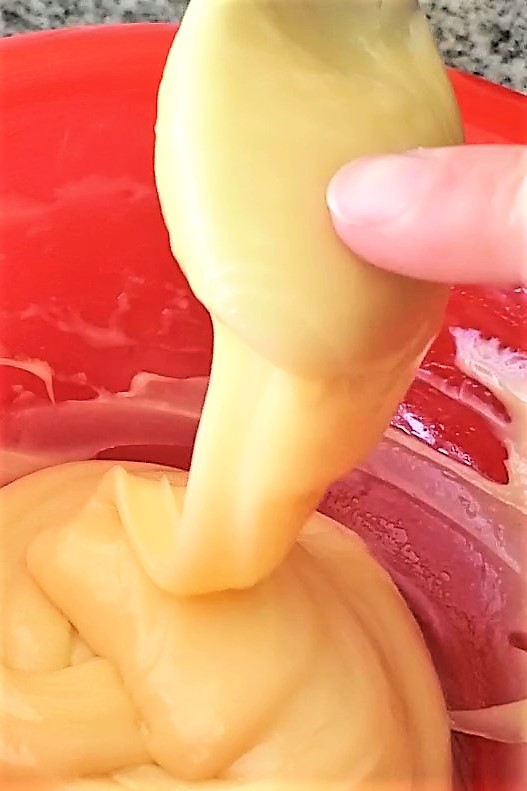
To make a drip, you'll need to make some white chocolate ganache. Liz uses a water ganache made with candy melts or wafers. I chose to make the traditional ganache using real chopped white chocolate and heavy cream. Chop the chocolate and place it in a microwave safe bowl. Microwave at 30 second intervals, stirring in between, until it's almost melted. Set it aside while you microwave the heavy cream for 20-30 seconds, just until barely simmering. Pour the hot cream over the nearly melted white chocolate and stir until smooth. Set this aside until it cools to barely warm. If you put your finger in it, it shouldn't feel hot or cold, just like your regular body temperature.
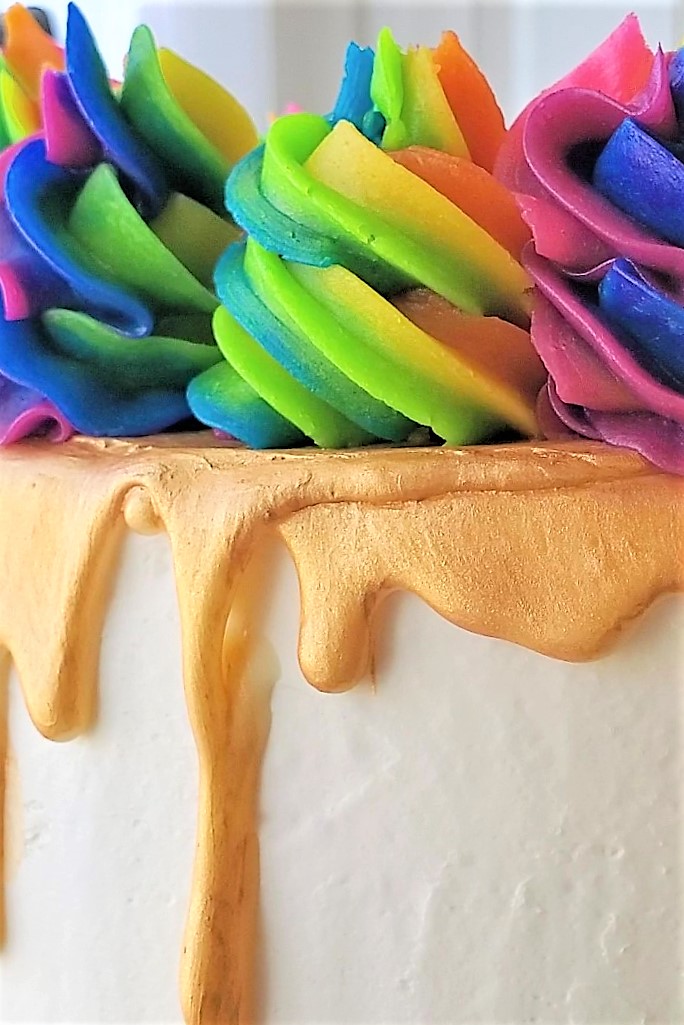
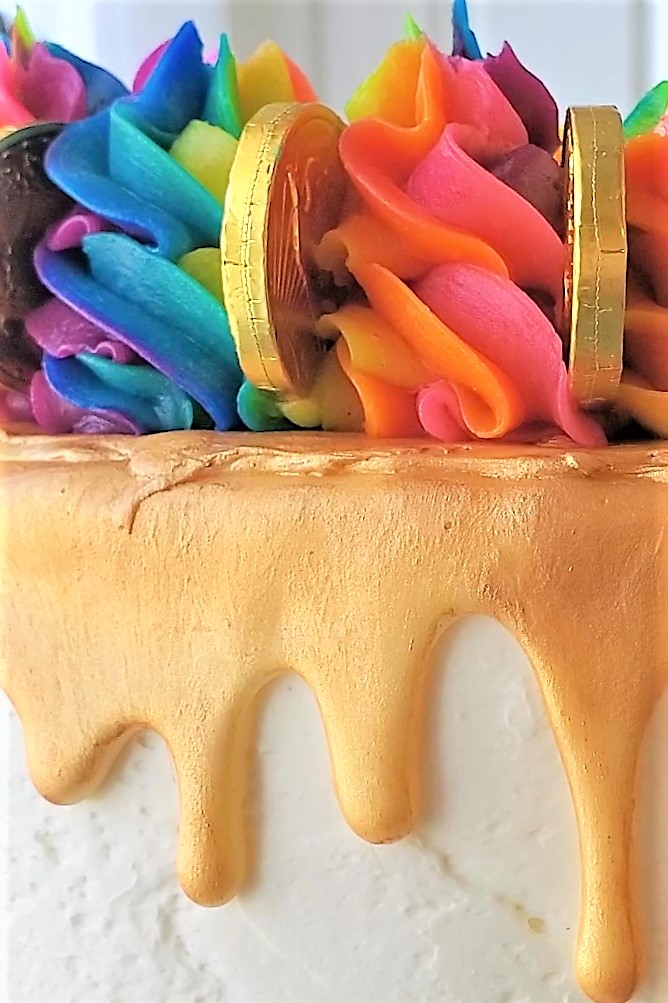
I had never done a drip cake before and it's easier than I thought. It's pretty cool how the pressure you use and the length of time you leave it in one spot gives drips of varying sizes and shapes. Fill a pastry bag (or ziptop baggie) with the cooled ganache and snip the end. Hold the bag on the edge of the cake and start putting pressure to let the ganache drip down the side. Release some of the pressure, move the bag, and continue all the way around the cake.
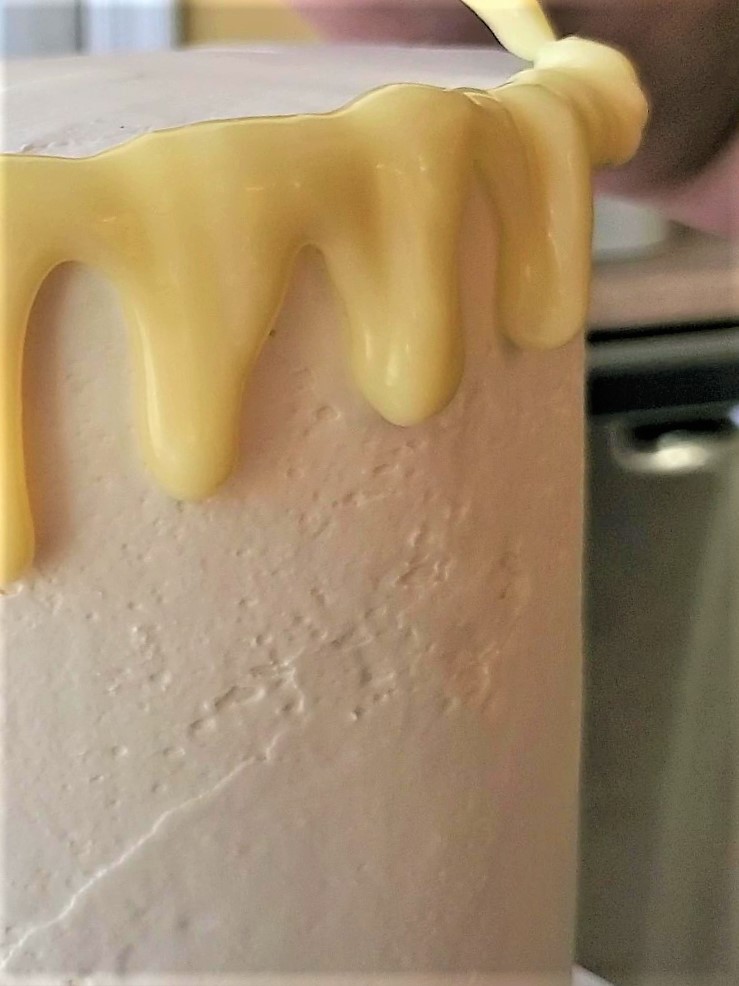
Once you've finished the drip, squeeze the rest of the ganache onto the top. Then use an offset spatula to spread it as evenly as you can. It doesn't need to be perfect because the gold coins will cover the top of the cake (if using). Refrigerate the cake until the ganache is firm, about one hour.
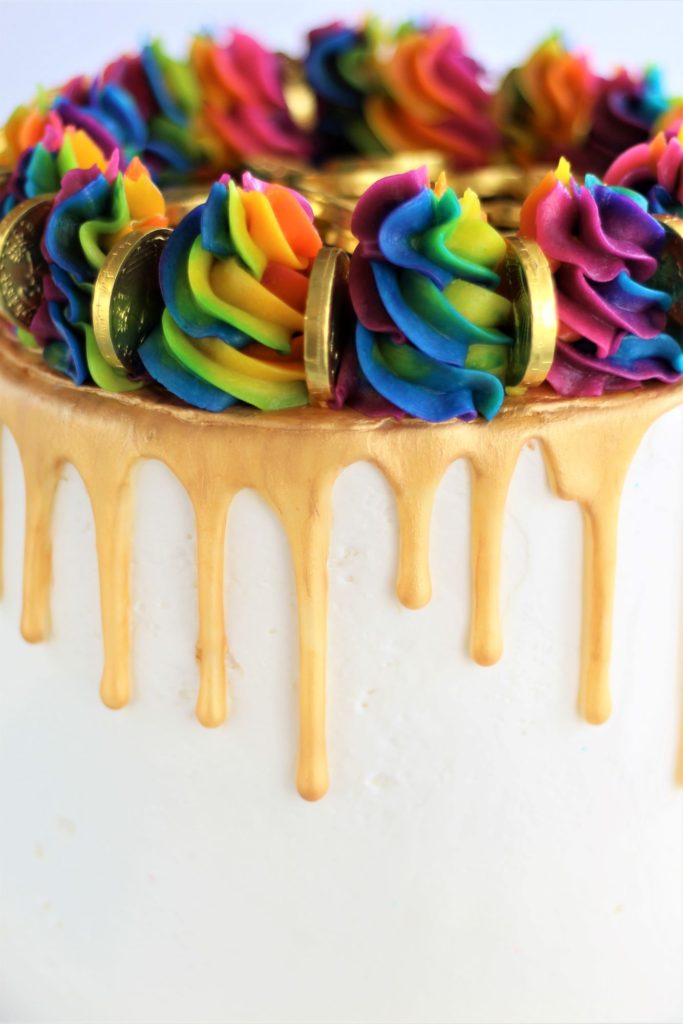
Liz recommends a specific metallic gold paint, but I stuck with this gold edible paint I got at Walmart. It comes with a little paint brush, which is perfect for painting the drips. Squeeze some into a small bowl and paint the drips with the little brush that comes with it. You'll need at least two coats, so let it dry in the fridge in between each coat. This should take no more than 30 minutes.
Piping the Rainbow Swirls and Finishing the Cake
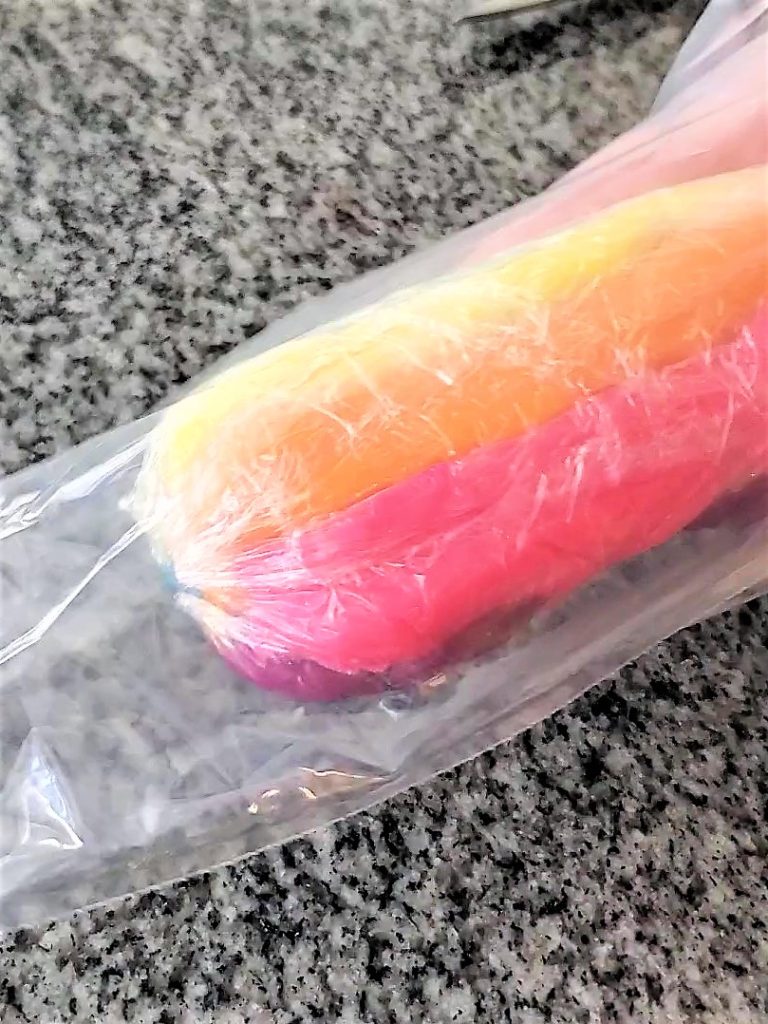
Liz made white buttercream swirls and sprinkled them with some colorful sprinkles. I chose to make mine into rainbow swirls using the rest of my buttercream. Divide the rest of your buttercream into six bowls and tint them the same colors as the cake layers. Use about a quarter of the gel colors that you use for the cake layers. Fill a small pastry bag (or even just a small baggie) with each of the colors.
Pipe about a half-inch stripe of frosting onto a large piece of plastic wrap using the first color. Then continue piping with the rest of the colors, side by side, until you have all the colors in a row. Fold one side of the frosting to meet the other side using the plastic wrap, and twist the ends of the plastic wrap. Cut off one end and stick the whole thing, plastic wrap and all, into a decorating bag fitted with a large open star tip (tip 1M), cut side first.


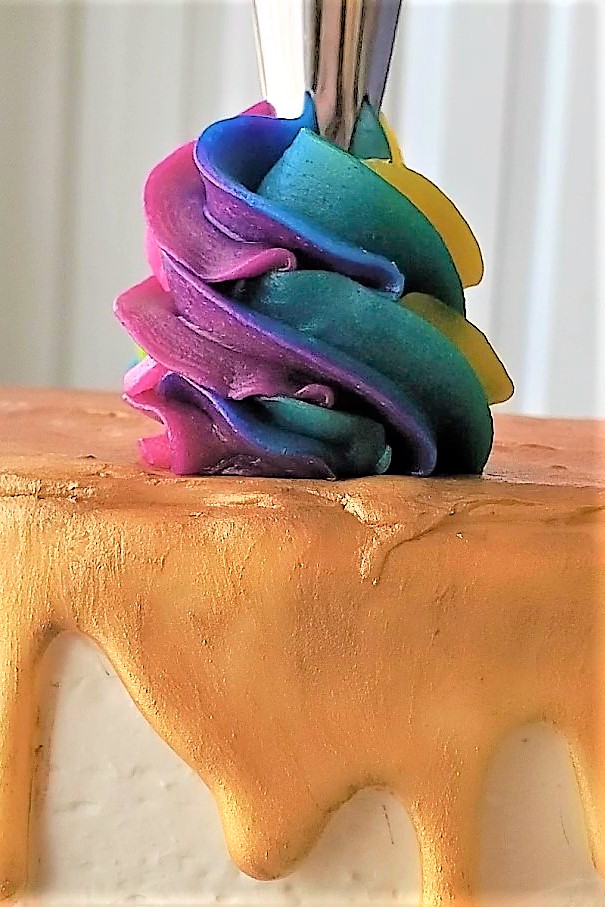
Pipe swirls on top of your cake at the edges. To get them as even as possible, pipe one swirl on one side. Then pipe another swirl directly across from it on the opposite side. That way they'll be pretty even. Stick gold chocolate coins in between each swirl and onto the top of the cake in the middle. You're done and now you get to taste your masterpiece! This is the best vanilla cake I've ever had, gluten free or not. And the frosting is silky smooth and delicious and marries so well with the cake! You'll have the luck o' the Irish with ya as you dig in!!
I hope you get a chance to make this cake to its fullest potential and admire your handiwork of colorful slices and gold drips!
Gluten Free Rainbow Cake
Ingredients
Rainbow Cake
- 4¾ cups (665 g) Kim's gluten free flour blend (a store bought blend may be substituted, but hasn't been tested)
- 3⅓ cups (680 g) granulated sugar
- 1 teaspoon kosher salt
- 2 tbsp (24 g) baking powder
- 1 tablespoon baking soda
- 10 ounces (283 g) egg whites from about 9 eggs (weigh for the most accurate results)
- ¾ cup (180 ml) vegetable or canola oil
- 2½ cups (600 ml) buttermilk, at room temperature or slightly warm
- 3 sticks (12 ounces or 339 g) butter, softened
- 1 tablespoon vanilla extract
- AmeriColor food coloring--Electric Kit
Swiss Meringue Buttercream
- 9 large (about 283 g) egg whites
- 3 cups (600 g) granulated sugar
- 3 cups (678 g) butter, at a cool room temperature, cut into one two inch chunks (I always use salted butter in my frostings)
- 1 tablespoon vanilla extract
Gold Drip
- 6 ounces (170 g) white chocolate chunks
- ¼ cup (60 ml) heavy cream
- 1 tube of edible gold paint
Instructions
For the Cakes:
- Preheat your oven to 335° F.
- Prepare six 8-inch round cake pans with nonstick spray and line each with a round of parchment paper. Set aside. NOTE: If you don't have six pans, prepare as many as you have for baking your first round of cakes. Allow them to cool completely before preparing them for the second round of baking.
- Combine 1 cup (240 ml) of the buttermilk and all of the canola or vegetable together in a measuring cup. Set aside. In another measuring cup, combine the rest of the buttermilk (1½ cups or 360 ml) with the egg whites and vanilla. Whisk well to break up the egg whites and set aside.
- In the bowl of a stand mixer (or a large bowl with a handheld mixer), measure out the flour, baking powder, baking soda, salt, and sugar. Using the paddle attachment, quickly mix these together and then add the softened butter and mix on low until it resembles coarse sand. NOTE: I pulsed this mixture initially because there's a chance some of your flour will fly out. You can also use the shield of your Kitchenaid.
- Add in the buttermilk and oil mixture and mix on low just to get the dry ingredients moistened. Then increase the speed to medium and let it mix for 2 minutes. Don't skip this step or your cake could collapse.
- Next add the egg white/buttermilk/vanilla mixture in three additions, allowing it to mix for 15 seconds between each addition. Scrape the sides and bottom of the bowl.
- Divide the batter evenly into six small bowls. Each should weigh 15 ounces, or 425 grams.
- Color the cake batter as follows: ½ teaspoon of pink for the pink layer, ¼ teaspoon yellow plus ¼ teaspoon orange for orange layer, ½ teaspoon yellow for yellow layer, ¼ teaspoon yellow plus ½ teaspoon green for green layer, ½ teaspoon blue for blue layer, ¼ teaspoon pink and ½ teaspoon purple for the purple layer.
- Bake the cakes for 24-28 minutes, or until the cake springs back when lightly touched, or a toothpick inserted into the center comes out clean. Don't under bake the layers as they will collapse in the middle. Immediately tap the cake layers on the counter, as soon as they come out of the oven, to release the steam. This helps make even layers. Allow the cakes to cool for 10 minutes in the pans and then flip them out onto wire racks to cool completely. If you have to do a second bake (due to not having enough pans), allow the pans to cool and prepare them again (you should be able to reuse the parchment paper though).
- Freeze the cake layers for 30 minutes before filling and stacking with the buttercream. Another option is to wrap each in plastic wrap and put them in the fridge overnight to make this cake a 2-day project.
- Fill and frost the cake layers with buttercream, refrigerating in between crumb coat and final coat. Refrigerate the cake for at least a half an hour before applying the drip.
- Apply the drip and return the cake to the fridge for at least 15 minutes before painting the drip with gold edible paint. Allow the paint to dry before finishing the cake with rainbow frosting swirls and gold coins.
For the Swiss Meringue Buttercream:
- Place the egg whites and sugar in the bowl of a stand mixer and set this over a small saucepan filled with one inch of barely simmering water.
- Whisk continuously until the mixture reaches 160° F, or a little rubbed between your fingers is smooth without any sugar crystals present.
- Attach the bowl to your stand mixer fitted with the whisk attachment and whisk on medium high until the meringue is stiff and the bowl is cool to the touch. This will take anywhere from 5-10 minutes, longer if you don't have a stand mixer.
- With the mixer still running on medium high, add the butter, one chunk at a time. The mixture may look curdled at some point while adding the butter or after. This is totally normally. It will become smooth so just keep whisking.
- Switch to the paddle attachment and add the vanilla extract. Turn the mixer on to low and continue to blend just to knock out any large air bubbles, which makes it easier to smooth the frosting onto the top and sides of the cake.
- After filling and frosting the cake, divide the rest of the frosting into six small bowls and color using the same color guide for the cake above, reducing the amounts to one quarter (where it calls for ½ tsp, use ⅛ and ¼ tsp, use just a few drops). Add each color to small decorating bags or sandwich baggies. Cut a half-inch off the corner of the baggies and pipe each color side by side into a stripe on a piece of plastic wrap. Fold it over itself to create a "roll" and twist the ends. Cut off one end and insert the frosting roll into a large piping bag fitted with a large open star tip (1M), cut side first (plastic wrap and all). Pipe frosting swirls onto cake as desired.
For the White Chocolate Ganache Drip:
- Place chopped white chocolate into a small bowl and microwave 20 second intervals until almost melted. Microwave heavy cream in another small bowl or measuring cup until just under boiling, 20-30 seconds.
- Pour hot cream over almost melted white chocolate and stir to combine. There should be no lumps of chocolate remaining. If there are, microwave at 20 second intervals and stir until completely smooth. Allow the ganache to come to barely warm (body temperature) before adding to a decorating bag. Snip off the corner of the bag and drip the ganache around the top of the cake at the edges using varying pressure to obtain different lengths of drips.
Recipe and techniques adapted from Liz at Sugar Geek Show

Janet
This was huge but delish. Can i cut the recipe so i can make just two layers
Kim
Sure!
Tanya Hudson
Hi, Kim! Does this white velvet cake have just the same texture as your red velvet cake? Which is perfectly awesome, by the way!
Kim
Thank you! It's not from the exact same recipe, but they are both very soft and delicious 😊
Wendy C
Kim, if i leave out the rainbow coloring will this cake be a true white? I need a gluten free white velvet cake for a wedding cake.
My usual white velvet cake is the Cake Boss recipe but it uses a regular cake mix plus some cake flour and other ingredients.
I have not found a pure white gf cake mix so I am thinking I will have to start from scratch and yours looks like it could work if it bakes up white!
Thanks so much!
Kim
It probably won't be pure white because of the butter, but it will be pretty close without any egg yolks. If you have any lavender or purple food coloring, you can take the tiniest bit on the end of a toothpick and add it to the batter, which should make it pure white. 😍
Maia-Beth Melbye Wechsler
This looks sooo amazing 🙂
I´m so excited to try this! mixing it all together now, but can't seem to find the cooking temperature? What should i set my oven to?
Kim
I am so sorry! I can't believe I didn't see that and no one told me until now!! It's fixed now. It's supposed to be 335 degrees F.
Thank you for alerting me 🙂
Pam V
Kim I am so impressed, this cake is a piece of art! Love the icing swirls on top. Thank you for sharing, this looks like great fun to make.
Kim
Thanks so much, Pam!!! It was actually super fun to make! I don't think I've ever colored cakes like that (except for red velvet).
Alene Wendrow
Oh my goodness! I believe that someone would pay good money for that cake. It is gorgeous! I don't have the dexterity to create the multi colored icing nor gobs of people to serve it to right now. It is really impressive!
Kim
Oh, haha! Thank you so much, Alene!! I really appreciate it 😍