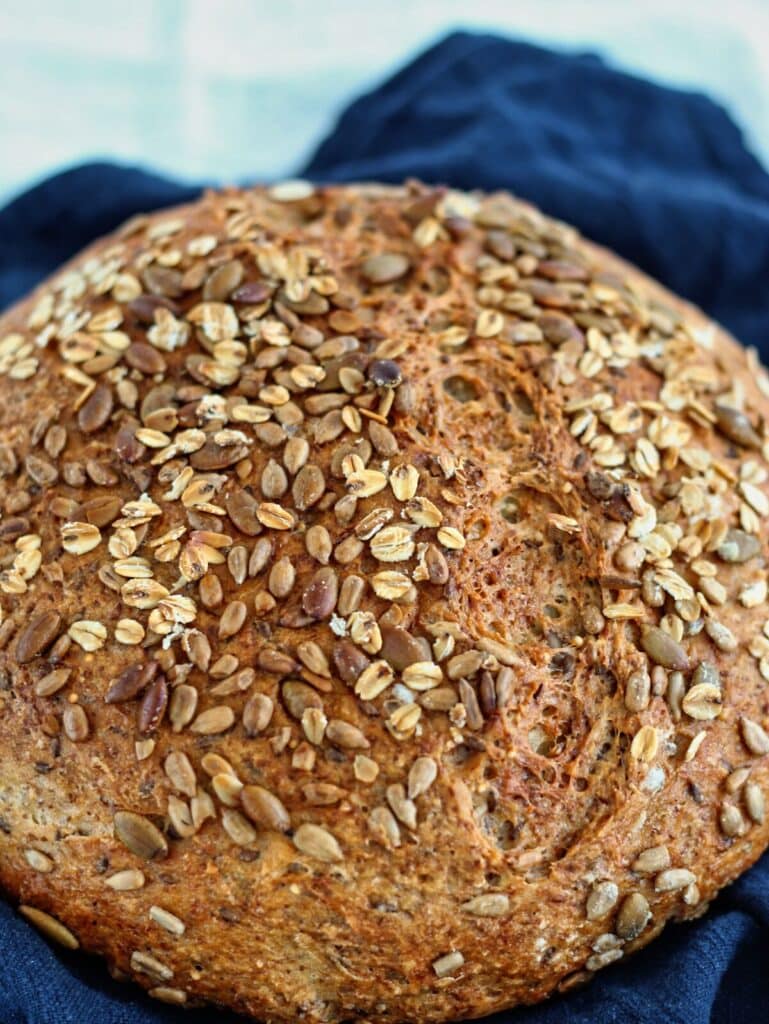
After many attempts, I finally nailed Gluten Free Multigrain Seeded Bread and it was worth the wait! Soft, but hearty, and much healthier, I hope you enjoy it as much as we do!
Some of the items linked in this post are affiliate links, meaning, at no additional cost to you, if you click through and make a purchase, I will earn a small commission.
Y'all. If you only knew how long I've been working on this bread. And the multigrain flour blend in general. I can't even remember when I first started, but I know it was well over a year ago, probably two. I just could not for the life of me get it right, but I persevered as I always do and finally created something that was not only hearty and tasty, but also very soft and fluffy. Like, SUPER soft. And FLUFFY. Those two words require all caps! Now the world is our oyster and we can have healthier options without sacrificing what we love!
why you'll love this bread
- It's easy to make
- It's healthier than all my other breads
- The texture is soft and fluffy on the inside and crusty on the outside
- You can customize the add-ins to your liking
ingredients needed to make multigrain seeded bread
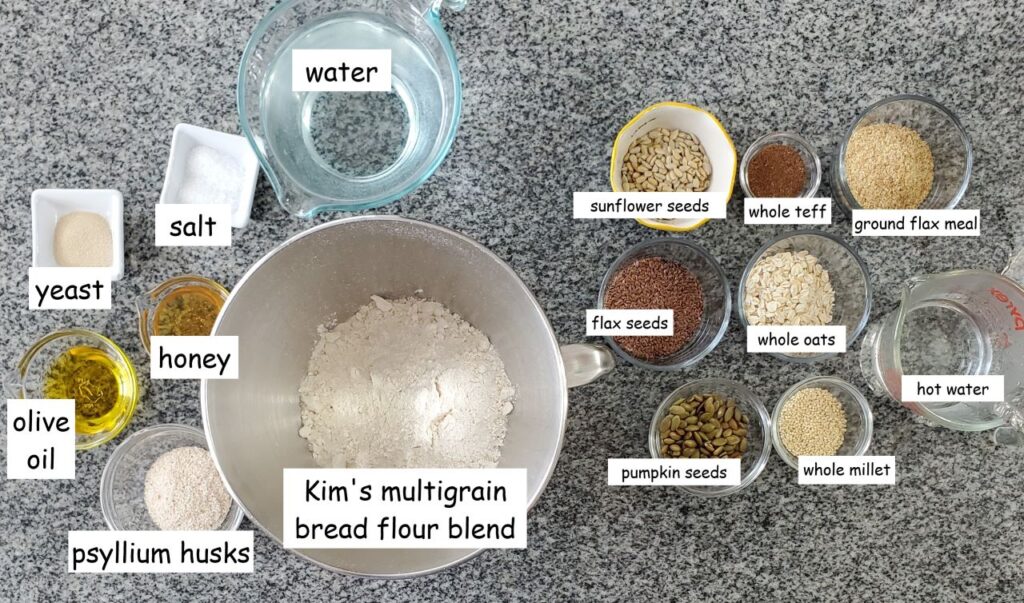
- Multigrain flour blend -- my all NEW flour blend, which is revolutionary and can also be customized to suit your dietary needs with multiple options!
- Psyllium husks -- I like to use whole psyllium husks, but you can substitute with psyllium husk powder in a smaller ratio (see the recipe card for instructions)
- Flax meal
- Sunflower seeds -- sunflower seeds are by far my favorite seed of all time. Feel free to use any seed you like.
- Pumpkin seeds -- great texture and flavor, but again, use what you enjoy eating.
- Whole millet -- I love how whole millet kinda "pops" like quinoa does, or what I used to love that we can't have anymore--barley.
how to make gluten free multigrain bread
- Put all soaker ingredients in a bowl and pour hot water over. Cover and let soak while you get all the other ingredients ready.
- If desired, pre soak your psyllium husks in some of the water from the dough recipe.
- Measure the rest of the ingredients for the bread in a large mixer bowl and mix, using the dough hook, until well combined.
- Add soaker (which by now should have soaked up all the water) and continue mixing the dough for another couple of minutes.
- Cover the dough and proof it in a warm, draft-free area until doubled in size, 1-2 hours (this could take longer based on the temperature of your proofing area).
- At this point, you can refrigerate it for a couple of hours or shape the dough because you pre-gelatinized the psyllium husks and the dough is a little bit easier to work with. However, I still prefer to refrigerate it overnight for an even better dough texture and flavor.
- To shape, dump dough out onto a floured surface and knead to degas slightly and smooth out the dough. Shape into a boule, batard, or baguette.
- Cover and allow to rise until nearly doubled in size. While dough is proofing, place a Dutch oven with a lid into the oven and preheat it to 500 degrees F.
- Slash risen loaf with lame or sharp knife and lower it into preheated Dutch oven and replace the lid. Put Dutch oven into preheated oven and shut door. Immediately turn heat down to 450 degrees F and bake for 40 minutes. Remove lid and bake for an additional 20 minutes.
- Allow to cool completely before slicing.
Multigrain Seeded Bread Frequently Asked Questions
Yes, you can use any seeds and/or nuts or even dried fruits in your soaker you'd like, as long as they weigh between 150-160g. Make sure to use some form of ground meal as about 18g of your soaker, however.
You don't have to add flax meal per se, but you do need to add some form of ground meal. A ground meal will begin the enzyme breakdown of the seeds and nuts you use in the soaker. This just means the nutrients are released from the seeds and nuts, allowing for optimal flavor and texture. You can use any form of nut or seed and grind it to use as your meal.
Yes, you can bake the bread on a pizza steel, pizza stone, on an overturned baking sheet, or even in a loaf pan.
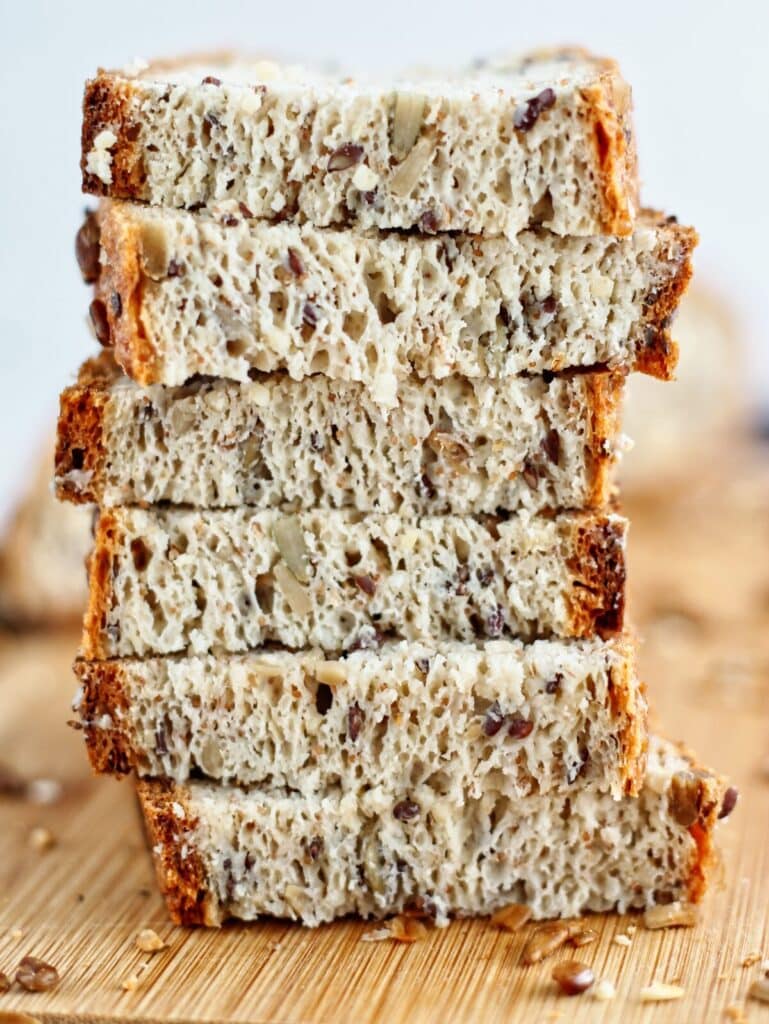
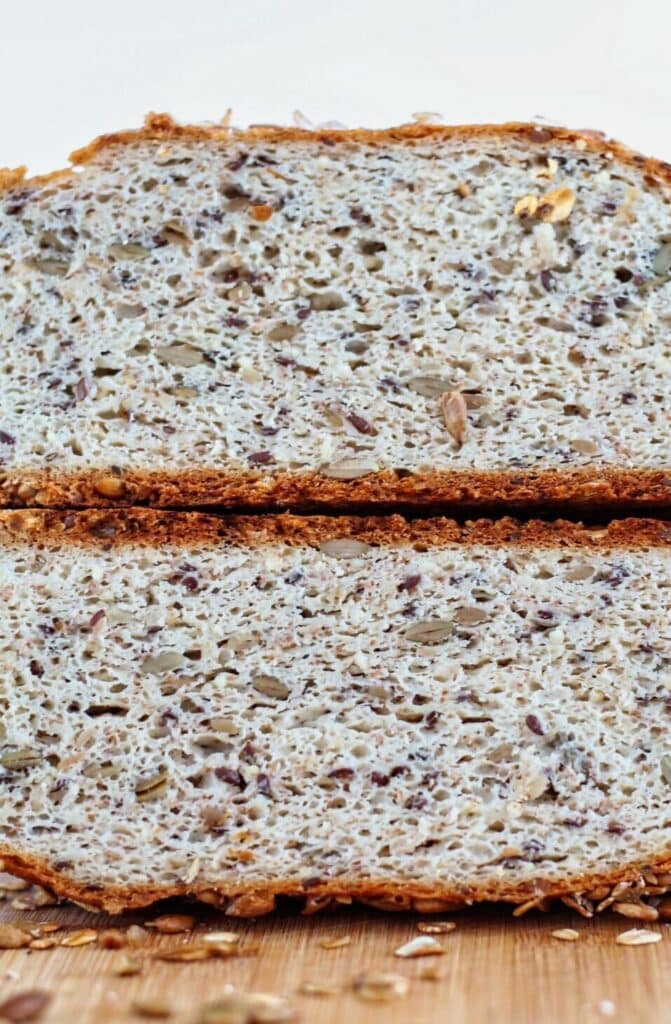
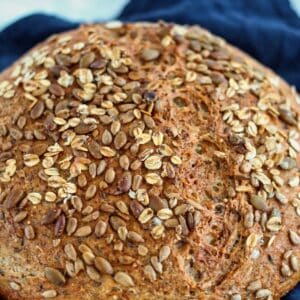
You won't believe how wonderfully soft this gluten free multigrain seeded bread is, while still being hearty and crunchy at the same time.
Gluten Free Multigrain Seeded Bread
Ingredients
Psyllium Husks Soak
- 2 tbsp (10g) whole psyllium husks** (see notes) (1½ tablespoon psyllium husk powder may be substituted)
- ¾ cup (180ml) hot water
Seed Soaker (these can be customized, but should total around 150-160g)
- 3 tbsp (30g) whole flax seeds
- 3 tbsp (20g) whole purity protocol rolled oats
- 3 tbsp (26g) raw sunflower seeds
- 3 tbsp (27g) raw pumpkin seeds (pepitas)
- 2 tbsp (24g) whole raw millet
- 3 tbsp (18g) flax meal
- 1 tbsp (12g) whole teff grains
- ½ cup (120ml) boiling (or very hot) water
Bread Dough
- 2½ cups (350g) Kim's multigrain bread flour blend
- 1½ tsp (5g) instant yeast
- 2 tsp (12g) kosher salt
- 1 cup (240ml) warm water
- 2 tbsp (26g) olive oil
- 2 tbsp (42g) honey
Instructions
Soak the Seeds/Nuts/Grains:
- In a small bowl, pour boiling water over seed soaker mixture and cover with plastic wrap. Set aside while you prepare the rest of the dough.
Soak the Psyllium Husks (this is not necessary, but allows you to make the dough and bake the bread all in the same day)
- Place psyllium husks in a small bowl and pour hot water over. Stir and set aside to gel.
Make the Dough
- Once psyllium husks have gelled, place all dough ingredients (including psyllium husks) into the bowl of a stand mixer and mix on medium high for a few minutes. Add the seed soaker (which by now should have soaked up all the water) and continue to mix for another few minutes. This can also be mixed using a handheld mixer or in a bowl with a good amount of elbow grease (a Danish dough whisk would help significantly if you want to mix this by hand).
- Scrape dough into a mound in the center of the bowl and cover the bowl. Allow to proof in a warm environment for 2-3 hours, or until doubled in size. Proofing time will vary based on the temperature of your proofing area.
- If you pre-soaked your psyllium husks, you may knead the dough immediately (or refrigerate it for a few hours before kneading). Otherwise, for best results, refrigerate the dough for at least 6 hours, preferably overnight.
- Knead dough on a well-floured surface until smooth, adding more flour as necessary to prevent stickiness.
- To shape into a boule, simply form into a round ball, pulling the dough up and under the ball and pinching on the bottom. If desired, add some seeds/grains to the counter, spray loaf with nonstick spray, and sprinkle seeds over the loaf. Place on parchment paper or put in a lightly floured banneton, smooth side down. To shape into a baguette, smooth the dough and roll into a rope shape, tapering it at the ends, adding more flour as necessary. Roll out as thick or thin as you'd like and as long as you're able to fit in your oven (make sure it will fit on your pizza steel or stone). Place it on a sheet of parchment paper.
- Place the loaf or loaves, covered loosely with plastic wrap, in a warm, draft-free area to rise until visibly puffed and slightly larger, but not doubled in size, about ½ to 1 hour. This time will vary greatly depending on the warmth of your proofing area and the time of year (summer loaves always proof quicker than winter loaves).
- BAKING STEEL OR STONE METHOD: Set up your oven for baking. Place a baking steel or stone (or overturned baking sheet) onto the middle rack with a shallow pan on a rack underneath. Preheat the oven to 450° F. DUTCH OVEN METHOD: Place a Dutch oven with a tight-fitting lid into the oven and preheat it to 500° F. You won't need the shallow pan with steam as enough steam will be created in the Dutch oven once the bread goes in. NOTE: This will only work with boules or loaves that can fit into the Dutch oven. If you're making a longer batard or baguette, you'll need to use the first method.
- When the dough has finished rising and is visibly puffed, run a serrated knife under hot tap water and cut slits in the dough swiftly but uniformly, about ½-¾ inch deep.
- BAKING STEEL OR STONE METHOD: Fill a measuring cup with one cup of very hot water (from the tap is fine). Using a pizza peel (paddle), slide the loaf (or loaves) onto the baking steel (or stone), parchment and all. Immediately pour the cup of very hot tap water into the shallow pan. Quickly shut the oven door. DUTCH OVEN METHOD: Remove the lid carefully and carefully lower the dough, parchment and all, into the Dutch oven. Replace the lid and shut the oven door. Immediately reduce the temperature down to 450° F.
- BAKING STEEL OR STONE METHOD: Bake for about 30 minutes for baguettes, or about 40 minutes for boules, OR longer for larger boules (some larger boules can take up to an HOUR or more). If the loaves are getting too browned, you can cover them loosely with foil. The loaves will look crusty and done on the outside, but will feel somewhat light when picked up. If they feel overly heavy, they're not done yet. However, because of the added seeds and bulk, they will be heavier than my usual loaves of gf bread. If necessary, allow them to bake for another 5-10 minutes and then check again, picking up the loaf with two gloved hands. If they're still feeling overly heavy, allow them to bake for another 5 minutes and check again. DUTCH OVEN METHOD: Bake the bread for 40 minutes with the lid on. Remove the cover and continue to bake for another 20 minutes. Check for doneness as above, adjusting time as needed.
- Remove from the oven and place on a cooling rack. Allow to cool COMPLETELY before cutting (or it will be gummy on the inside).
Notes
Did you make this recipe? Snap a pic and tag @letthemeatglutenfreecake on Instagram so I can see your creation!


Shang Zewar
Hi Kim
I live your recipes, can this bread be baked in an air fryer instead a Dutch oven?
Thanks
Joanne L Turner
Kim,I am confused about your high-altitude adjustments. It says yeast 2.5 teaspoons + 1/8th (reduced ea tsp- by 1/8th tsp), but original recipe only called for 1.5 tsp. Salt says 1.5 tsp (added 1/2 tsp), original recipe called for 2 tsp. salt. So it appears that the High altitude has more yeast than original, not less, and has less salt than original recipe. I have been really struggling with the sourdough gluten free bread, so I figured I would try a recipe without sourdough. I just want to get a not only edible loaf of bread, but delicious as well. Thank you for your time!!
Kim
I'm sorry, Joanne. I only copied and pasted that response from another follower and that's what she used. I cannot speak to high-altitude instructions because I don't live in a high-altitude location and don't know how to bake for high altitude. I wish I could help you further. If you look through the comments, you might be able to find this person's response and maybe ask her directly.
Nataline Calia Brieck
Dear Kim,
I was so excited to find your website as I am GF;however, I'm, also Vegan and so I do not want to use the Whey Protein Isolate. Is there another option? Hope so! Thank you... Natalie
Kim
Hi! Please read through the recipe post. You'll find alternative suggestions for whey protein.
Nosheen Ausaf Kidwai
Another perfect recipe! All your recipes give amazing result. How can we share pictures of our baked products with you? I had posted on Instagram a week ago and tagged you, but I think you missed it.
Nosheen
Kim
Thank you so much, Nosheen!!! You are baking your way through my website and I'm LOVING it 🥰🥰🥰
If you are on Instagram, you can tag @letthemeatglutenfreecake and I'll see it 😊
Alice Kowalyshen
Hi Kim, awesome receipe, I love it!!
But my hubby cannot have seeds, can I make this receipe & omit the seeds? Would I have to adjust the water to flour ratio?
Thanks
Kim
I would use my artisan bread recipe instead then. You can just substitute the regular bread flour blend in that with the multigrain flour blend.
Saga
This is such a great bread recipe! I have a suggestion for bakers who cannot tolerate dairy and therefore can't use the whey protein isolate, I used Ancient Nutrition Bone Broth Protein. As long as you're not vegetarian, it's worth a try. I have baked beautiful loaves substituting this protein for the whey protein isolate and the savory flavor of the bone broth protein complements the nutty flavor of the whole grains and seeds beautifully. Thanks very much for all your research, this is amazing bread! I am looking forward to making Swedish Lucia buns based off the Hot Cross Bun recipe.
Helen Harris
OMG! This bread is fabulous! I’ve been making your breads for a few years and this is by far the best. You have knocked it out of the ballpark on this one with the flavor and texture. One little thing I noticed on my loaf-a little tiny bit of gumminess on the knife as I was slicing near the bottom. It was completely cool and had been out of the over for 4-5 hours. What do you think caused that? Maybe underbaked a little? I took it out 2 minutes early because it was getting so dark on top. I used the Dutch oven method. My gluten eating, bread loving husband is now eating almost the whole loaf! Thank you!!
Kim
Yes, definitely underbaked. That happens to me sometimes, too (the thin gummy line at the bottom). If it seems to be getting a little too dark and you feel it's not done yet, tent it with foil. Thanks so much for your really nice comment 🥰
Helen Harris
And one more salute to this bread - I’m eating my last piece 4 days after making it, toasted, with cream cheese and fig butter. To die for! And still good 4 days later! If you plan to take a bread to the commercial market, this is the one to take. Happy Thanksgiving and thank you for all you’ve created for us.
Rachel Nicole
I am absolutely thrilled with this recipe. Thank you, Kim, for all of your time and effort. I am a recipe developer, too, and I know how much work goes into creating the perfect formula. This is the first time I have made (or eaten) a gluten free bread that could actually convince people that it isn't gluten free. It came out beautiful the first time I made it, and my family loves it. I am in the process of fermenting your sourdough starter and I plan to use your recipes for all of my future gluten free baking.
I want to also note that I did substitute the whey protein (all I had was vanilla flavor) in the flour blend for nonfat dry milk and it worked just fine.
Kira
Dear Kim,
I needed some help. I want to bake the multi grain loaf bread. I wanted to ask if I could skip the seed soaker? Will it affect the bread if I do not include the seed soaker?
Kim
No, it won't affect the bread at all. I've made this as just a multigrain loaf without any seeds.
Bailey Nimmrichter
Kim, this was a fantastic recipe. Maybe I have old yeast as I didn't get the rise I wanted. I recently saw your 2.0 sourdough recipe, could I try adding the heat activated baking powder to try to get more oven spring??? 🙂 Thank you for your contribution to my gluten free life!!!!
Kim
Yes, you should try the baking powder! I'd love to go back through all of my bread recipes and try it as well.
Thank you for your kind words and support 🥰
Lisa Jackson
I made this delicious multigrain bread as a boule, baked with pizza stone, it was perfect! I have a 13 x 4 Pullman loaf pan, can you advise me how I can make use this recipe and bake it in my loaf pan? NOTE it is a longer bread pan, 13 inches. Thank you
Kim
Funny you should ask that as I'm currently trying to figure out how to convert any of my bread recipes to be made in a loaf pan! I've been experimenting for the past week and have been trying to get the right temperature and timing for maximum oven spring. I'm not quite there yet, but don't worry because I won't give up. I'll come back on here and let you know when I get it right 😊
Lisa Jackson
Thank you! I look forward to learning from you how I can bake your delicious multigrain bread in my 13 x 4 Pullman Loaf pan! Good luck testing it out! Much appreciation!
Priscilla
I have been GF since 2008, and this is such an awesome recipe, as anything you can buy that has multigrain is ridiculously expensive! Besides, homemade is the best! I want to put this into a loaf pan--have been using boules--and would love to hear/see when you have succeeded in whatever changes might be needed for a loaf pan bake. How will I know to find it when you do post it? I hope to try many of your recipes..but I suspect this will remain a favorite. Thanks so much for your innovation, Kim!
Priscilla
R. B.
Can this be made into rolls? If so, would the Dutch Oven method be the best place to start? Any suggestions for baking times, temps, etc., are appreciated. Love your recipes. After I use up my Better Batter flour, I'm switching to your blend as I'm having much better results with it.
Kim
Awesome! Yes, they should be able to be made into rolls as well. See my crusty French rolls recipe for tips on how to do that.
Lynn
Kim, a quick claifiaction....if you use pysillium powder, do you soak it in the 3/4 cups of water like you would for the husks? I just made my first loaf using the powder, but did not soak it in water and think my dough might be too dry.
Kim
It's not absolutely necessary to soak the psyllium husks before making this recipe, so I don't think that would be the problem.
Lynn
I've got this recipe down now and absolutely love the bread...great recipe thank you and keep them coming!!
Kathy Taylor
Kim, I love your blog. It's my go-to for everything gluten free and especially love your bread flour blend. I'm considering trying bread in my Dutch Oven. What do you think?
cchandler
Hi Kathy,
This bread recipe is ideal for the Dutch oven method! From my experience though, I prefer to put a baking sheet or two on the oven shelf below so that the bottom doesn’t get too crusty. The use of parchment paper to transfer the loaf into the pre-heated pan is absolutely invaluable.
Enjoy!
Kim
That's how this was baked, in a Dutch oven. There are instructions in the recipe card 🙂