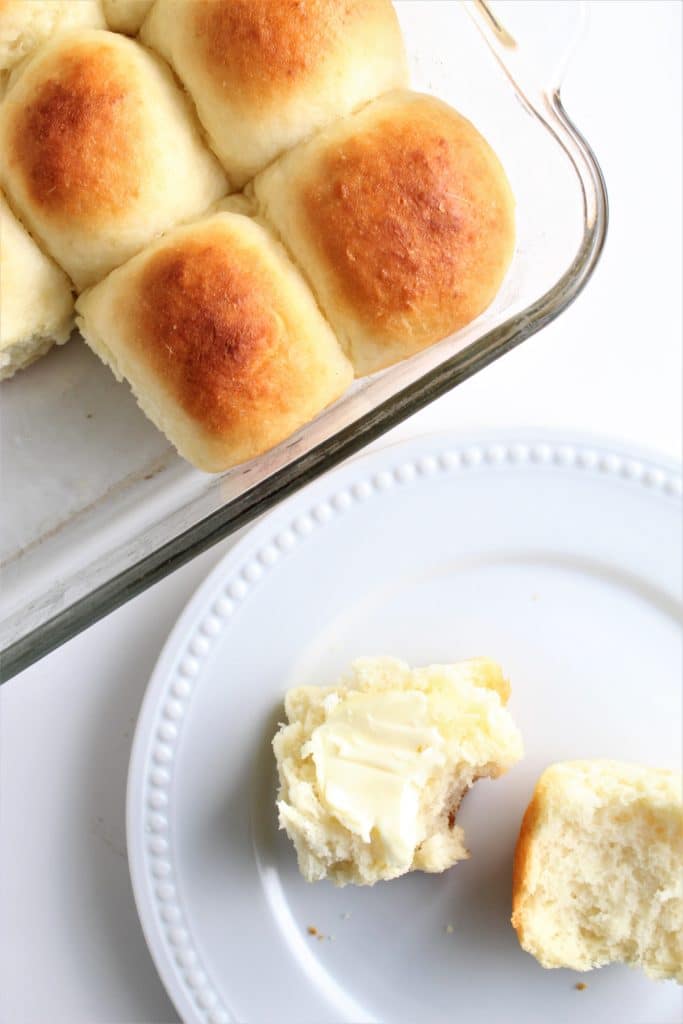
What's a Thanksgiving dinner without a basket of soft, fluffy dinner rolls? These gluten free Hawaiian rolls will satisfy your cravings for those buttery rolls we've all been missing. I dare anyone to believe they're gluten free!
It's so funny how we seem to miss something more when it's gone. Am I right? This theory really held true when I found out I had Celiac. At Thanksgiving, I'd always fill up on the turkey and all the other sides and would never have room for a roll. All of a sudden, though, when rolls are taken away from me, I found myself really craving rolls! And good rolls, too, not little balls of weirdly textured crap. Who's with me????
TOOLS FOR MAKING GLUTEN FREE BREAD
Every time I begin making gluten free bread of any kind, I gather all my tools that I love to use and would be lost without. You don't have to use these tools, but they will definitely make your gluten free bread baking experience so much easier!
- Cambro 8-quart Round Containers with Lids -- these containers are perfect for all my baking needs. They fit at least 20 cups each of my flour blends. You may only need a 4-quart or 6-quart, but I like being able to make (and store) a LOT of my flour blends at once.
- A small bowl or container with a lid -- I keep this filled with extra gluten free bread flour blend as my "bench" flour, to be sprinkled liberally on the counter as needed.
- Kitchenaid Stand Mixer -- I don't know what I'd do without my Kitchenaid. I use it almost daily, but especially when I make gluten free bread. It's nearly impossible to knead gluten free bread dough by hand and the power of a Kitchenaid mixer is hard to duplicate. It's an investment, but in my opinion it's well worth it.
- Bench Scraper -- another tool I couldn't live without, a bench scraper makes gluten free bread making so much easier. Bench scrapers lift and scrape the dough off the counter if it sticks, and is also useful in moving flour out of the way.
- Flexible Dough Scraper -- his flexible plastic scraper is one of my essential tools for making gluten free bread. I use it to scrape the dough into one cohesive mass after it's finished mixing, and also for removing the dough from the bowl and dumping it onto the counter. I've taken many classes about baking bread and this is what all the pros use.
- Food Scale -- if you haven't bought a scale by this point, you really should. They're great because you can weigh everything right in the bowl and don't need to break out extra measuring cups. Plus, they're so much more accurate than measuring by volume, not mention they're super cheap!
SEPARATING AND WEIGHING THE ROLLS
If you've been around the blog a while, you might have tried my ultimate gluten free cinnamon rolls. If not, you really should because they're AMAZING! That very same dough is what I use for these Hawaiian rolls. It's such a versatile dough and is so easy to work with!
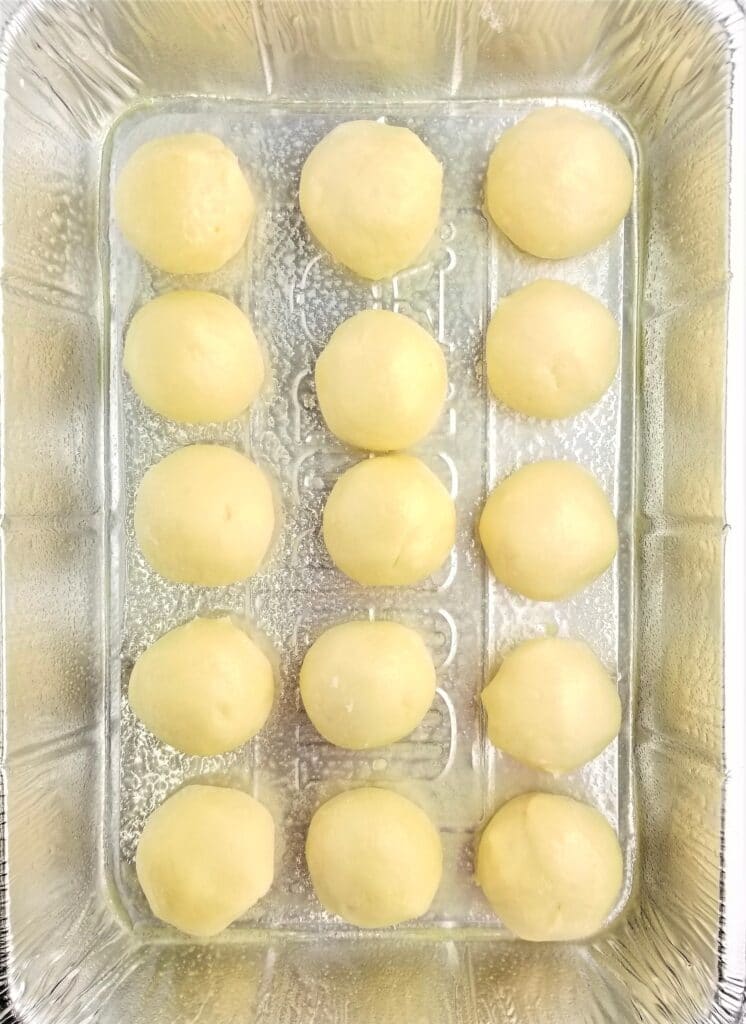
After making the dough and allowing it to chill in the fridge for a while, divide it into small portions, about 1.5-2 ounces (about 56 grams) each. Weighing them will ensure equal size for each roll, which also ensures even baking.
ROLLING THE DOUGH INTO BALLS
I learned how to roll dough into smooth, tight balls for individual rolls from a class I took on Craftsy by the master of bread baking, Peter Reinhart. It works very similarly with this gluten free dough as it does with wheat dough.
Cup your hand into a "C" shape around the dough with the outside of your hand (closest to your pinky) always in contact with the counter. Only using a tiny sprinkling of flour so the roll doesn't completely stick to the counter (you want some friction), roll into balls in a counterclockwise motion. If you're left-handed it would be clockwise. Once it's in a smooth ball, place it in a baking pan. If it's slightly stuck to the surface, use your bench scraper to release it.
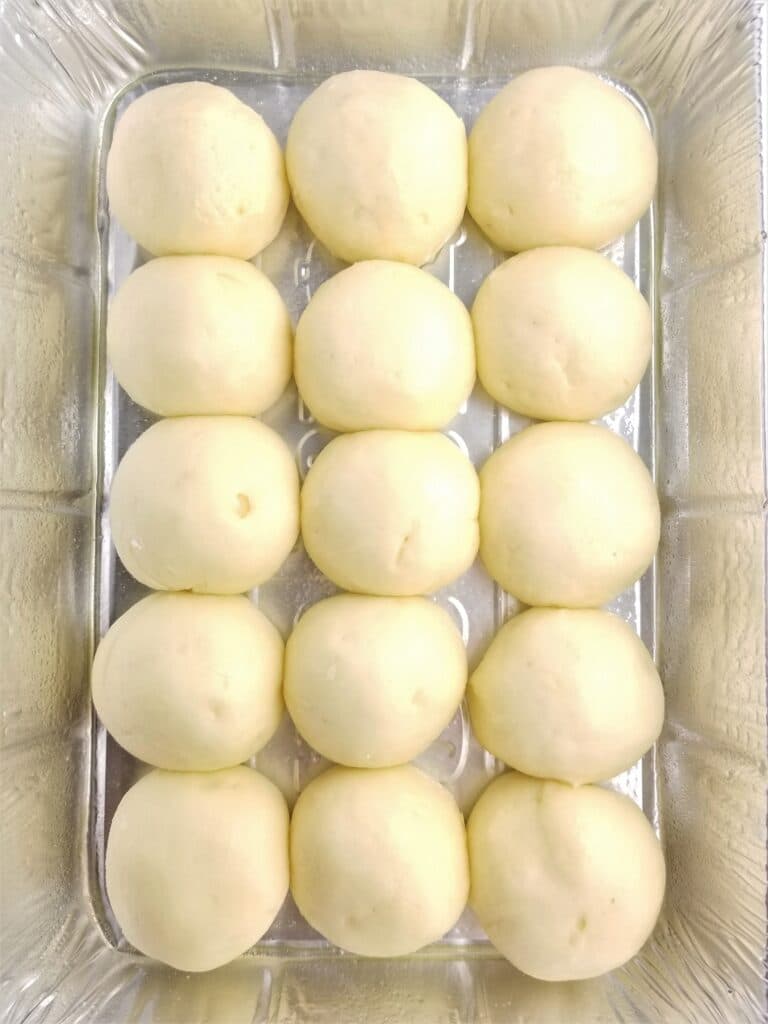
Once you've formed all of your rolls, let them rise in a warm, draft-free area, until doubled in size, about an hour or two, depending on the temperature of your proofing area.
BAKING THE ROLLS
Preheat the oven to 350 degrees. When the rolls have finished rising, brush them ever so gently (so as not to deflate them) with melted butter. Bake for about 20-25 minutes or until golden brown and they spring back when lightly touched.
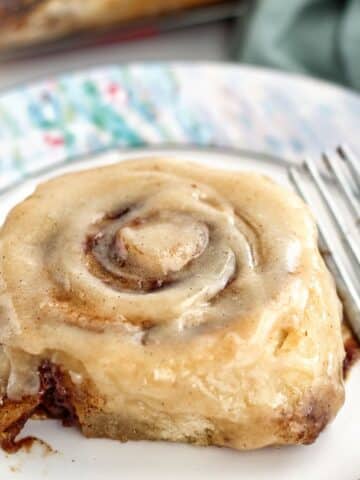
The texture and flavor of these rolls is so SPOT ON like the well-known Hawaiian rolls everyone loves. Soft and squishy, just like real gluten-filled rolls, with a sweeter side. I use them for anything and everything--dinner rolls of course, slider buns, party sandwiches--you name it!!!
MAKING THE ROLLS AHEAD OF TIME
You can make this sweet dough ahead and keep it in the fridge for 3 days. OR you can shape and freeze the rolls prior to baking. Shape the dough into rolls and place them in the baking pan. Cover with two layers of plastic wrap, followed by a layer of heavy-duty foil. Freeze for up to one month.
The day before baking, take them out of the freezer and put them in the refrigerator to thaw overnight. Remove from the fridge and allow time for their final rise in a warm, draft-free area until doubled in volume. Bake as instructed. These are great for make-ahead Thanksgiving rolls!!
You can also freeze already baked rolls. Bake them as instructed, allow to cool completely, and wrap as above. To thaw, leave them sit on counter, still wrapped. When ready to serve, cover with foil and place in a 350 degree oven for about 15 minutes. Or to reheat individually, wrap in slightly damp paper towel and place in the microwave for about 20 seconds.
Bake up a batch of these gluten free Hawaiian rolls for YOUR Thanksgiving bread basket. You won't miss the store bought ones and no one will ever know they're gluten free!
Gluten Free Hawaiian Rolls
Ingredients
GLUTEN FREE SWEET DOUGH
- 3½ cups (495 g) Kim's gluten free bread flour blend (for dairy free use pea protein, coconut protein, soy protein, or other whey protein alternative)
- 1 cup (200 g) granulated sugar
- 1¾ teaspoon baking powder
- 2 tbsp plus 1½ teaspoon (24 g) instant (bread machine or fast acting) yeast
- 1 teaspoon salt
- 1¼ cups (300 ml) milk (for dairy free use almond, coconut, or other dairy free milk alternative)
- ¾ cup (1½ sticks or 169 g) butter, softened or melted (for dairy free use coconut oil or dairy-free butter alternative)
- 2 large eggs, lightly beaten
- melted butter for brushing (about 2 tbsp)
Instructions
- Blend all dry ingredients in the bowl of a stand mixer using a handheld whisk. With the paddle attachment OR the dough hook, begin mixing on low speed and slowly pour milk into dry ingredients, followed by lightly beaten eggs. Add softened or melted butter, a little at a time, until all is incorporated.
- Increase speed to medium high and beat for about 5 minutes (set a timer and walk away).
- Remove dough hook or paddle attachment and scrape dough into a rough ball in center of bowl (or dump into another bowl). Cover with plastic wrap and set in a warm, draft-free area until doubled or tripled in volume, roughly 2 hours.
- Place bowl in refrigerator and allow dough to chill for at least 6 hours, or up to 3 days.
- Remove dough from the refrigerator and knead briefly on very well floured surface, just to create a cohesive, smooth ball. At this point, either divide the dough in half and wrap the other half in plastic wrap for another use, or use the entire batch of dough to make two pans of rolls or larger rolls.
- Divide dough into small portions (each portion should weigh about 1.5-2 ounces each) and roll each into a ball. Place into greased or buttered baking dish (9 by 13-inch).
- Cover with plastic wrap and let rise in warm, draft-free area for about an hour, or until doubled in size. Depending on temperature, it could take longer than an hour.
- Preheat oven to 350 degrees.
- When rolls have fully risen, brush with melted butter and bake for 22-25 minutes or until rolls are golden brown and spring back when lightly touched. Brush again with the rest of the melted butter.
Notes
- It's always best to weigh ingredients over measuring them in volume because you may get different results by volume.
- To freeze unbaked rolls, form balls and place in pan. Wrap in double layer of plastic wrap followed by heavy-duty foil. Freeze for up to one month. Thaw in fridge overnight before proceeding with the final rise and baking.
- To make garlic butter cheese rolls, to melted butter add ½ teaspoon garlic powder and 1 tablespoon freshly grated parmesan cheese. Brush over rolls after baking.
- Make sweet/salty rolls by sprinkling with flake salt after brushing with butter when they come out of the oven. The salt helps balance the sweetness and is really a favorite of ours.
This post was originally created on November 18, 2018 and has been updated with new pictures, new tips and tricks, and a video.


Jay O
Hi! Thanks for sharing your hard work with the world. Fyi... for others who only have weird spreadable "butter" in your fridge (like country crock), it doesn't work. Kim, quick question- do you use your bread flour blend or other gf flour to knead this dough?
Kim
I always use whatever flour blend is used in the recipe as bench flour. I keep small containers of all my flour blends handy so if I'm rolling out pie crust, I will dust the surface with my AP flour blend and if I'm kneading dough, I will dust the surface with my bread flour blend.
BFlynn
I do not have a stand mixer. Will this work with a handheld mixer/beater and/or my hands?
Kim
It should work with a handheld mixer and might work with something like a Danish dough whisk.
Mabel Bond
Hi Kim! I just wanted to let you know about the last time I made your Hawaiian dough. I made a batch for a church dinner early in November. I only used half of the dough. I totally forgot about the other half being in the fridge until a couple weeks later at Thanksgiving. I pulled it out and made a dozen croissants . They were absolutely amazing ! Even after the dough holding in the fridge for two weeks!
Sarah
I can’t have refined sugar, can I use coconut sugar I’m place of the sugar? I would assume it would work just fine but thought I’d ask
Kim
Honestly, I'm not sure it would work. Sugar plays such a major role in this recipe, not just for sweetness but also to feed the yeast AND for tenderness. I haven't worked with coconut sugar before so I don't know if it has the same properties as regular sugar. All I could suggest is try it, then you'll know.
Summer chatwin
Our favorite roll recipe !! It worked great with Cup for Cup flour
Carrie
What’s the brand of the cup for cup flour you used?
Kim
I don't use a store bought blend. I use my own blend, which is linked right within this recipe, right up above here. Click on Kim's gluten free bread flour blend in the recipe card above and you'll find the ingredients needed.
Kaleigh
I tried making this and used King Arthur, but my dough is so wet and sticky! Not sure what happened 😣
Kim
Awesome!
Patricia Sutton
I made the Hawaiian rolls and they were exceptional! I had leftover dough, and I used that to make cheese danish. They were so so good. Thank you so much for this recipe Kim.
Jennifer Ehkers
Help!!! My dough is incredibly sticky and after 2 hours of no activity I put them into the oven with only the light on as our house is on the cooler side and the dough is still not rising.
Kaleigh
Same! My dough is soooo sticky.
Jillian
THESE ARE SO AMAZING!!! King's Hawaiian Rolls are pretty much the #1 thing I miss from when I was eating gluten. I could eat an entire tray of them to myself. These gluten free rolls are SO CLOSE!! And to be honest, it's probably my fault they're not exact. I used almond milk instead of cow's milk because that's all I had on hand. I will make this recipe forever. THANK YOU!!!!
Kim
That's awesome, Jillian!!
AmateurGfBaker
As an experienced baker and cook with regular flour taking on Gluten free recipes seemed scary and daunting. When I bought all the ingredients it kinda sat around for that reason. Lol But this recipe was so easy to make. I thought I messed up when the dough was kinda runny after it mixed but as you mentioned I have to let it mix for the full 5mins and walk away. After it came out the refrigerator it set really well although stil sticky. But nothing flour dusting didn’t fix. They came out amazing. Thank you so much I can’t wait to try your other recipes. 🙂
Laurel
I’ve made these rolls several times and think they are the absolute best even before I was diagnosed with celiac. Convinced my brother-in-law to try one this Thanksgiving. Got a huge compliment how good they were he said they taste like a regular roll(he doesn’t have to eat gluten free).
Thank you for sharing your recipes!!
Laurel
Jillian Busch
How do you store them?
Amy
These were so good! The crust and crumb were perfect. I could only find finely ground brown rice flour. It seemed to work. I had to give it a lot of time to rise but they were very good. I’ve yet to have leftovers to see how long it’s shelf life is. Thank you. You give very good directions.
Angela Schabo
I am having trouble getting your’ print’ tab to work. Anxious to try this recipe!
Kim
Hmmm. I just printed 3 recipes from my own site yesterday and didn't have a problem at all. Maybe it's your browser? Could you possibly reboot your device and see if that helps?
Ella B
These rolls are UNREAL!!! SO DELICIOUS. Follow the recipe EXACTLY and don’t use stone ground white rice flour like I accidentally did the first time. But seriously, Kim, you are amazing I love your recipes!!!
Holly Gottlieb
How do these Hawaiian Sweet Rolls compare to your Pillowy Soft GF Dinner rolls in terms of taste, texture etc.? I am planning to make one of them for Thanksgiving, but Im not sure which!
Thanks!! Love your website so much!
Kim
They're definitely sweeter, but not much difference in terms of texture.
Thank you so much for your kind words 🥰
Kim
Absolutely love these!! 1 of my kiddos has celiac. I'm always trying recipes in attempt to find something that is "normal". This absolutely fits the bill. My teenager didn't believe they were gf. So good and so soft! Thank you for sharing your recipes! I've fallen in love with baking again!
Kim
Awe, that's great! So happy you're enjoying baking again!!
Valerie Hughes
Summer's here and I'm missing my Kings Hawaiian Rolls with my BBQ. But Kim you've come to the rescue with this absolutely delish recipe. So easy that my 13 yr old granddaughter made them for me. While she's not good at reading thru the recipe first we didn't know we'd have to wait an extra day for these tasty delights (she missed all the rising instructions). But it was well worth the wait. Thank you. Can't wait to try out more of your recipes!
Kim
Awe, that's so awesome, Valerie!! So glad you're enjoying them 🥰
Ariana
These are the best and you are the best Kim!
Thanks a lot ❤️
Greetings from Argentina
Kim
Awe, thank you so much, Ariana 🥰🥰🥰