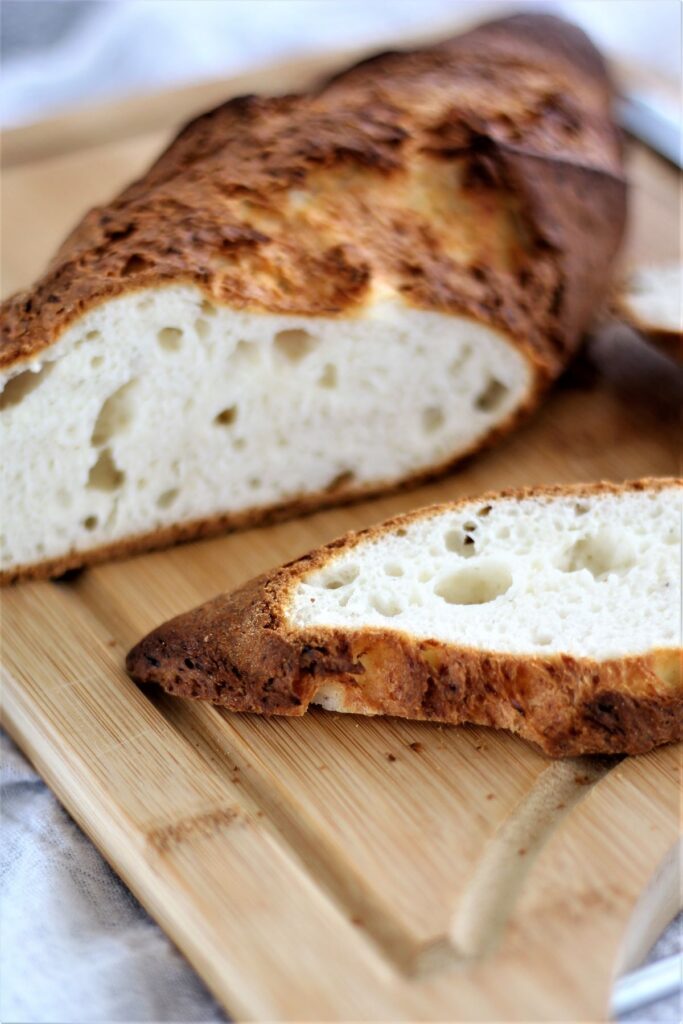
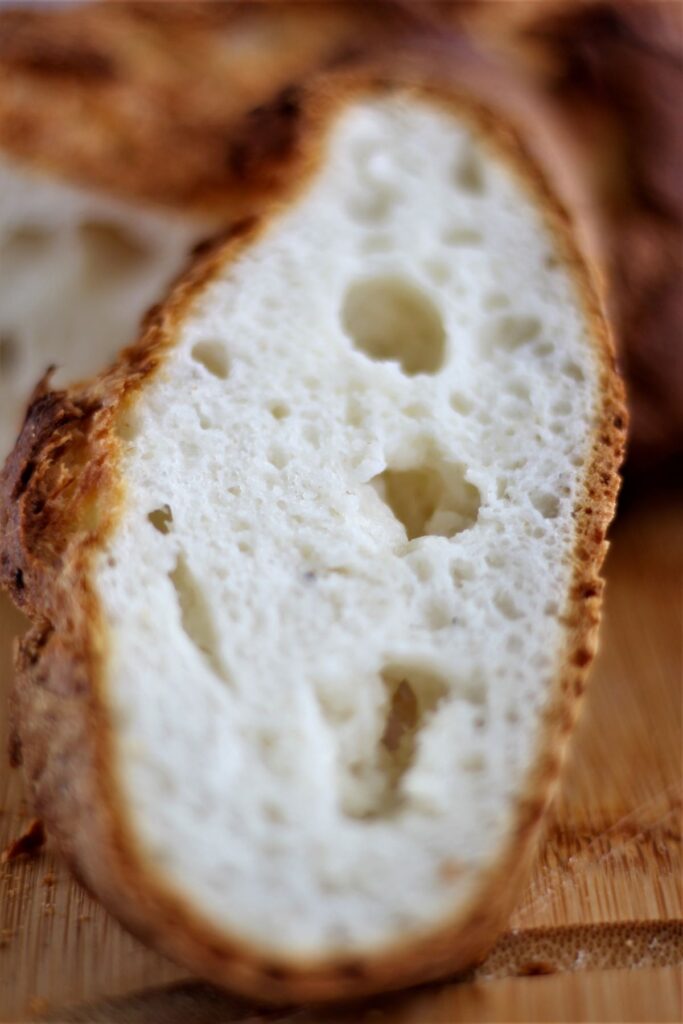
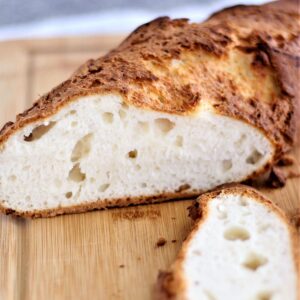
This FABULOUS Gluten Free Italian Bread was a total accident, and I am so, so glad it was! It's soft and fluffy with a thin softer crust that's just absolute perfection 🙂
I don't have a culinary degree, but I've been in love with baking since I was a little girl. Since being diagnosed with celiac, I've learned SOOOOO much more about baking, I think because I had to. When you're stuck with this disease and you're a foodie AND a baker, you learn to make everything yourself.
Sometimes it takes many hours (or even years) before succeeding at gluten free baking, especially when it comes to breads. If you were to look up gluten in a culinary textbook, there'd probably be a picture of yeast bread right beside it. Yeast bread is pretty much an exercise in the formation of gluten. There are still a few breads that elude me in this gluten free baking world, but I'll never give up. Not just because that's how I am as a baker, but also because I want what "they" have. I want the good stuff. The real deal. And I know you do, too.
What You'll Need
- Kim's gluten free bread flour blend--my bread flour blend is essential to the success of this bread (or any of my breads, for that matter)! If you're using a store bought blend, you will NOT get the same results as this.
- Sugar--just a little bit of sugar is all you need.
- Salt--every great bread needs a little salt.
- Instant yeast--instant yeast doesn't require blooming in the liquid before adding to the rest of the dough. Hence, the name "instant."
- Whole psyllium husks--Ever since I discovered the power of psyllium husks, I've been going back through a lot of my breads and adding it for the extensibility it provides. Psyllium husk powder can be substituted in smaller amounts (which are listed in the recipe below). NOTE: This bread can be made without psyllium husks with excellent results! See the notes in the recipe card for further details.
- Milk--you can use non-dairy milk if you need to be dairy free. Almond milk is a great alternative.
- Butter--a small amount of butter in the dough really helps with the softness of the inside of the bread, but also helps the crust remain crunchy but very thin and not overly hard.
How to Make Gluten Free Italian Bread
Each of my gluten free breads are special to me in their individual ways, but I have to say, out of all the gluten free bread I've made, this one is by far my favorite (and I'm pretty sure my family's as well). Like most of my breads, though, it's as easy to make as it is to eat!
Make the Dough
Whisk together the flour blend, sugar, salt, instant yeast, and psyllium husks in the bowl of a stand mixer. Add the milk and butter and knead using the dough hook for about 5 minutes on medium high. Scrape the dough into the center of the bowl (or transfer to another bowl).
Let the Dough Rise (Bulk Ferment)
Cover the bowl and place it in a warm, draft-free area to rise until doubled in size. This can take anywhere from 1-2 hours or more, depending on the warmth of your area. In the summertime, it doesn't take as long in my kitchen. In the winter, I like to turn my oven on to the "warm" function, let it heat up for a few minutes, and then turn it off and place the dough in the oven. This offers a nice and cozy area for the dough to do its thing.
Refrigerate Overnight
So many people always ask me this, but yes, it is really important to allow the dough to chill overnight (or at least six hours) in the fridge. Refrigeration not only allows the dough to develop a little more flavor, it mainly helps to make it easier to work with. Without it, shaping a loaf of bread would be near impossible.
Knead and Shape
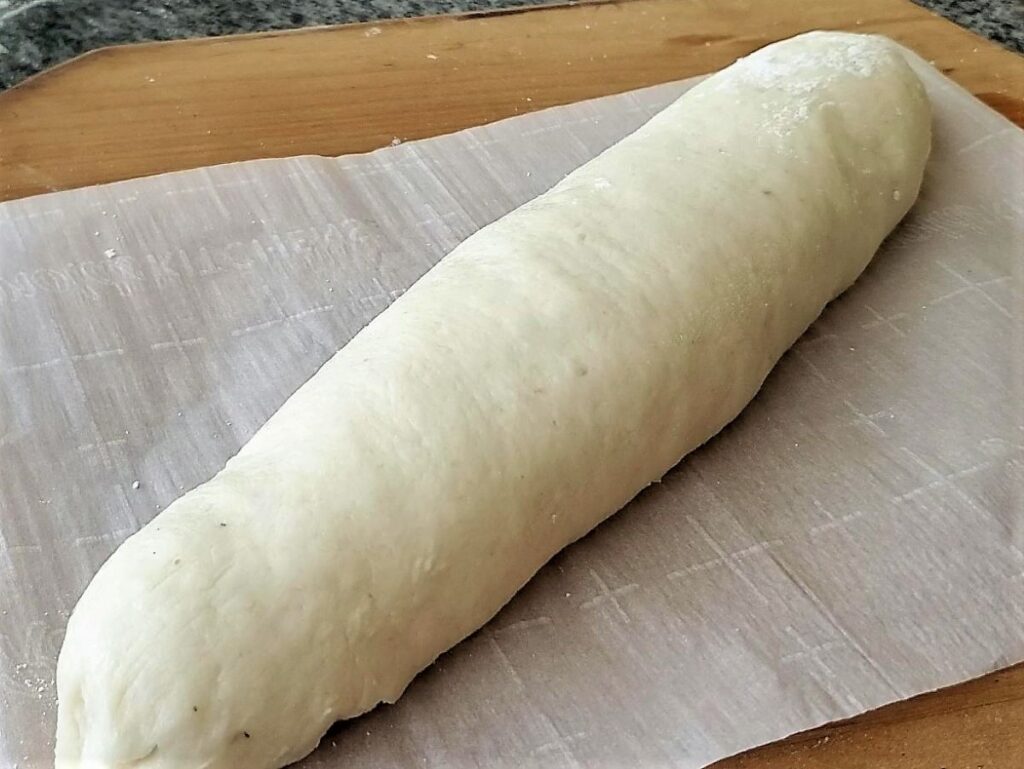
After its stint in the fridge, the dough is ready to be shaped. Dump it out onto a well-floured surface and knead it until smooth, adding more flour as necessary to avoid sticking. Start rolling the dough into a fat batard (which is like a short, squat baguette), or a boule if you'd rather. Place it on a piece of parchment paper.
Proof
Place the parchment with the shaped dough onto either a pizza peel or a baking sheet and cover the loaf with plastic wrap. Allow the dough to proof (rise) for 30 minutes to an hour, or until it's visibly puffed, but not necessarily doubled in size. Meanwhile, place a pizza steel, stone, or overturned baking sheet in the middle of your oven and a shallow oven-proof pan on a rack underneath it and heat the oven to 450 degrees F.
Bake
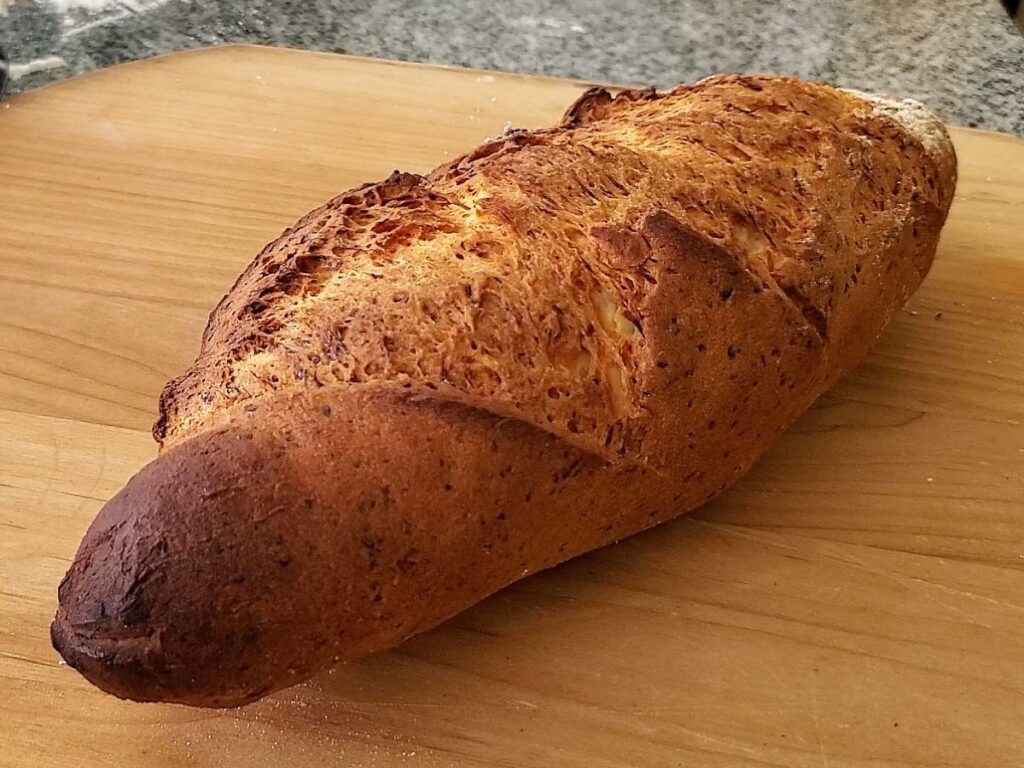
When the dough is ready, slash it with a sharp knife or lame 2-3 times at a diagonal and slide it onto the pizza steel, stone, or baking sheet. Pour one cup of very hot tap water into the shallow pan underneath and shut the door. Bake for 30-35 minutes, or until deep golden brown and light in weight.
Frequently Asked Questions
If you've had my gluten free artisan bread, there is a subtle difference, but a noticeable one. In the ingredients, water is used instead of milk, which makes Italian bread softer. Olive oil is the fat of choice in artisan bread, whereas my Italian bread uses butter. This also lends to a softer bread on the inside, and a thinner, less hard crust.
Luckily, this bread is egg free so there's no worry about subbing eggs. That can be challenging in gluten free baking. As far as dairy free in the flour, see my flour blend page for suggestions. You should be able to swap out the milk with almond, coconut, soy, or other non-dairy milk. For the butter, try a non-dairy butter alternative such as Earth Balance.
Store this bread in a ziptop bag or wrapped in foil on the counter for a few days. After that it'll start to stale, like any great bakery bread. It can be refreshed by running it under cold water (yep, the entire loaf!), and placing it in a 350 degree F oven, directly on the rack, for 10 minutes. For longer storage, freeze the bread, well wrapped, for 3 months. Thaw it on the counter, still wrapped, and then refresh it as above.
I'm so excited for you to try this Fabulous Gluten Free Italian Bread! I wouldn't be surprised if it becomes your favorite, just like it is ours. What sandwich will you make first with it?
Fabulous Gluten Free Italian Bread
Ingredients
- 3 cups plus 3 tbsp (453 g) Kim's gluten free bread flour blend
- 2 tablespoon plus 1 tsp (29 g) granulated sugar
- 2 teaspoon kosher salt
- 2 teaspoon rapid rise (instant) yeast
- 1 tablespoon whole psyllium husks, or 1 ½ teaspoon psyllium husk powder*
- 2¼ cups (540 ml) milk (a dairy free milk can be substituted, but hasn't been tested)
- 4 tbsp (56 g) butter, melted (dairy free butter can be substituted, but hasn't been tested)
Instructions
- In the bowl of a stand mixer, weigh bread flour, psyllium husks (if using), sugar, salt, and yeast. Whisk to combine. Place on the mixer and turn the mixer on low and slowly pour in the milk and butter. Increase the speed to medium high and knead for about 5 minutes.
- Scrape the dough into a large mass (or into another bowl) and cover the bowl with plastic wrap. Allow to rise for about 2 hours or until doubled in size in a warm, draft-free location. Refrigerate for at least 6 hours, but up to 7 days.
- On baking day, remove the dough from the refrigerator and dump it out onto a liberally floured surface. Knead until smooth. Roll it into a torpedo or batard shape (not as long as a baguette, but wider). You can divide the dough into two smaller loaves, if desired. Place the shaped dough on a piece of parchment and onto a pizza peel, but you can also use an overturned baking sheet. Cover with plastic wrap and allow to rise for about a half an hour. It will not double in size, just be slightly puffed.
- While the bread is rising, place a baking steel (or baking stone, or an overturned baking sheet) on the middle rack of the oven and a shallow baking pan (such as a broiler pan) on the rack below it. Preheat the oven to 450° F.
- Slash the loaf a few times and slide it, parchment and all, onto the steel, stone, or baking sheet. Add one cup of hot tap water to the broiler pan and quickly shut the oven door. Alternatively, you may drop a couple ice cubes on the bottom of your oven to create steam.
- Bake for about 30-35 minutes, or until you begin to smell the bread and it feels relatively light for its size (pick it up with gloved hands--if it feels at all heavy, add another 5-10 minutes to the baking time and check again). If the top is getting too dark, cover the bread with aluminum foil.
- Remove from the oven and allow it to cool on a wire rack before cutting. The crust will soften as it cools.
Notes
Did you make this recipe? I'd LOVE to see it!!! Post a picture and tag @letthemeatglutenfreecake on Instagram.
This bread was originally posted on March 27, 2019 and has been updated with a video, several new tips, and a revision to the original recipe.


Cassie
Oh my is this bread fantastic. I haven't had a crusty bread since I found out I was gluten intolerant!
This was the definition of "trust the process" though. You really can't skip out on any of the ingredients or steps. I was worried at how loose and liquid-y the dough was immediately after mixing, but after letting it rise and refrigerating, it puffed up so much!
One tip for handling the sticky dough, I've found, is to utilize a bench scraper in your dominant hand. I made sure to thoroughly flour my work surface, put some olive oil on my hands to help prevent sticking, then used the bench scraper to scoop and shape the dough into the loaf shape. Worked like a charm and with less fuss than other times I've tried working with GF dough.
We sliced and froze the leftovers and the first time I got some out of the freezer and let it thaw I was disappointed to find that it was dry and crumbly. But a damp paper towel wrapped around a slice popped into the microwave for 20-30 seconds got it almost as good as freshly baked! It really needs that steam.
I'm so stoked to be able to have bruschetta again!!!
Kim
That is awesome, Cassie!!!! I'm so happy you are able to enjoy something you had before going gluten free 🥰
Nosheen Ausaf Kidwai
Hi Kim. Thank you so much for sharing the perfect flour blend, and your fabulous recipes with us! I have been trying gluten free recipes since more than a decade but have never had such wonderful results. I have tried your naan, dinner rolls and this Italian Bread. They all turned out delicious.
Thanks once again. Looking forward to trying your other recipes too.
Nosheen
Pakistan
Kim
Awe, thank you so much, Nosheen!! I'm so glad you're enjoying baking through the blog 🥰
Dora
This is perfect! I've made several of your recipes and I am so thankful I found your website. I've been GF for over a decade so I've tried a lot. This bread was wonderful, turned out exactly as advertised, crunchy on the outside and chewy on the inside. The taste is exactly right. Along with the cinnamon buns, artisan bread, dinner rolls and buns, and red lobster rolls, it's on the favorites list! I can't even tell you how much my grands love your cinnamon rolls! Thank you!!!!